Runs the app in the development mode.
Open http://localhost:3000 to view it in the browser.
The page will reload if you make edits.
You will also see any lint errors in the console.
yarn test
Launches the test runner in the interactive watch mode.
See the section about running tests for more information.
yarn build
Builds the app for production to the build folder.
It correctly bundles React in production mode and optimizes the build for the best performance.
The build is minified and the filenames include the hashes.
Your app is ready to be deployed!
See the section about deployment for more information.
yarn eject
Note: this is a one-way operation. Once you eject, you can’t go back!
If you aren’t satisfied with the build tool and configuration choices, you can eject at any time. This command will remove the single build dependency from your project.
Instead, it will copy all the configuration files and the transitive dependencies (webpack, Babel, ESLint, etc) right into your project so you have full control over them. All of the commands except eject will still work, but they will point to the copied scripts so you can tweak them. At this point you’re on your own.
You don’t have to ever use eject. The curated feature set is suitable for small and middle deployments, and you shouldn’t feel obligated to use this feature. However we understand that this tool wouldn’t be useful if you couldn’t customize it when you are ready for it.
You should run gavpi as administrator for it work properly in most games. (right click run as…)
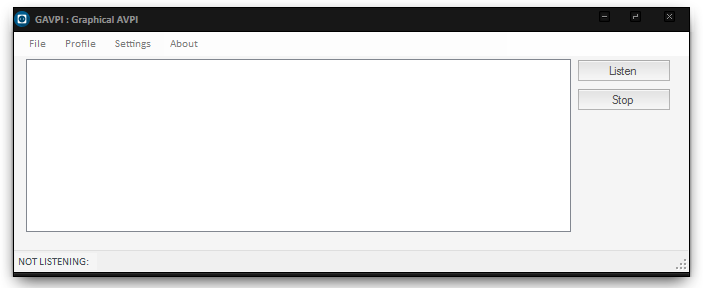
About
GAVPI is an open source voice command software / speech recognition key bind tool. Using gavpi you can execute repetitive or complex tasks using your voice. It can be used with any application, since it’s equivilent to pressing your mouse/keyboard.
You can:
Bind a set of action sequences (mouse/keyboard presses or text-to-speech events) to arbitrary phrases.
Create profiles for different games or applications.
Enjoy the program for free.
Installation
Just extract and run the exe.
Usage
Profile
The profile is broken down into three sections.
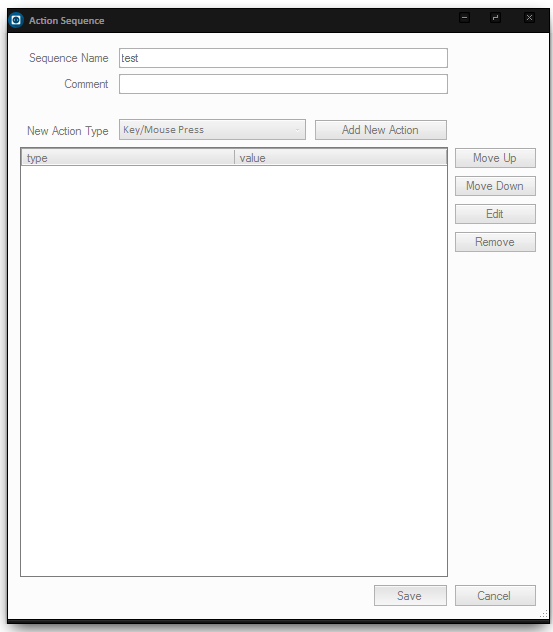
1. Action Sequence
An action sequence is composed of sequential “actions”, one of keyboard or mouse press/down/up, wait or speak. The key or mouse presses are carried out at direct input level which is equivalent to your physical key presses. Action sequences are carried out very quickly, in some cases near instantly so it is helpful to use the wait (milliseconds) command if an application is failing to registered presses.
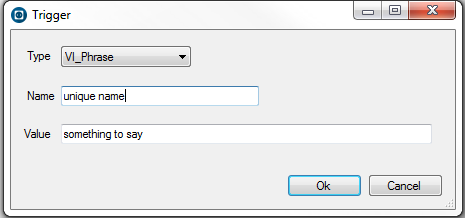
2. Trigger
Triggers are composed of three parts type, name and value.
Currently only one type of trigger is implemented, VI_Phrase. This is the speech recognition trigger type its value being a spoken word or phrase.
When the speech value is recognized the trigger will execute all of its corresponding events[3] in order.
3. Trigger Events
Trigger events are carried out when a trigger executes.
The events can be multiple Action Sequences or other Triggers, in this way an you can reuse action sequences in multiple triggers or create a template trigger of sorts.
Saving/Loading
Profiles are stored in XML format and can be edited by hand in any text editor which supports it. You can also load profiles made by other people. Additionally you can store simple variables usint the database. Today you can use gavpi’s speech to read them out, saving you some time. But in the future you’ll have access to boolean logic and updating at run time, watch out.
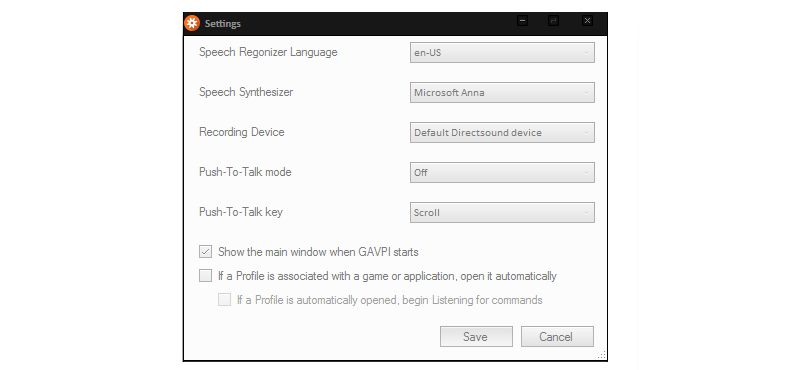
Settings
The settings allow you to change which voice pack and localization gavpi will use. Microsoft fully supports recognition in several languages, English is tested the most however.
Additionally you can configure push to talk, useful if you’re dealing with chatter or ambient noise.
Mocha, Chai e Sinon para testes de integração e Docker;
👨💻 O que foi desenvolvido
Layout da página para o usuário
Layout da página para o ADMIN
O TFC é um site informativo sobre partidas e classificações de futebol simulando a tabela do Brasileirão 2022! ⚽️
Foi desenvolvo o TFC, onde fiquei responsável por desenvolver uma API (utilizando o método TDD) e também integrar – através do docker-compose – as aplicações para que elas funcionem consumindo um banco de dados.
Nesse projeto, eu construi um back-end dockerizado utilizando modelagem de dados através do Sequelize.O desenvolvimento deste projeto respeitou regras de negócio e a API é consumida pelo front-end.
Temos a opção de adicionar uma partida, mas para adicionar é necessário ter um token e a pessoa deverá estar logada para fazer as alterações. Temos um relacionamento entre as tabelas teams e matches para fazer as atualizações das partidas.
Pude implementar regras de negócio para popular adequadamente a tabela disponível no front-end onde ela é exibida para a pessoa usuária do sistema.
Estrutura do projeto
O projeto é composto de 4 entidades importantes na sua estrutura:
1️⃣ Banco de dados:
Container docker MySQL configurado no docker-compose através de um serviço definido como db.
Tem o papel de fornecer dados para o serviço de backend.
Durante a execução dos testes sempre vai ser acessado pelo sequelize e via porta 3002 do localhost;
Você também pode conectar a um Cliente MySQL (Workbench, Beekeeper, DBeaver e etc), colocando as credenciais configuradas no docker-compose no serviço db.
Adicionei um arquivo no local /app/backend/.env.example para caso você queira rodar o banco de dados localmente, basta renomea-lo para .env e as váriaveis de ambiente já estão configuradas ao docker.
2️⃣ Back-end:
Ele roda na porta 3001, pois o front-end faz requisições para ele nessa porta por padrão;
Sua aplicação é inicializada a partir do arquivo app/backend/src/server.ts;
Ela garanta que o express é executado e a aplicação ouve a porta que vem das variáveis de ambiente;
3️⃣ Front-end:
O front se comunica com serviço de back-end pela url http://localhost:3001 através dos endpoints que foi construído.
4️⃣ Docker:
O docker-compose une todos os serviços conteinerizados (backend, frontend e db) e sobe o projeto completo com o comando npm run compose:up;
🕵️ Linter
Para garantir a qualidade do código, usei o ESLint para fazer a sua análise estática.
Este projeto já vem com as dependências relacionadas ao linter configuradas nos arquivos package.json nos seguintes caminhos:
app/backend/package.json
Para rodar o ESLint em um projeto, basta executar o comando npm install dentro do projeto e depois npm run lint. Se a análise do ESLint encontrar problemas no seu código, tais problemas serão mostrados no seu terminal. Se não houver problema no seu código, nada será impresso no seu terminal.
Você também pode instalar o plugin do ESLint no VSCode: bastar ir em extensions e baixar o plugin ESLint.
⚠️ Configurações mínimas para execução do projeto
Na sua máquina você deve ter:
Sistema Operacional Distribuição Unix
Node versão 16
Docker
Docker-compose versão >=1.29.2
➡️ O node deve ter versão igual ou superior à 16.15.0 LTS:
Para rodar o projeto por completo, basta digitar o código em seu terminal npm run compose:up;
⚠️ Inicialização do compose e verificação dos logs das aplicações
Considerando o uso do parâmetro healthcheck em cada container do seu docker-compose.yml, a inicialização dos containers deve aguardar o comando de status de saúde (o que valida se aquele container está operacional ou não):
No container db, representado por um comando ping no banco de dados;
No back-end, representado por um comando lsof, que vai procurar aplicações ativas na porta definida (por padrão, no caso 3001);
No front-end, representado por um comando lsof, que vai procurar aplicações ativas na porta definida (por padrão, no caso 3000).
Caso os containers respeitem as premissas anteriores, os mesmos devem ser criados sem maiores problemas:
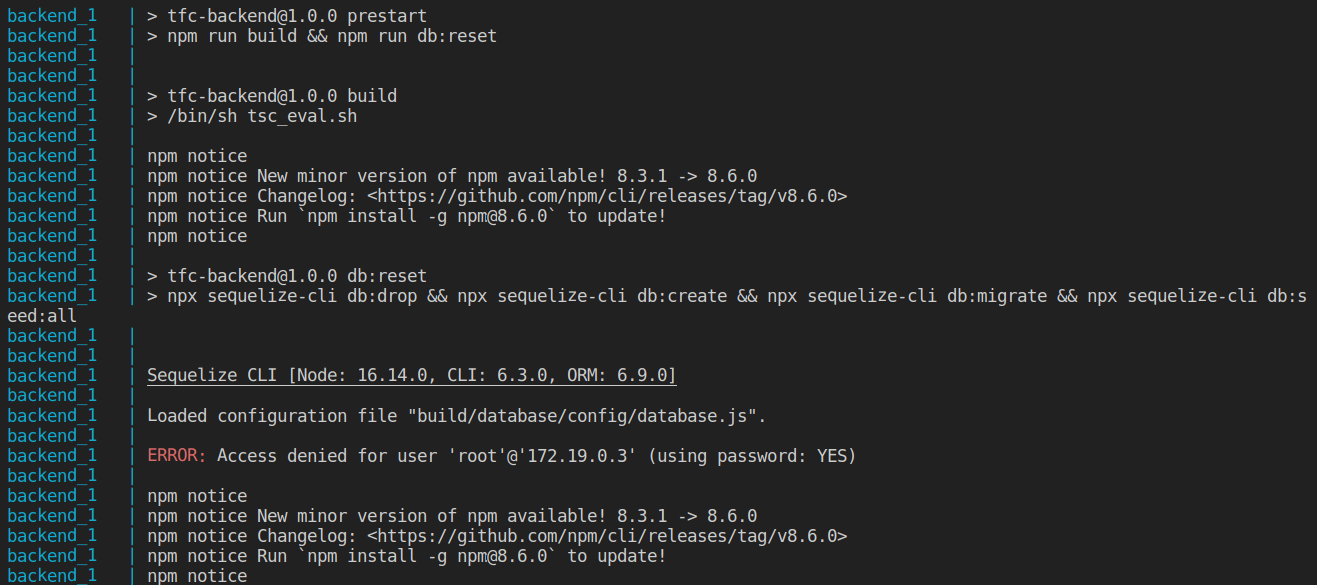
Em caso de algum problema (no back-end, por exemplo), você deve se deparar com alguma mensagem do tipo:
Aqui não houve problema com o tsc, porém a senha para acesso ao banco pelo sequelize estava errada.
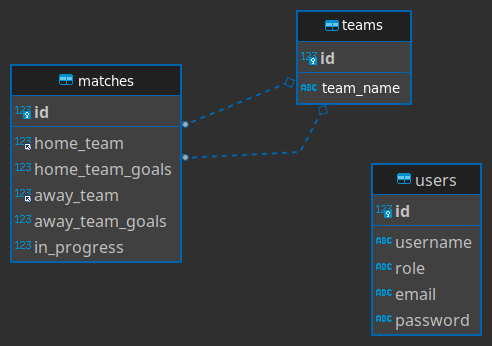
🎲 Sequelize
Para o desenvolvimento, foi baseado no Diagrama de Entidade-Relacionamento (DER) para construir a modelagem do banco de dados. Com essa imagem você já consegue saber:
A general course of Ecole 42 covering topics from basic libraries to Containers using languages C and C++. Average duration of completing the common core projects: 14 – 16 months.
Simulation a lifecycle of philosphers, their eating, sleeping and waiting states, using limited resources.
Skills: C (multithreading, multiprocessing, mutexes).
Creation your first machine in VirtualBox under specific instructions.
Skills: Debian, Unix Shell, Network & system administration (SSH, UFW, password policy)
Sossoldi is a free and open source wealth management / personal finance / Net Worth tracking app, made with Flutter.
❓ What problem we are solving & why
Mr. Rip is a blogger that has a spreadsheet in which he tracks his net worth. Sossoldi is a Mobile + Desktop app that aims at replacing that spreadsheet and make it easier for everyone to track their net worth even if they are not as skilled with Google Sheets or Excel.
The app is being developed using the Flutter framework which makes it possible to have one codebase for different platforms (Android, iOS, Windows, macOS, Linux). We are currently working on a beta which hopefully will be out soon.
This app is for you if you want to…
📈 track your net worth
💸 track your expenses to better understand where you are spending your money
👀 keep track of your investments
🪦 keep everything in one place like Mr. Rip
What features do we want to implement?
💸 Track expenses (even recurrent ones)
🏦 Track different bank accounts
📊 Graphs, statistics and reports
💻 All data are stored locally (with the option to share it in different platforms)
🔗 Link bank accounts that support the OpenBanking PSD2 API
🤓 Advanced onboarding
Phase 1 (Ongoing)
We will not build the complete app all at once. We will start from the basic features and then we will move onto the others.
Phase 1 will be completed when the following features will be ready:
💸 Expenses (even recurrent ones) tracker
🤑 Income tracker
⚖️ Bank accounts balance (without the use of API)
📊 Basic stats
📱 Data stored only locally
The pages that will be implemented are:
Dashboard
Movements page
Basic settings
Basic onboarding
Contributing
If you want to help with this project you are more than welcome! Sossoldi is completely free and open source, the best place to start is from the issue tab and look for something that seems interesting to you. If you are unsure on where to start feel free to reach out to us on Discord, we will be more than happy to help you find what’s best for you!
This project is an implementation of the Webmention protocol. It allows the webmention receiving service to be run separately from the blogging software or website environment, making it easier to manage and integrate with other services.
Say you have a statically-generated website using Jekyll or something similar, you can add the appropriate <link> tag pointing to this service, and now you have Webmentions enabled on your static site!
Accept Webmentions for any site by adding an html tag: <link rel="webmention" href="https://webmention.io/example.com/webmention" />
API to get a list of pages linking to your site or a specific page
If you want to receive Pingbacks on your site but don’t want to deal with XMLRPC, then you can use this service to convert Pingbacks to Webmentions
API
Find links to a specific page
This service provides an API for returning a list of pages that have linked to a given page. For example:
GET https://webmention.io/api/mentions.jf2?target=https://indieweb.org

{
  "type": "feed",
  "name": "Webmentions",
  "children": [
    {
      "type": "entry",
      "author": {
        "type": "card",
        "name": "Tantek Çelik",
        "url": "http://tantek.com/",
        "photo": "http://tantek.com/logo.jpg"
      },
      "url": "http://tantek.com/2013/112/t2/milestone-show-indieweb-comments-h-entry-pingback",
      "published": "2013-04-22T15:03:00-07:00",
      "wm-received": "2013-04-25T17:09:33-07:00",
      "wm-id": 900,
      "content": {
        "text": "Another milestone: @eschnou automatically shows #indieweb comments with h-entry sent via pingback http://eschnou.com/entry/testing-indieweb-federation-with-waterpigscouk-aaronpareckicom-and--62-24908.html",
        "html": "Another milestone: <a href=\"https:\/\/twitter.com\/eschnou\">@eschnou<\/a> automatically shows #indieweb comments with h-entry sent via pingback <a href=\"http:\/\/eschnou.com\/entry\/testing-indieweb-federation-with-waterpigscouk-aaronpareckicom-and--62-24908.html\">http:\/\/eschnou.com\/entry\/testing-indieweb-federation-with-waterpigscouk-aaronpareckicom-and--62-24908.html<\/a>"
      }
    }
  ]
}
Find links of a specific type to a specific page
You can include a parameter to limit the returned links to mentions of a specific type:
GET https://webmention.io/api/mentions.jf2?target=https://indieweb.org&wm-property=in-reply-to
or request multiple types by repeating the query parameter:
GET https://webmention.io/api/mentions.jf2?target=https://indieweb.org&wm-property[]=in-reply-to&wm-property[]=rsvp
The full list of recognized properties is below:
in-reply-to
like-of
repost-of
bookmark-of
mention-of
rsvp
Find links to multiple pages
This is useful for retrieving mentions from a post if you’ve changed the URL.
GET https://webmention.io/api/mentions.jf2?target[]=https://indieweb.org/a-blog-post&target[]=https://indieweb.org/a-different-post
Find all links to your domain
You can also find all links to your domain:
GET https://webmention.io/api/mentions.jf2?domain=indiewebcamp.com&token=xxxxx
(You will see your account’s token when you sign in.)
You can optionally add a since parameter to return new webmentions as of a certain date. This is useful to poll for new webmentions you haven’t seen yet.
GET https://webmention.io/api/mentions.jf2?domain=indiewebcamp.com&token=xxxxx&since=2017-06-01T10:00:00-0700
Find all links to all sites in your account
With no parameters, the API will return all links to any site in your account:
GET https://webmention.io/api/mentions?token=xxxxxx
Sorting
You can choose the sorting mechanism to return the list of mentions. The following options are supported:
sort-by=created (default) – Sort by the date the mention was created in the webmention.io database.
sort-by=updated – Sort by the updated date of the page, as seen by webmention.io (not the date the post reports in its microformats data).
sort-by=published – Sort by the published date as reported by the linking page. Some pages don’t include published date so this will fall back to created date if published is not present.
sort-by=rsvp – Sort by RSVP value, in the following order: “no”, “interested”, “maybe”, “yes”.
By default, results are returned in descending order. You can control the ordering with the sort-dir parameter:
sort-dir=down (default) – Newest first, RSVP “yes” first
sort-dir=up – Oldest first, RSVP “no” first
Paging
Basic paging is supported by using the per-page and page parameters. For example,
?per-page=20&page=0 first page of 20 results
?per-page=20&page=1 second page of 20 results
The default number of results per page is 20. Results are always sorted newest first.
Finding New Mentions
You can use the since or since_id parameters to find new mentions retrieved by the service.
since=2017-06-01T10:00:00-0700 – pass a full timestamp to the since parameter to return links created after that date. This corresponds to the date the link was created in the webmention.io service, not the published date that the page reports.
since_id=1000 – pass an ID to return links with a greater ID
The pingback system is a way for a blog to be automatically notified when other Web sites link to it. It is entirely transparent to the linking author, requiring no user intervention to work, and operates on principles of automatic discovery of everything that it needs to know.
A sample blog post involving pingback might go like this:
Alice posts to her blog. The post she’s made includes a link to a post on Bob’s blog.
Alice’s blogging system contacts Bob’s blogging system and says “look, Alice made a post which linked to one of your posts”.
Bob’s blogging system then includes a link back to Alice’s post on his original post.
Reader’s of Bob’s article can follow this link to Alice’s post to read her opinion.
Webmention is a modern alternative to Pingback. It’s analogous to the Pingback protocol except does not use XML-RPC and is much easier to implement. This project also includes a simple API for converting XML-RPC Pingbacks to Webmentions and forwarding the request on to your own site.
Using Webmention.io in this mode does not require an registration, and this service does not store any of the information. The Pingback request is simply forwarded on to your server as a Webmention.
Any Pingbacks received will be forwarded on to the specified Webmention endpoint. It is up to you to handle the Webmention and return an expected result. The Webmention result will be converted to a Pingback result and passed back to the sender.
Full Example
A blog links to your site, makes a GET request for the page to retrieve the Pingback header
GET http://example.com/post/1000

<html>
  <head>
    <title>Example Post 1000</title>
    <link rel="pingback" href="https://webmention.io/webmention?forward=http://example.com/webmention" />
    ...
The blog sends a Pingback request to webmention.io
You can start using this right now to quickly handle Pingbacks as Webmentions on your own domain. This is a way to bootstrap the Webmention protocol until more services adopt it.
Development
First, check your Ruby version. 2.0.0 does not work; details below. Try 1.9.3 or anything >=2.1.3 instead, they should work. Here are minimal instructions for Mac OS X, using Homebrew, ruby-install, and chruby:
Now, run these commands to set up your environment and start the server locally:
bundle install
cp config.yml.template config.yml
mysql -u root -e 'CREATE USER webmention@localhost IDENTIFIED BY "webmention"; CREATE DATABASE webmention; GRANT ALL ON webmention.* TO webmention@localhost; FLUSH PRIVILEGES;'export RACK_ENV=development
bundle exec rake db:bootstrap
./start.sh
Now open http://localhost:9019/ and check that you see the front page. You can also run bundle exec rake test:sample1 to send a test pingback.
Troubleshooting
If bundle install dies like this while compiling libxml-ruby:
...
ruby_xml_node.c:624:56: error: incomplete definition of type 'struct _xmlBuf'
    result = rxml_new_cstr((const char*) output->buffer->content, xencoding);
                                         ~~~~~~~~~~~~~~^
...
An error occurred while installing libxml-ruby (2.3.3), and Bundler cannot continue.
Make sure that `gem install libxml-ruby -v '2.3.3'` succeeds before bundling.
You’re in…um…a weird state. You probably have an old version of the repo checked out with a Gemfile.lock that asks for libxml-ruby 2.3.3, which is incompatible with your system’s libxml2 2.9.x. HEAD fixes this by asking for libxml-ruby 2.6.0. git pull and then rerun bundle install.
If bundle install dies with this message in the middle of its error output:
/.../lib/ruby/2.0.0/tmpdir.rb:92:in `mktmpdir': parent directory is world writable but not sticky (ArgumentError)
When you open the front page, if you see an error that includes Library not loaded: libmysqlclient.18.dylib, your MySQL shared libraries may not be installed at a standard location, e.g. if you installed MySQL via Homebrew. Try DYLD_LIBRARY_PATH=/usr/local/mysql/lib ./start.sh (or wherever your MySQL libraries are located).
Ruby 2.0.0 woes
If rake db:bootstrap raises an TypeError: no implicit conversion from nil to integer exception in quoting.rb, you’ve hit this Ruby 2.0.0 bug/incompatibility. Use a different Ruby version.
If rake db:bootstrap hangs while attempting to create the links table , Ruby 2.0.0 strikes again! Use a different version. (You won’t see progress details per table by default; it’ll just hang.)
If bundle exec rake ... complains Could not find rake-10.4.0 in any of the sources, and you run bundle install and bundle check and they’re both happy, and vendor/bundle/ruby/2.0.0/gems/rake-10.4.0/ exists…Ruby 2.0.0 strikes again. (Maybe?) Use a different version.
Monitoring
This server collects stats on its own, caches in Redis, and provides a Munin plugin to retrieve the stats.
Counts that are tracked, one graph for webmention, another for pingback
success
dns_error
connect_error
timeout
ssl_error
ssl_cert_error
ssl_unsupported_cipher
too_many_redirects
no_content
invalid_content
no_link_found
unknown_error
FAQ
Is there a way to replay webhooks
Q: Is there a way to replay webhooks from webmention.io?
A: In short no, however you should be able to get the same data from the API, and make sure you use the .jf2 URLs instead of .json since that’s the format it uses for the webhook.
A browser extension to quickly navigate to ArcGIS REST API administration operations for hosted services.
Features
Navigate to the following ArcGIS REST API operations directly from the extension:
Refresh
Add To Definition
Update Definition
Delete From Definition
Important Notes
This extension has been successfully tested on ArcGIS Online (AGOL) 11.0.0 and ArcGIS Enterprise Portal 10.8.
Newer versions of AGOL and Portal may have a different interface when opening the REST URL. To ensure this extension works, be sure to open the item’s REST URL in a new tab. The URL must look something like this to work: https://services.myserver.com/OrgID/ArcGIS/rest/services/example/FeatureServer/0.
How to use
Install the extension in your browser.
Navigate to an ArcGIS REST services URL.
Click the extension’s icon in the top bar.
Select the desired operation from the dropdown menu.
Click the “Execute Operation” button.
The operation’s webpage will open in a new tab.
Manual Installation
Chrome
Download the Chrome extension files from the Chrome directory in this repository.
Open the Chrome browser and navigate to chrome://extensions.
Enable “Developer mode” by toggling the switch in the top right corner of the page.
Click “Load unpacked” and select the folder containing the downloaded Chrome extension files.
The extension should now be installed and visible in your Chrome extensions list.
Firefox
Download the Firefox extension files from the Firefox directory in this repository.
Open the Firefox browser and navigate to about:debugging.
Click “This Firefox” in the left sidebar.
Click “Load Temporary Add-on…” and select the manifest.json file from the downloaded Firefox extension files.
The extension should now be installed and visible in your Firefox extensions list.
Limitations
The extension currently supports ArcGIS Online and Enterprise Portal hosted services.
The extension assumes the user has a valid token included in the URL for accessing the REST API operations.
Mailgun Sender is an easy to use Java command line tool that you can use to send messages to mailing lists or email addresses using your Mailgun account.
No programming skills are required to use this tool.
Many people don’t have the time or the skills to code against APIs. So, I built Mailgun Sender for you. All you need is your Mailgun account info and your message content in plain-text and html.
Incidentally, if code is your thing, this tool is built on top of my Mailgun Manager API.
A valid Mailgun account (Note: You’ll need to know your public and private API keys to run the tool)
Installation and Setup
Download and extract the latest release to an installation directory on your computer, e.g., ~/Applications.
Navigate to the installation directory.
Before running Mailgun Sender for the first time, you’ll need to configure two properties files (mailgun.properties and mailgun-sender.properties) located in the /config directory.
Open a terminal window on your computer, so that you can run Mailgun Sender using command line arguments
mailgun.properties
Set the publicApiKey, privateApiKey, and the domain property values. The API keys can be found in your Mailgun’s account settings.
Set the mailgun.sender.default.from.email property value.
# Mailgun Sender properties

mailgun.sender.default.from.email=Support Team <support@example.com>
Usage
If you haven’t already, open a terminal window on your computer.
Note: All messages sent via Mailgun Sender require a plain-text and HTML version of the email message content. Hence, the path to the plain-text and HTML files are passed via the command line using the -p and -h options. Additionally, when sending messages there are several optional arguments, which include the following:
-c,--campaign-id <ID>                 Campaign identifier
-t,--test-mode-flag <Flag>            Test mode flag [default: false]
-f,--from-email-address <Email>       From email address [default set in mailgun-sender.properties]
-r,--reply-to-email-address <Email>   Reply-to email address
Send message to a list of recipients in the recipients.txt file using the -R option.
$ java -jar mailgun-sender.jar -R recipients.txt -s "Test Message to Recipients from a File" -p plain-text.txt -h content.html -f postmaster@mg.example.com -r support@skedi.zendesk.com
Note: In this example, the default from email address (set in the mailgun-sender.properties file) is being overridden with -f option and a reply-to email address is set using the -r option.
Recipients Format
Text file with a new line for each message recipient.
bob@gmail.com
john@mailgun.net
doe@mailgun.net
Help
$ java -jar mailgun-sender.jar
Contributors
Contributions can be made by following these steps:
Fork it!
Create your feature branch: git checkout -b my-new-feature
Commit your changes: git commit -am 'Add some feature'
Push to the branch: git push origin my-new-feature
Submit a pull request 😀
If you have any questions, please don’t hesitate to contact me at john@rodaxsoft.com.
License
This Source Code Form is subject to the terms of the Mozilla Public License, v. 2.0. If a copy of the MPL was not distributed with this file, You can obtain one at http://mozilla.org/MPL/2.0/.