Blog

  • umd-design-system-base

    UMD Design System Base Drupal Theme

    Provided by the UMD Libraries.

    Base theme implementing the UMD Design System1 using Drupal’s
    Single Directory Components (SDC)2.

    Find currently created SDCs under /components.

    Current Status

    Currently developed version 1.x. All work should be done against this branch.

    Installation

    To install, you can either:

    • Clone this repository (main branch) into your themes directory (preferred method if you intend to develop or submit pull requests)
    • Install using composer (preferred if you plan to subtheme off this theme)
    composer require umd-lib/umd-design-system-theme

    See: https://packagist.org/packages/umd-lib/umd-design-system-theme

    Usage

    This theme can be used as a base theme or in UI configuration.

    To create a new subtheme based on this theme, first create a new theme folder
    and set umdds as the base theme.

    E.g.,

    name: New Terp Theme
    type: theme
    description: Sub-theme of UMDDS
    core_version_requirement: ^11
    base theme: umdds

    Sub-theme templates can then employ SDCs when displaying content3

    For example, to hardcode a hero component, use the {{ include() }} or {% embed %} tag:

    {{ include('umdds:umd-element-hero', {
        variant: 'minimal',
        theme: 'light',
        hero_image: 'https://www.lib.umd.edu/sites/default/files/styles/optimized/public/2022-02/McKeldin%20Library%201920x550.jpg',
        hero_image_alt: 'McKeldin Library',
        eyebrow: 'Sports News',
        hero_title: 'Maryland Wins'
        }, with_context = false)
    }}

    Or with field content, such as in a node.html.twig:

    {{ include('umdds:umd-element-hero', {
        variant: 'minimal',
        theme: 'light',
        hero_image: {{ file_url(content.field_hero_image[0]['#media'].field_media_image.entity.uri.value | image_style('optimized')) }},
        hero_image_alt: {{ content.field_hero_image[0]['#media'].field_media_image.alt }},
        eyebrow: {{ content.field_eyebrow|field_value }},
        hero_title: {{ node.title.value }}
        }, with_context = false)
    }}

    Note that if overriding individual SDCs, you will want to sub-theme even if only
    using UI Patterns or similar. In this case, you can override individual SDCs
    using the replaces syntax4:

    replaces: 'sdc_theme_test:my-card'

    However the intention is that these components be used to site build in the UI
    using the UI Patterns5 module alongside Layout Builder or field configuration.

    See the libraries/main
    branch for examples of how to override SDCs.

    Upgrading Theme to Latest Design System

    Because the theme comes with JS and precompiled CSS, this procedure should only be
    necessary when upgrading the theme for a Design System upgrade.

    Design System / Tailwind CSS

    To pull the node modules, run the following:

    npm install

    To recompile the UMDDS CSS, run the following command:

    npx tailwindcss --input css/base/ui.css --output css/design-system/compiled.css

    Which will evaluate src/index.css configuration and pipe the complied file
    to css/design-system/compiled.css.

    Also copy node_modules/@universityofmaryland/web-components-library/dist/index.js
    to js/design-system/index.js

    Footnotes

    1. https://designsystem.umd.edu/

    2. https://www.drupal.org/docs/develop/theming-drupal/using-single-directory-components/quickstart

    3. https://www.drupal.org/docs/develop/theming-drupal/using-single-directory-components/using-your-new-single-directory-component#s-using-your-component-in-twig-template

    4. https://www.drupal.org/docs/develop/theming-drupal/using-single-directory-components/creating-a-single-directory-component#s-overriding-components-provided-by-other-modules-or-themes

    5. https://www.drupal.org/project/ui_patterns

    Visit original content creator repository
    https://github.com/umd-lib/umd-design-system-theme

  • Health-Monitoring-System

    Health-Monitoring-System


    IoT based Health Monitoring System is a project for Hardware lab. This repository contains detailed description about the project and code also.

    Motivation


    In this project, we tried to implement a cheap medium to monitor a patients’ condition continuously and provide information to doctors, nurses, and patient’s relatives efficiently.

    Description

    In this project, we implemented a microcontroller-based health monitoring system. It can continuously monitor patients’ health conditions such as body temperature, pulse and send this information to doctors and patient’s relatives’ phones. It will also automatically upload all information on the cloud through the WiFi module.

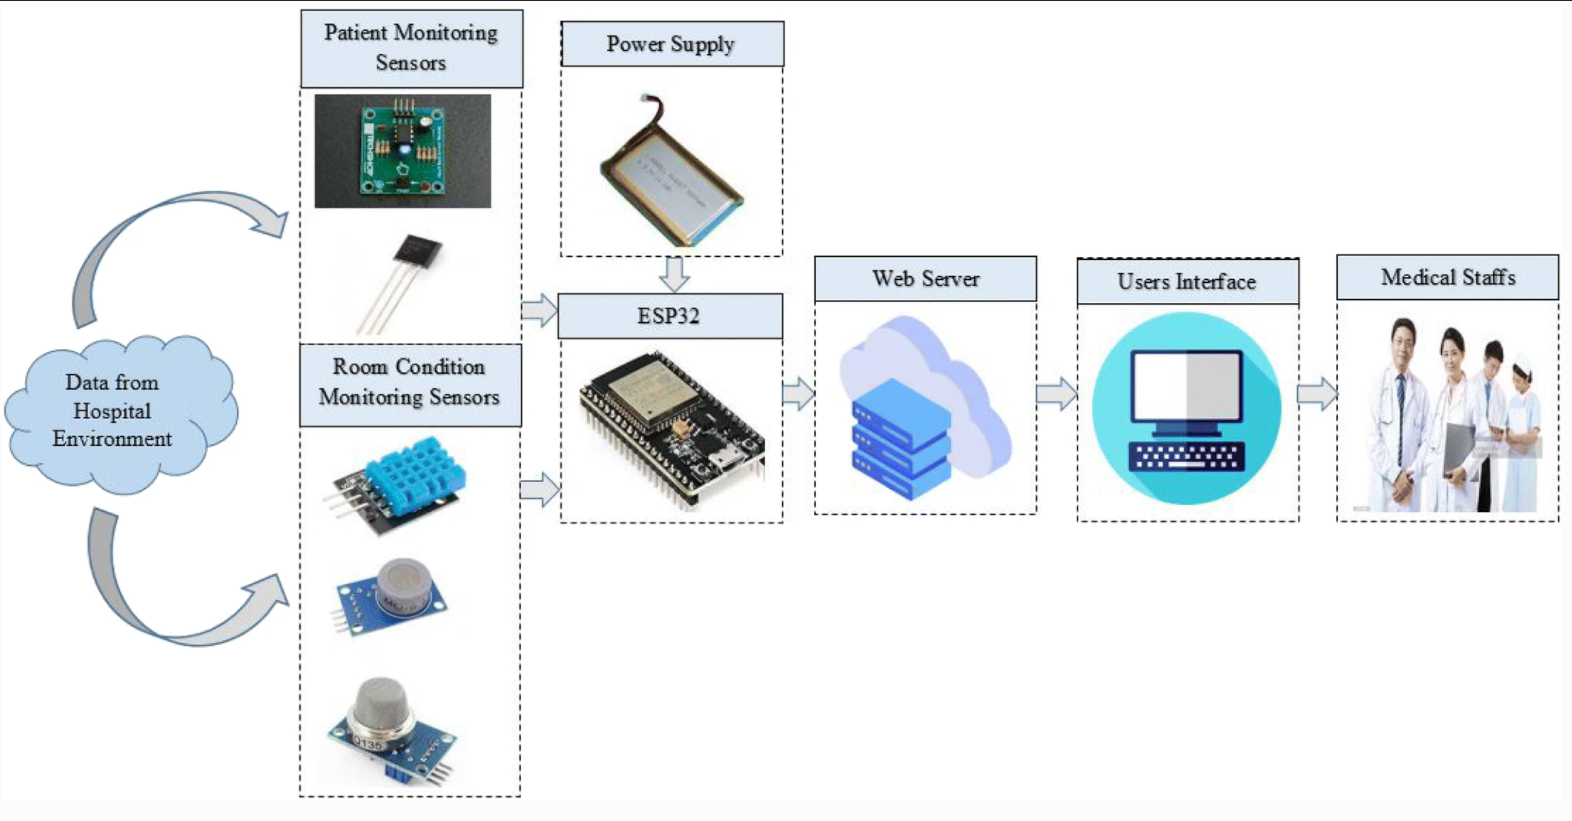
    Overall system design is included here,

    System Design

    Hardware

    • Processors
      • ATmega32
      • Arduino-Uno (built-in ATmega328p)
      • ESP8266 WiFi Module
      • GSM Module (SIM800L)
    • Sensors
      • Pulse Sensor
      • Body Temperature Sensor (LM35)
      • Room Temperature Sensor (DHT11)
    • Others
      • BreadBoard
      • Battery
      • USB AVR ISP programmer
      • LCD Display
      • Resistor, Capacitor, and Inductor
      • Potentiometer
      • Jumper Wires

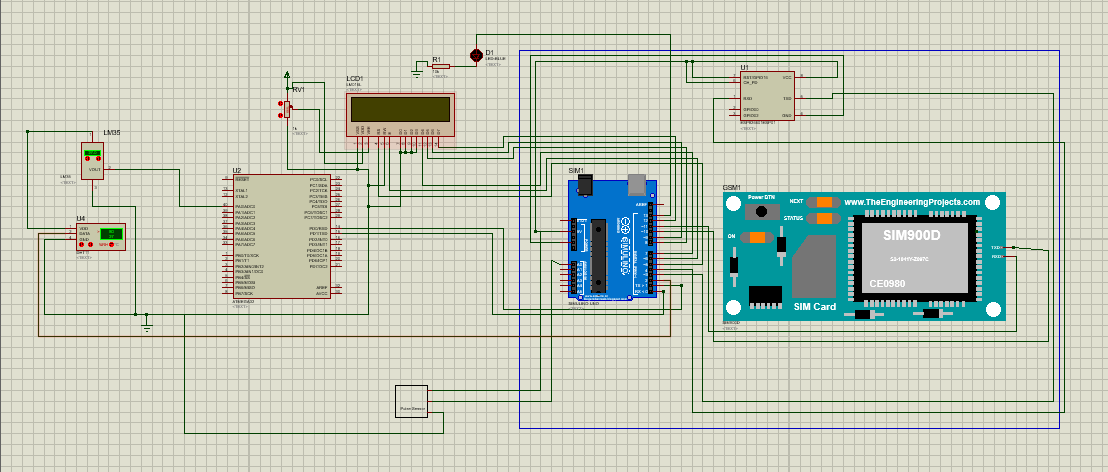
    Circuit Diagram

    The main circuit components and diagram shown below

    System Design

    Contribution


    Want to contribute?

    Before contribution read CONTRIBUTION.md


    Visit original content creator repository https://github.com/rng70/Health-Monitoring-System
  • react-launchpad

    Project Logo

    Discord Liberapay Donations Liberapay Goal

    React Launchpad open-source codebase

    Table of Contents

    Introduction

    React Launchpad is a modern React project starter setup aimed at simplifying the initial setup for React projects. It provides a streamlined starting point with pre-configured tools and dependencies to kickstart your development process.

    Getting Started

    To get started with this app, follow these steps:

    To get started with this app, follow these steps:

    1. Fork & clone the repository:

      git clone https://github.com/<your_username>/react-launchpad.git
    2. Install the dependencies:

      pnpm install
    3. Run the development server:

      pnpm dev
    4. Open http://localhost:3000 with your browser to see the result.

    Note

    I use Neode for managing application data in this project. Ensure that

    📃 Scripts Overview

    The following scripts are available in the package.json:

    • dev: Starts the development server with colorized output
    • build: Builds the app for production
    • start: Starts the production server
    • format: Formats the code with Prettier
    • lint: Lints the code using ESLint
    • lint:fix: Automatically fixes linting errors
    • prettier: Checks the code for proper formatting
    • prettier:fix: Automatically fixes formatting issues
    • story: Starts the Storybook server
    • build-story: Builds the Storybook for deployment
    • test: Runs unit and integration tests
    • test:ui: Runs end-to-end tests in headless mode
    • coverage: checking for how many of your code is tested

    Roadmap

    • Update documentation for installation & configuration: This is currently a work in progress. Enhancing documentation ensures smoother onboarding for new contributors and users. Focus on clarity, completeness, and providing examples where necessary.\

    • Create a starter app and show how folder structure and explain how the project work: This is currently a work in progress.

    • [] Enhance Testing Coverage: Consider expanding test coverage, especially for critical functionalities. Incorporate unit tests, integration tests, and end-to-end tests to ensure robustness and reliability.

    • [] Streamline Development Workflow: Evaluate the existing development process and tooling. Identify areas where automation can be introduced to streamline repetitive tasks and improve developer productivity.

    • [] Address Technical Debt: Take time to address any accumulated technical debt. Refactor code, resolve code smells, and optimize performance to maintain codebase health and sustainability.

    • [] Community Engagement: Foster community engagement by encouraging contributions, providing clear contribution guidelines, and actively participating in relevant forums or communities related to your project.

    • [] Accessibility and Internationalization: Assess the accessibility and internationalization aspects of your project. Ensure that the application is accessible to users with disabilities and supports multiple languages for a broader user base.

    • [] Performance Optimization: Continuously monitor and optimize application performance. Implement techniques such as code splitting, lazy loading, and caching to enhance user experience and reduce load times.

    By following this roadmap and implementing the suggested improvements, you can enhance the overall quality, maintainability, and user satisfaction of your project.

    UI

    • Tailwind CSS – Utility-first CSS framework for rapid UI development
    • Shadcn/ui – Re-usable components built using Radix UI and Tailwind CSS
    • Framer Motion – Motion library for React to animate components with ease
    • Lucide – Beautifully simple, pixel-perfect icons
    • next/font – Optimize custom fonts and remove external network requests for improved performance
    • ImageResponse – Generate dynamic Open Graph images at the edge

    Hooks and Utilities

    • useIntersectionObserver – React hook to observe when an element enters or leaves the viewport
    • useLocalStorage – Persist data in the browser’s local storage
    • useScroll – React hook to observe scroll position (example)
    • nFormatter – Format numbers with suffixes like 1.2k or 1.2M
    • capitalize – Capitalize the first letter of a string
    • truncate – Truncate a string to a specified length
    • use-debounce – Debounce a function call / state update

    Code Quality

    • TypeScript – Static type checker for end-to-end typesafety
    • Prettier – Opinionated code formatter for consistent code style
    • ESLint – Pluggable linter for Next.js and TypeScript

    Testing app

    Mocking api for test perposes with fakerjs and msw.

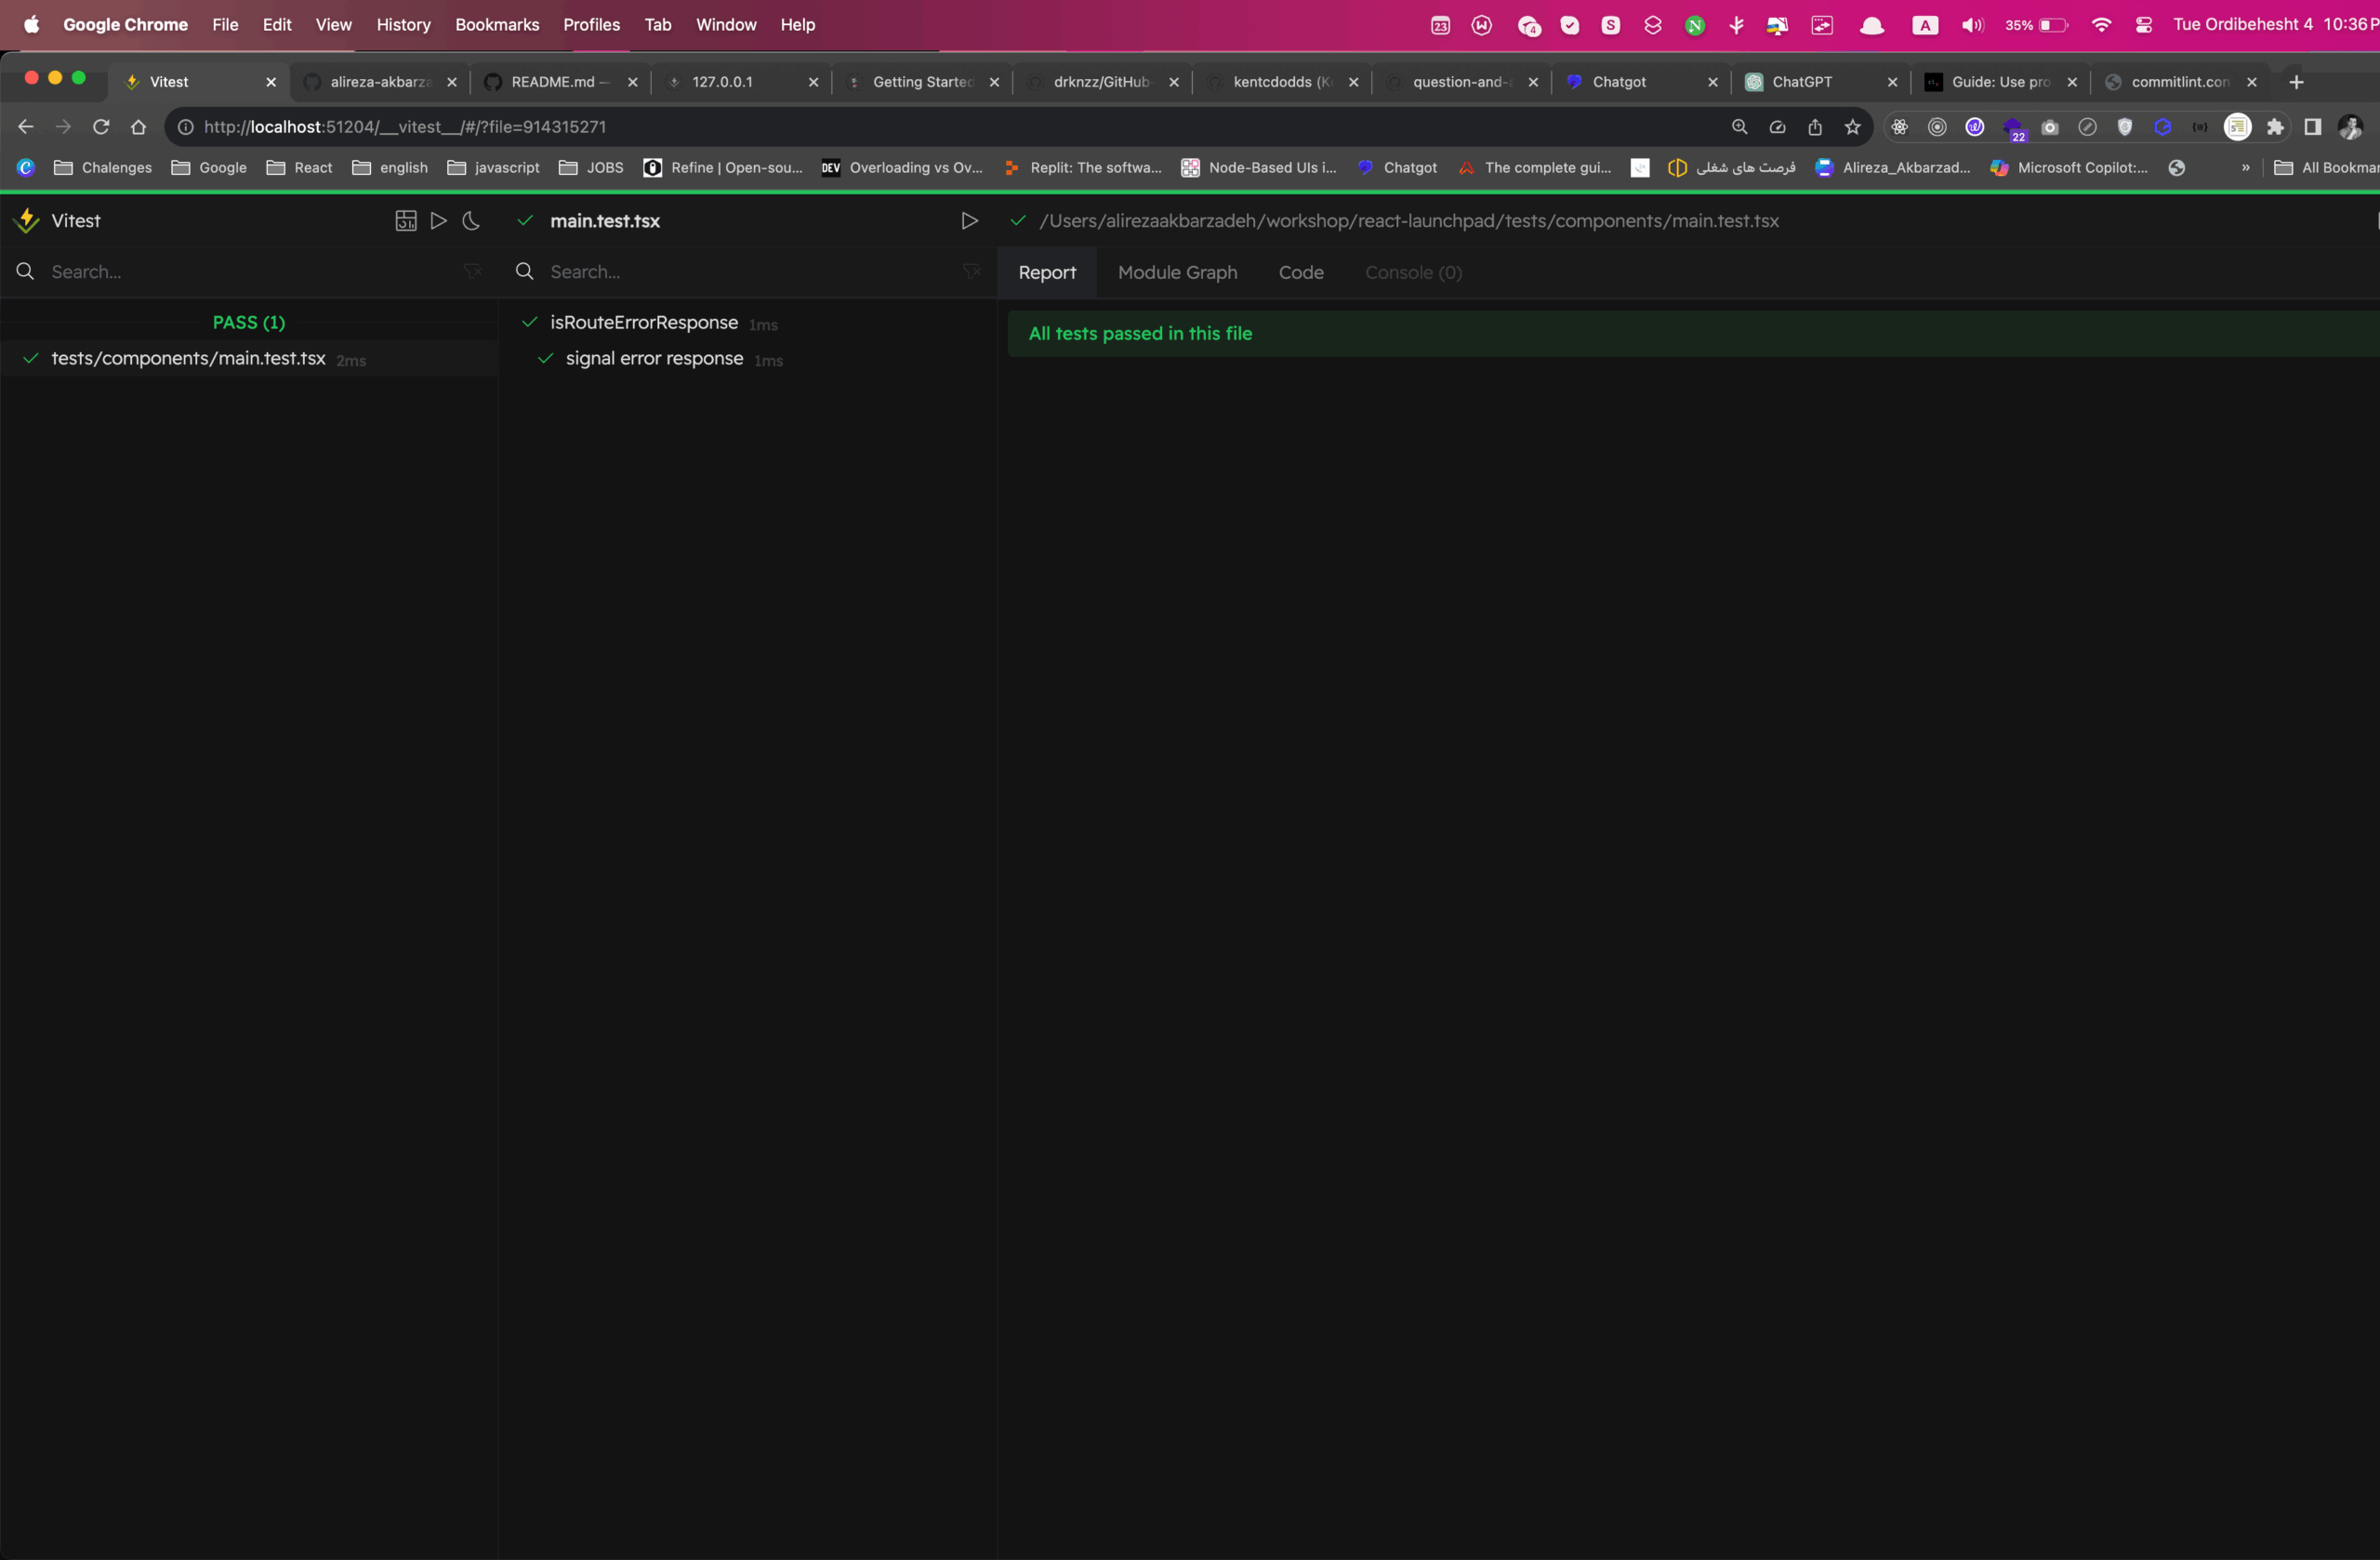
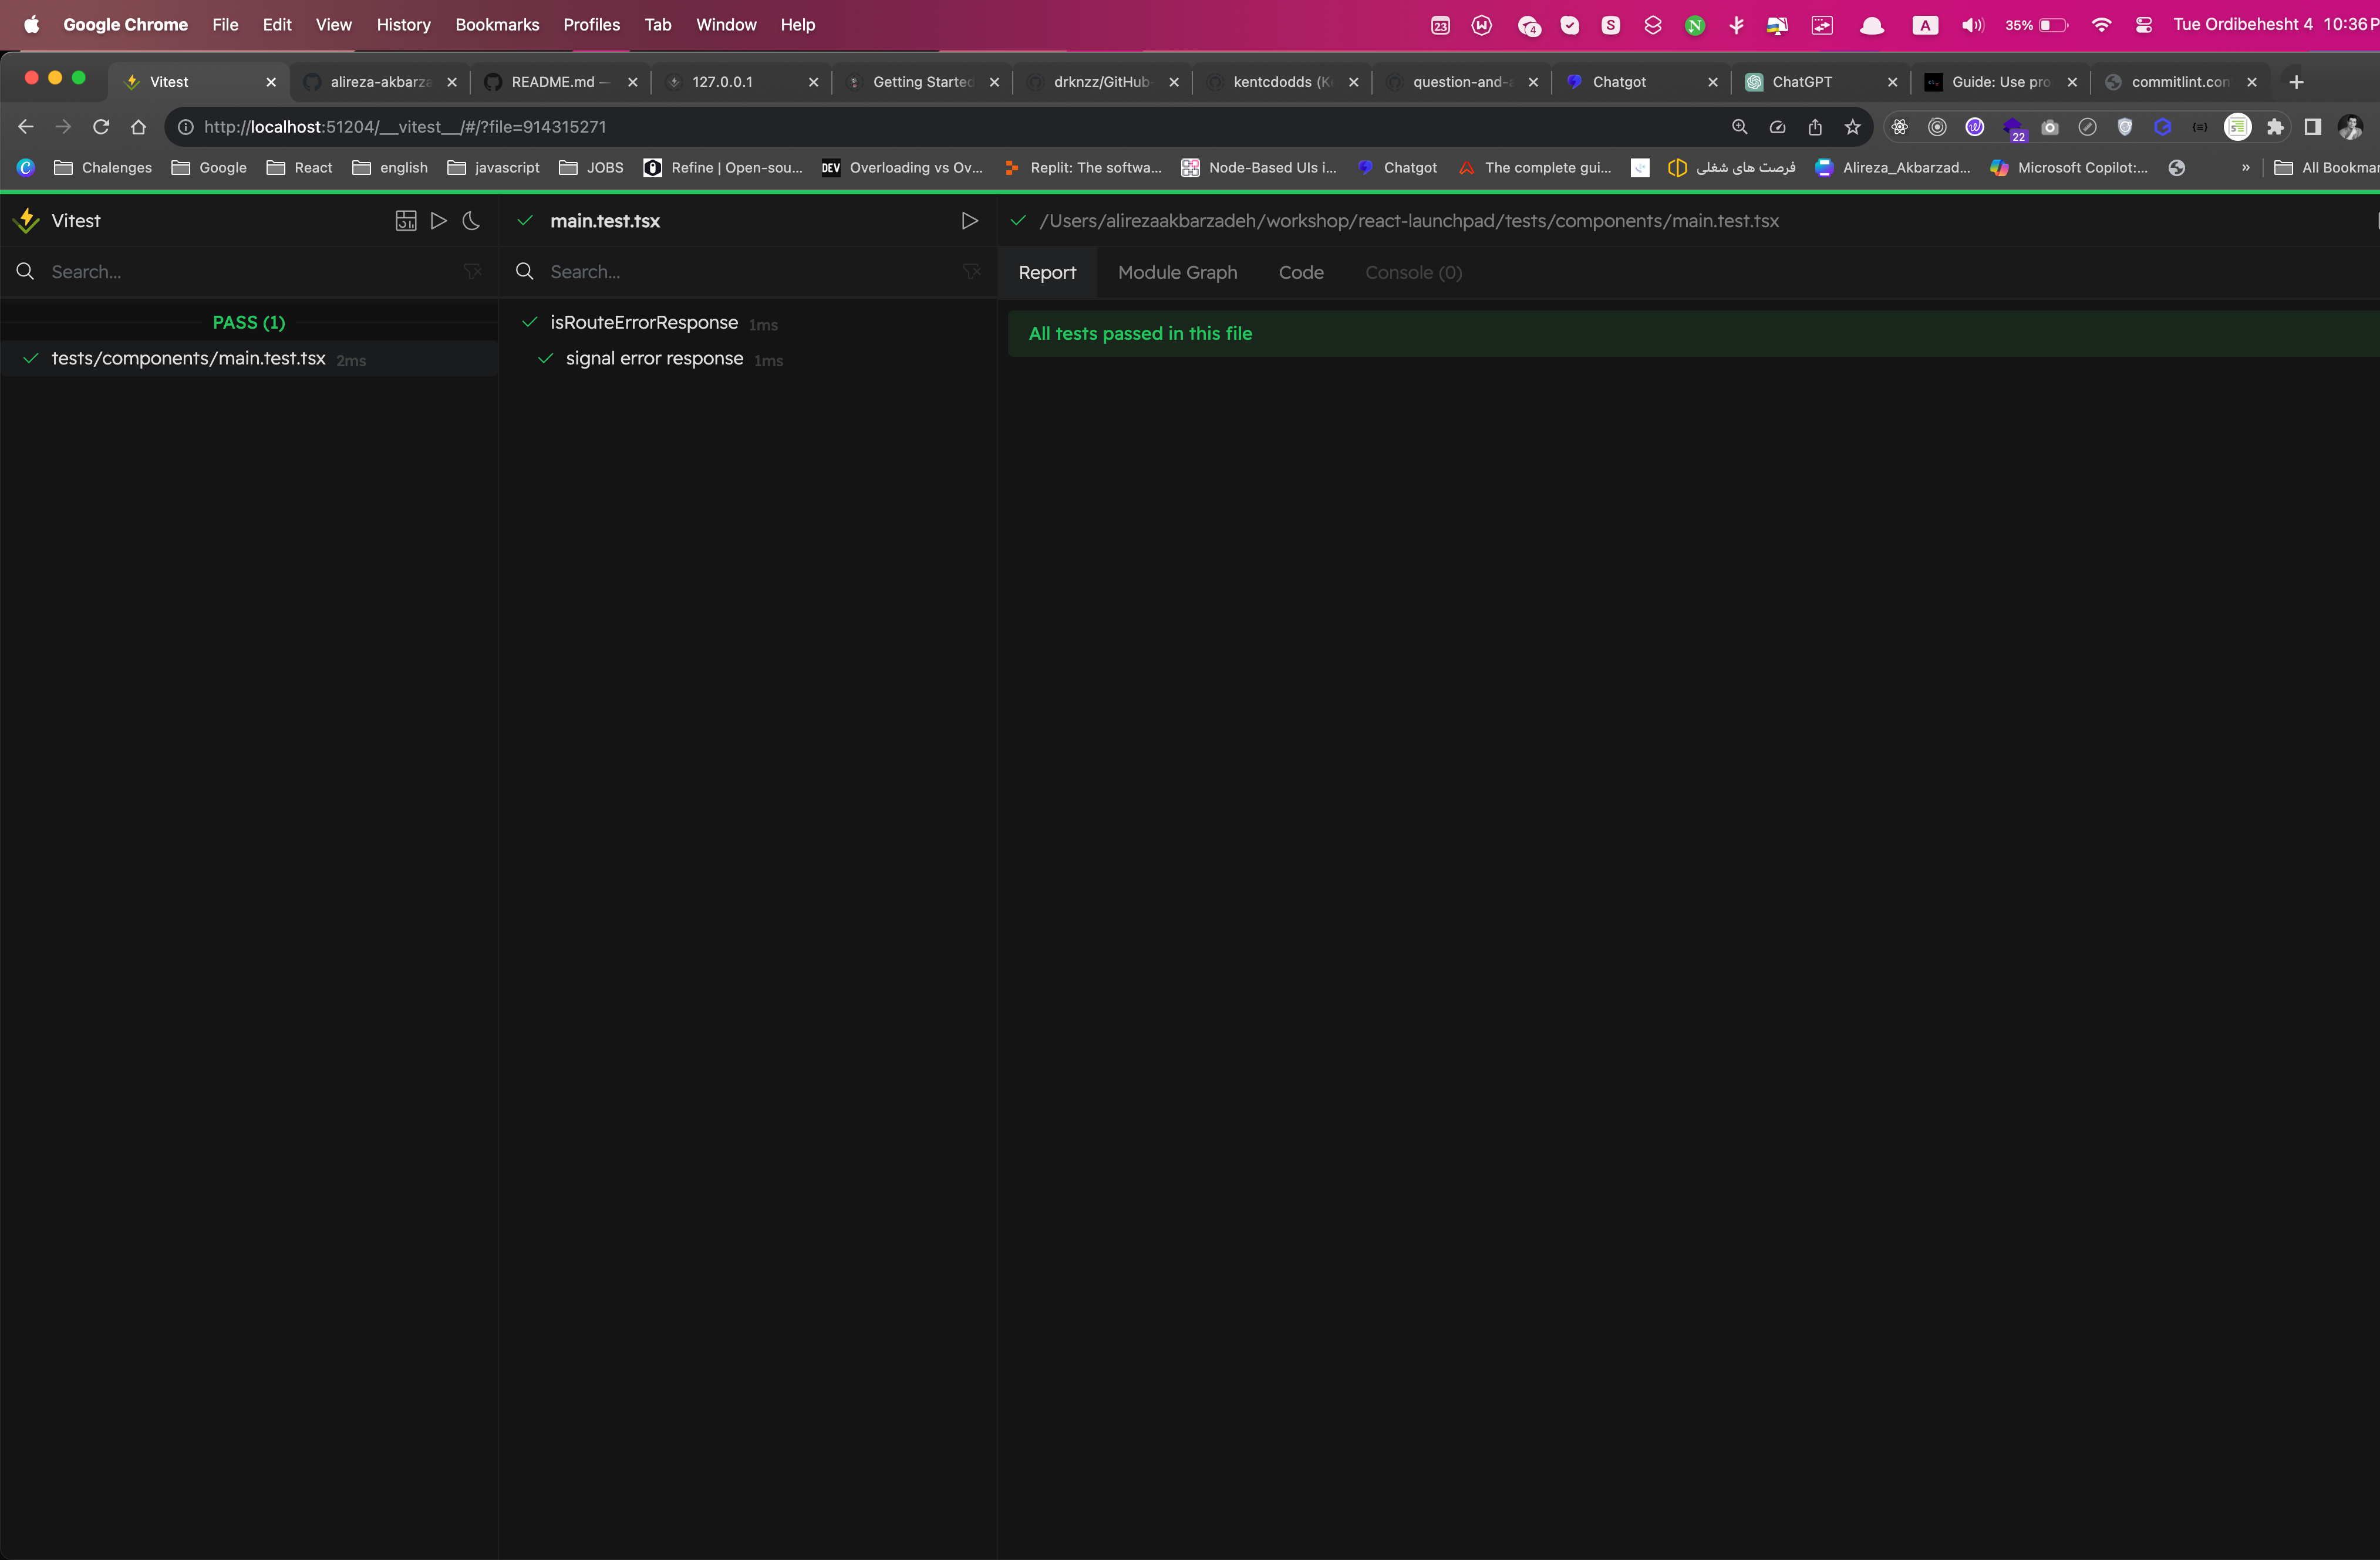
    Run a test like a pro with and vitest ui and react testing library.

    Testing Screenshot

    Integrate type checking and eslint and commitlint and husky for caching errors in compile time.

    🚀 Deployment

    Easily deploy your React.js app with Vercel by clicking the button below:

    Deploy with Vercel

    Contributing

    The devtools community is possible thanks to thousands of kind volunteers like you. We welcome all contributions to the community and are excited to welcome you aboard.

    Recent Contributions:

    Alt

    Platform, Build, and Deployment Status

    The general platform status for all our applications is available at https://react-launchpad.vercel.app/status. The build and deployment status for the code is available in our DevOps Guide.

    Visit original content creator repository https://github.com/alireza-akbarzadeh/react-launchpad
  • Froxlor-Mail

    Release Docker Build Docker Pulls License

    ko-fi

    Froxlor Mail Docker

    Docker image of Postfix and Dovecot for Froxlor Server Management Panel.

    This image is meant to be used with the Froxlor image.

    Deployment

    Docker Compose

    version: '2.4'
    
    services:
      mail:
        image: bloodhunterd/froxlor-mail
        environment:
          TZ: 'Europe/Berlin'
          FRX_MAIL_DIR: '/var/customers/mail'
          FRX_DB_HOST: 'localhost'
          FRX_DB_NAME: 'froxlor'
          FRX_DB_USER: 'froxlor'
          FRX_DB_PASSWORD: '+V3ryS3cr3tP4ssw0rd#'
          MAIL_DOMAIN: 'example.com'
          POSTMASTER_MAIL: 'postmaster@example.com'
          ROOT_MAIL: 'root@example.com'
        restart: unless-stopped
        ports:
          - '25:25'
          - '110:110'
          - '143:143'
          - '465:465'
          - '993:993'
          - '995:995'
          - '4190:4190'
        volumes:
          - ./mail:/var/customers/mail/

    Configuration

    ENV Values Default Description
    FRX_MAIL_DIR DIRECTORY PATH /var/customers/mail Path to the Froxlor customer mails.
    FRX_DB_HOST HOSTNAME \ IP localhost
    FRX_DB_NAME DATABASE NAME froxlor Froxlor database name
    FRX_DB_USER DATABASE USER froxlor Froxlor database user
    FRX_DB_PASSWORD DATABSE PASSEWORD Froxlor database user password
    ROOT_MAIL EMAIL root@example.com Email address alias for internal mails to the root user.
    MAIL_DOMAIN FQDN example.com Mail domain
    POSTMASTER_MAIL EMAIL postmaster@example.com Postmaster email address
    CLEANUP_TRASH INTEGER 30 Time in days after mails in Trash folder will be deleted.
    CLEANUP_SPAM INTEGER 60 Time in days after mails in Spam folder will be deleted.
    TZ PHP: List of supported timezones – Manual Europe/Berlin Used timezone for date and time calculation.

    Ports

    Port Protocol Description
    25 SMTP Receive encrypted and unencrypted emails. A TLS certificate may be required.
    110 POP Used to receive emails. The emails are downloaded locally.
    143 IMAP Used to receive emails. The e-mails remain on the server.
    465 SMTPS Encrypted ONLY version of SMTP.
    993 POPS Encrypted version of POP. A TLS certificate is required.
    995 IMAPS Encrypted version of IMAP. A TLS certificate is required.
    4190 Sieve Service for managing rules for receiving and storing e-mails.

    Volumes

    Volume Path Read only Description
    Customer mail /var/customers/mail/ Froxlor customer mail content.

    Update

    Please note the changelog to check for configuration changes before updating.

    docker-compose pull
    docker-compose up -d

    Build With

    Authors

    License

    This project is licensed under the MIT – see LICENSE.md file for details.

    *[ENV]: Environment Variable *[FQDN]: Fully Qualified Domain Name *[IMAP]: Internet Message Access Protocol *[IP]: Internet Protocol *[MIT]: Massachusetts Institute of Technology *[POP]: Post Office Protocol *[SMTP]: Simple Mail Transfer Protocol *[TLS]: Transport Layer Security *[TZ]: Timezone

    Visit original content creator repository https://github.com/bloodhunterd/Froxlor-Mail
  • avlit


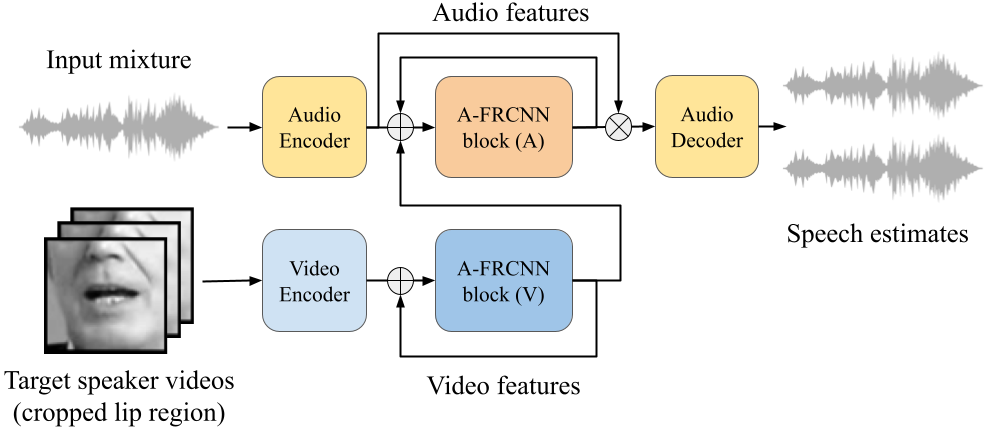
    AVLIT: Audio-Visual Lightweight ITerative model

    PyTorch arXiv Samples

    Description

    Official Pytorch Lightning implementation of “Audio-Visual Speech Separation in Noisy Environments with a Lightweight Iterative Model”, accepted at INTERSPEECH 2023.

    AVLIT_Folded AVLIT_Unfolded
    (A) Folded view of AVLIT (B) Unfolded view of AVLIT

    Audio-Visual Lightweight ITerative model (AVLIT) uses the A-FRCNN as building block. AVLIT employs a homogeneous design with audio and video branches composed of A-FRCNN blocks used iteratively. The weights are shared for each modality, making the number of parameters constant. Please refer to the paper for details.

    Quick start

    Installation

    Make sure to have pytorch with GPU support installed on your machine according to the official installation guide.

    Basic usage

    Here is a minimal example of how to use AVLIT in plain Pytorch. The default parameters will produce the configuration for AVLIT-8, which is the best performing model in the paper.

    from src.avlit import AVLIT
    
    # Instantiate the model
    model = AVLIT(
        num_sources = 2,
        # Audio branch
        audio_num_blocks = 8,
        # Video branch
        video_num_blocks = 4,
        video_encoder_checkpoint = "path/to/ae.ckpt",
    )
    model.cuda()
    
    # Training or inference logic here
    # ...

    Advanced usage

    For more control over the architecture, it is possible to provide values for more parameters as follows:

    from src.avlit import AVLIT
    
    # Instantiate the model
    model = AVLIT(
        num_sources = 2,
        # Audio branch
        kernel_size = 40,
        audio_hidden_channels = 512,
        audio_bottleneck_channels = 128,
        audio_num_blocks = 8,
        audio_states = 5,
        # Video branch
        video_hidden_channels = 128,
        video_bottleneck_channels = 128,
        video_num_blocks = 4,
        video_states = 5,
        video_encoder_checkpoint = "path/to/ae.ckpt",
        video_encoder_trainable = False,
        video_embedding_dim = 1024,
        # AV fusion
        fusion_operation = "sum",
        fusion_positions = [4],
    )
    model.cuda()
    
    # Training or inference logic here
    # ...

    Tests

    The tests/ folder contains unit tests for the AVLIT architecture. It is useful to run these tests if you want to customize the configuration parameters to verify that the input/output shapes are as expected and that the model can perform a forward pass correctly on CPU/GPU.

    To run all the unit tests, make sure to install the pytest package and run:

    pytest tests/test_models.py 
    

    Cite

    If you use AVLIT in your research, please cite our paper:

    @inproceedings{martel23_interspeech,
      author={Héctor Martel and Julius Richter and Kai Li and Xiaolin Hu and Timo Gerkmann},
      title={{Audio-Visual Speech Separation in Noisy Environments with a Lightweight Iterative Model}},
      year=2023,
      booktitle={Proc. INTERSPEECH 2023},
      pages={1673--1677},
      doi={10.21437/Interspeech.2023-1753}
    }

    Contact

    • For technical/academic questions please write an email to the corresponding authors mentioned in the paper. Alternatively, use the discussions page. Do not open an issue.
    • For bugs or problems with the code, please open an issue in this repository.
    • For other inquiries, contact me via email at hmartelb@hotmail.com.

    Changelog

    • [2023/07/26] 🎧 Demo samples website made public.
    • [2023/06/02] 🚀 Model code released.
    • [2023/05/31] 📰 Final version made public on arXiv.org.
    • [2023/05/17] 📰 Paper accepted at INTERSPEECH 2023!

    License

    This code is licensed under the terms of the MIT License.

    MIT License
    Copyright (c) 2023 Héctor Martel
    
    Permission is hereby granted, free of charge, to any person obtaining a copy
    of this software and associated documentation files (the "Software"), to deal
    in the Software without restriction, including without limitation the rights
    to use, copy, modify, merge, publish, distribute, sublicense, and/or sell
    copies of the Software, and to permit persons to whom the Software is
    furnished to do so, subject to the following conditions:
    
    The above copyright notice and this permission notice shall be included in all
    copies or substantial portions of the Software.
    
    THE SOFTWARE IS PROVIDED "AS IS", WITHOUT WARRANTY OF ANY KIND, EXPRESS OR
    IMPLIED, INCLUDING BUT NOT LIMITED TO THE WARRANTIES OF MERCHANTABILITY,
    FITNESS FOR A PARTICULAR PURPOSE AND NONINFRINGEMENT. IN NO EVENT SHALL THE
    AUTHORS OR COPYRIGHT HOLDERS BE LIABLE FOR ANY CLAIM, DAMAGES OR OTHER
    LIABILITY, WHETHER IN AN ACTION OF CONTRACT, TORT OR OTHERWISE, ARISING FROM,
    OUT OF OR IN CONNECTION WITH THE SOFTWARE OR THE USE OR OTHER DEALINGS IN THE
    SOFTWARE.
    
    Visit original content creator repository https://github.com/hmartelb/avlit
  • redsys-virtual-pos

    Redsys Virtual POS

    Build Status Latest Stable Version Total Downloads Latest Unstable Version License

    Redsys Virtual POS is an unofficial standalone PHP library to handle payments through the spanish payment service Redsys.

    NOTE: This library its still under development and its functionality is subject to change.

    Prerequisites

    • PHP >=5.4.0 <8.0

    Installation

    Installation is recommended through Composer.

    $ composer require bahiazul/redsys-virtual-pos
    

    Sample

    Go to the sample folder an run the following command in a terminal to start PHP’s built-in web server:

    # install dependencies
    $ composer install
    
    # start the server
    $ php -S 0.0.0.0:8000
    

    Then open your browser and go to here.

    If you want to test the online (async) response, replace localhost with your public IP or hostname, making sure that your machine is accesible through the port 8000 (you can use another port if you want).

    Usage

    Basic usage:

    use Bahiazul\RedsysVirtualPos\Message\WebRequest;
    use Bahiazul\RedsysVirtualPos\Field\Currency;
    use Bahiazul\RedsysVirtualPos\Field\TransactionType;
    
    $secret       = 'Mk9m98IfEblmPfrpsawt7BmxObt98Jev';
    $merchantCode = '999008881';
    $terminal     = '871';
    
    // The Environment object holds connection details
    $env = new Bahiazul\RedsysVirtualPos\Environment\DevelopmentEnvironment();
    $env->setSecret($secret);
    
    // Setup the Parameters for the Request
    $params['Amount']             = '145'; // €1,45
    $params['Order']              = strval(time());
    $params['MerchantCode']       = $merchantCode;
    $params['Currency']           = Currency::EUR;
    $params['TransactionType']    = TransactionType::STANDARD;
    $params['Terminal']           = $terminal;
    $params['MerchantName']       = 'Test Store';                        // optional
    $params['ProductDescription'] = 'Product Description';               // optional
    $params['UrlOk']              = 'http://localhost:8000/success.php'; // optional
    $params['UrlKo']              = 'http://localhost:8000/failure.php'; // optional
    
    // Generate the Request
    $webRequest = new WebRequest($env);
    $webRequest->setParams($params);
    
    // Generate the form
    $submitBtn = "<p><input type='submit' value='Submit'></p>";
    $wrForm = $webRequest->getForm([], $submitBtn);
    
    // Render the HTML form w/ Submit button
    echo $wrForm;

    See sample/index.php and sample/response.php for more detailed examples.

    Test

    Run the following command in a terminal:

    # install dependencies
    $ composer install
    
    # run the tests
    $ phpunit
    

    Changelog

    See CHANGELOG.md

    Authors

    License

    MIT

    Visit original content creator repository https://github.com/bahiazul/redsys-virtual-pos
  • CustomFormViews

    API Open Source Love Open Source Love Download

    Codacy Badge Code Climate Issue Count

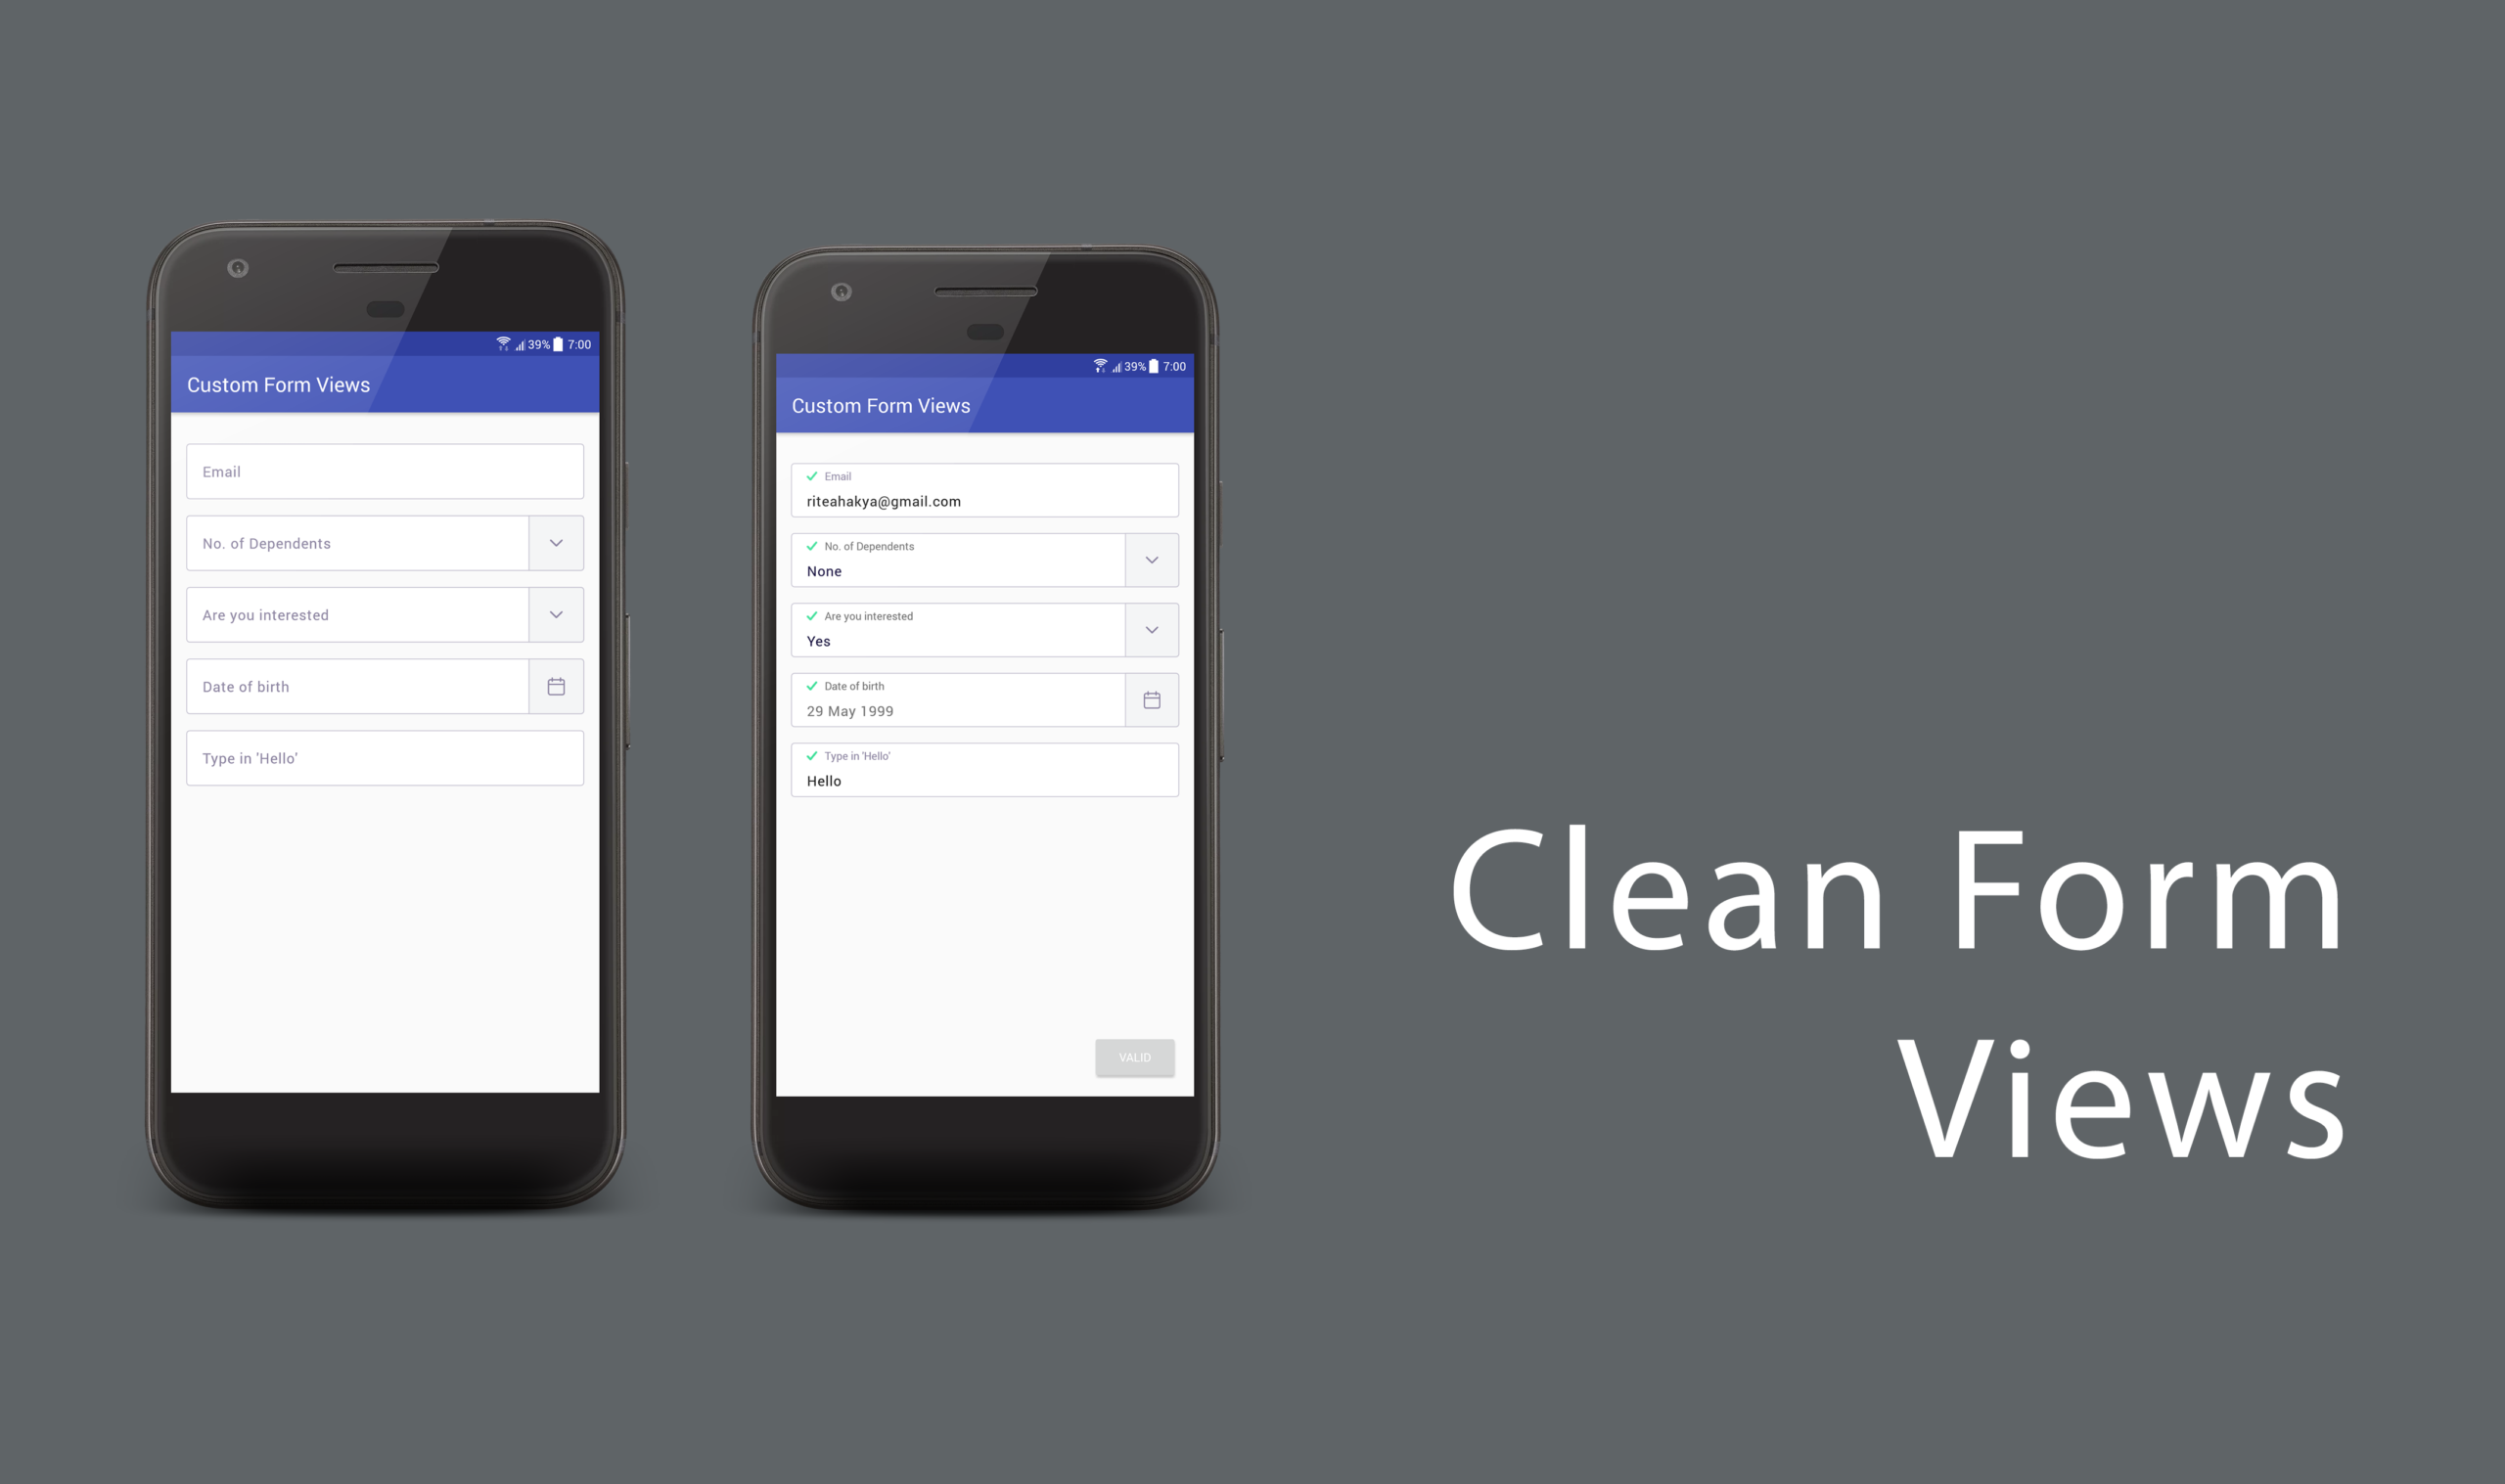
    Clean Form Views

    A clean collection of views used for forms with excellent support for individual and combined validity.

    Demo

    Clean Form Views (APK)

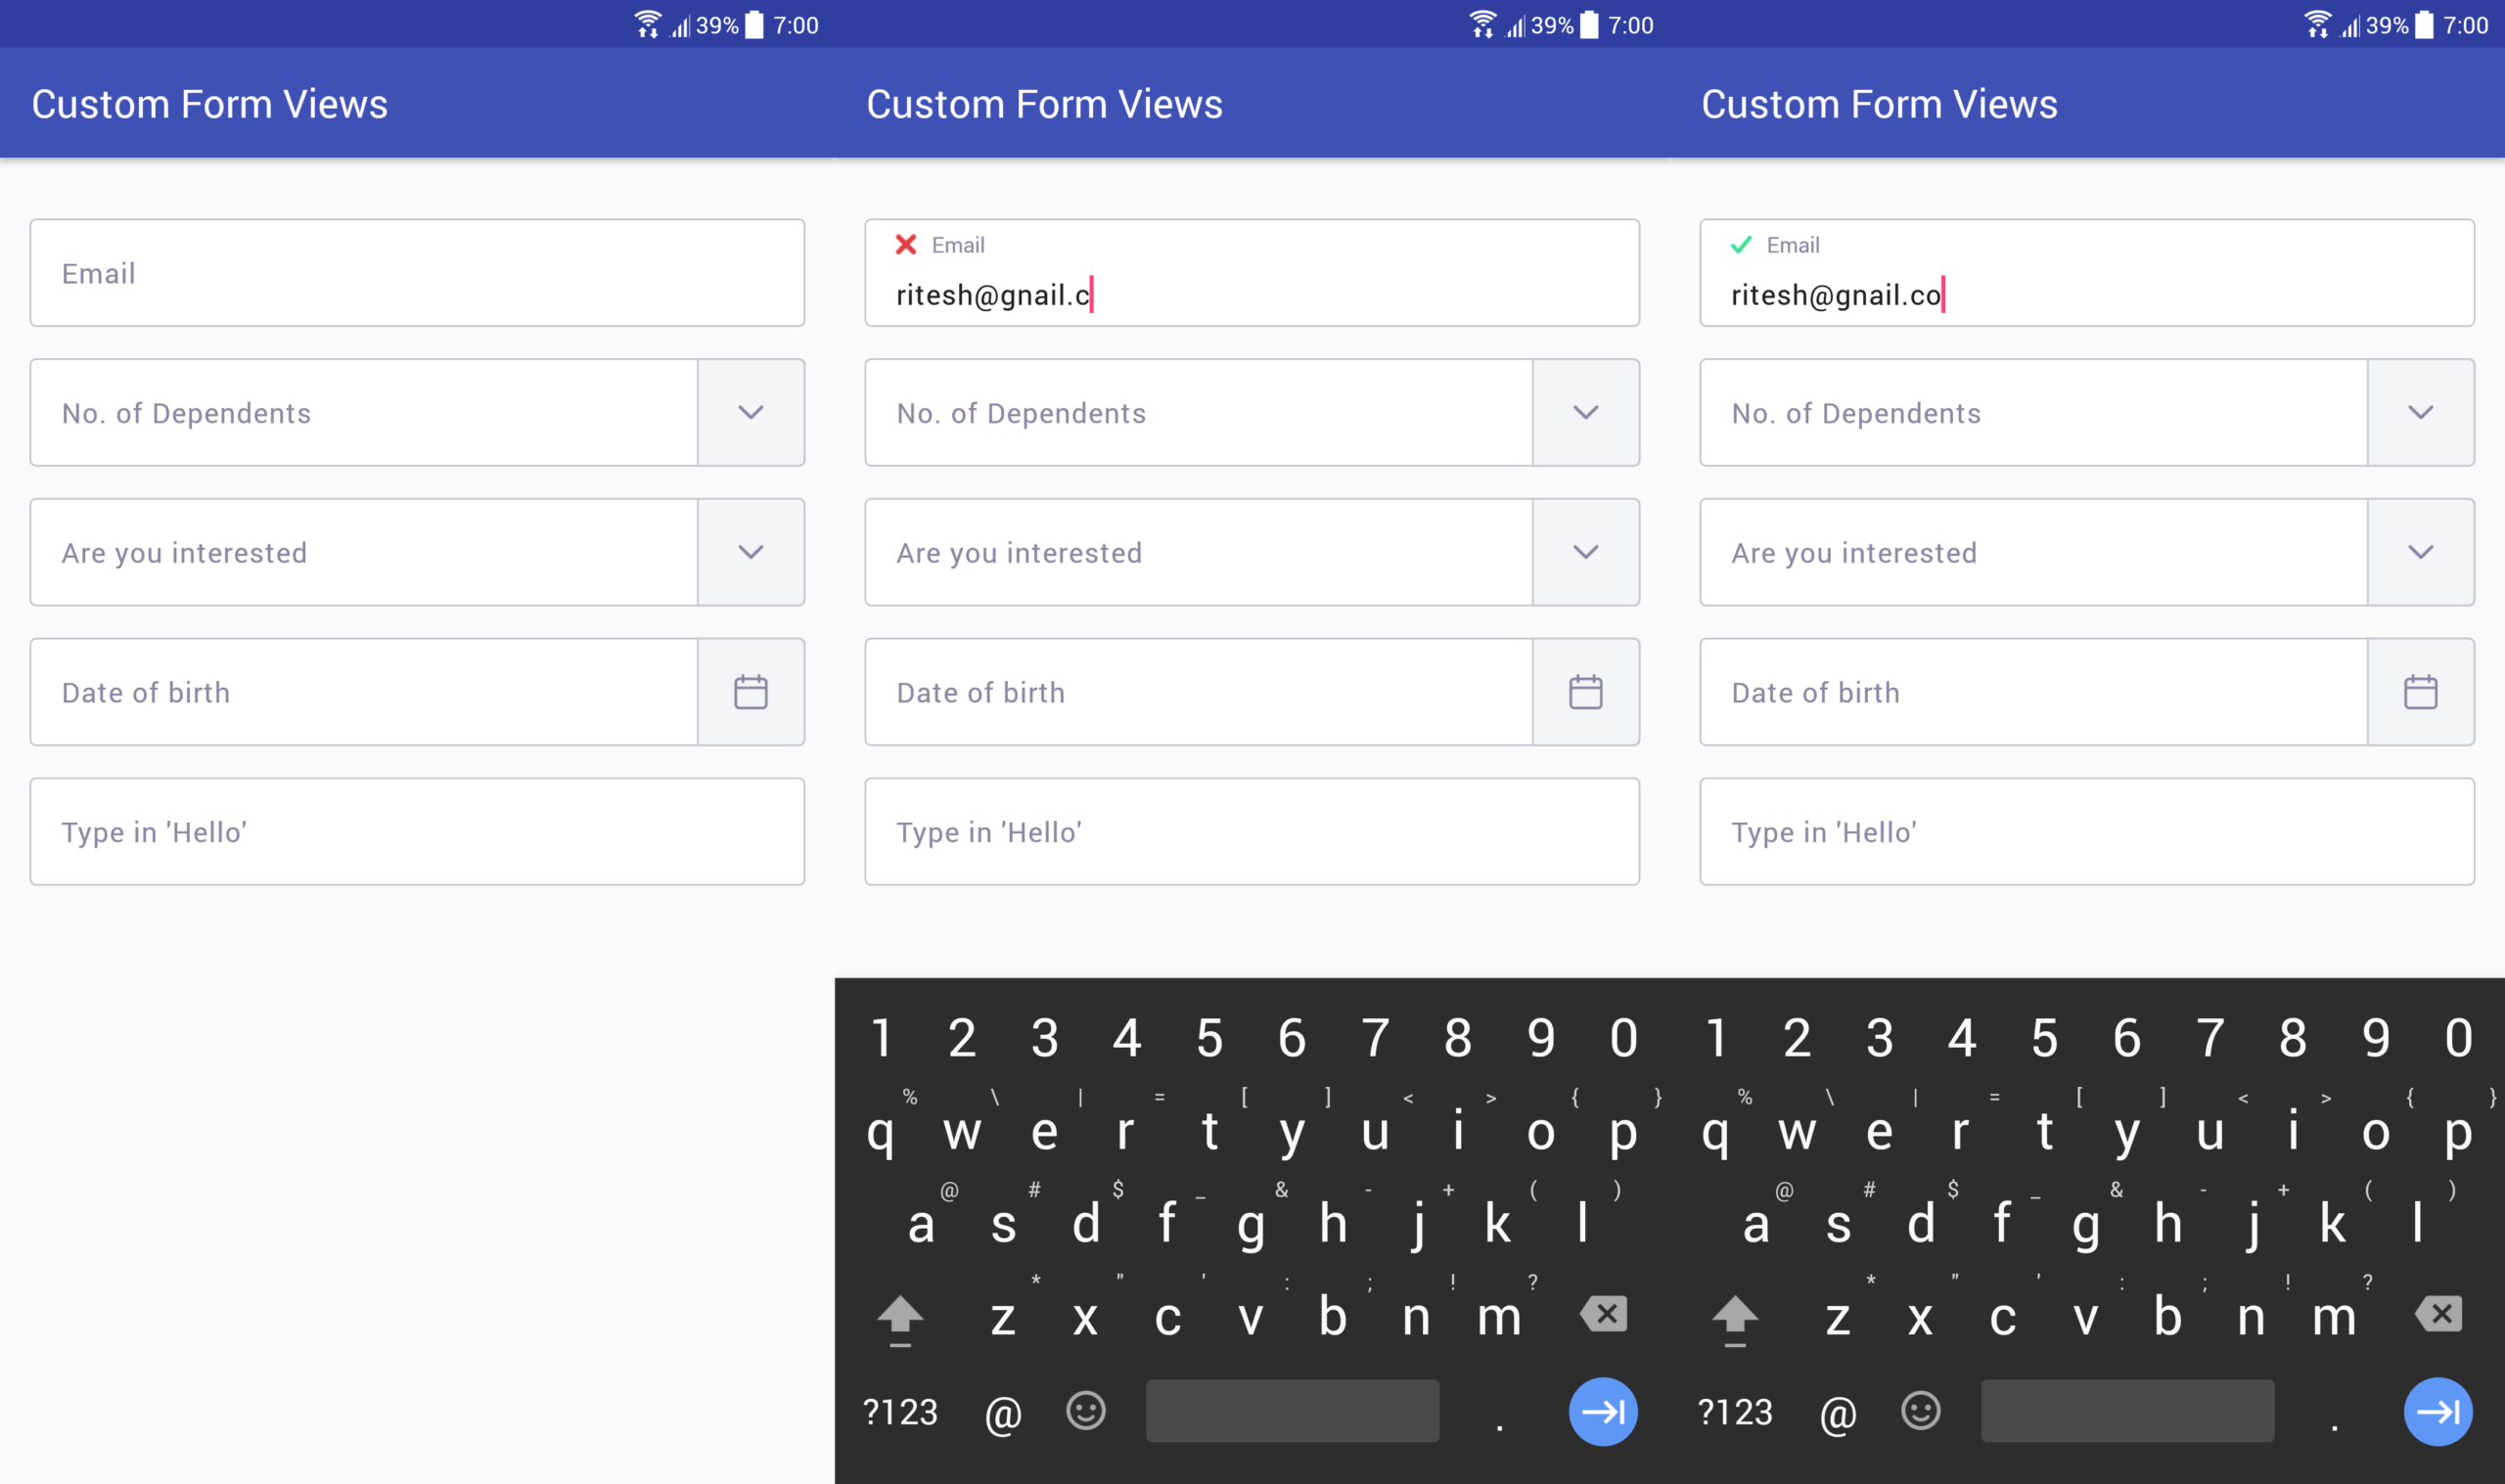
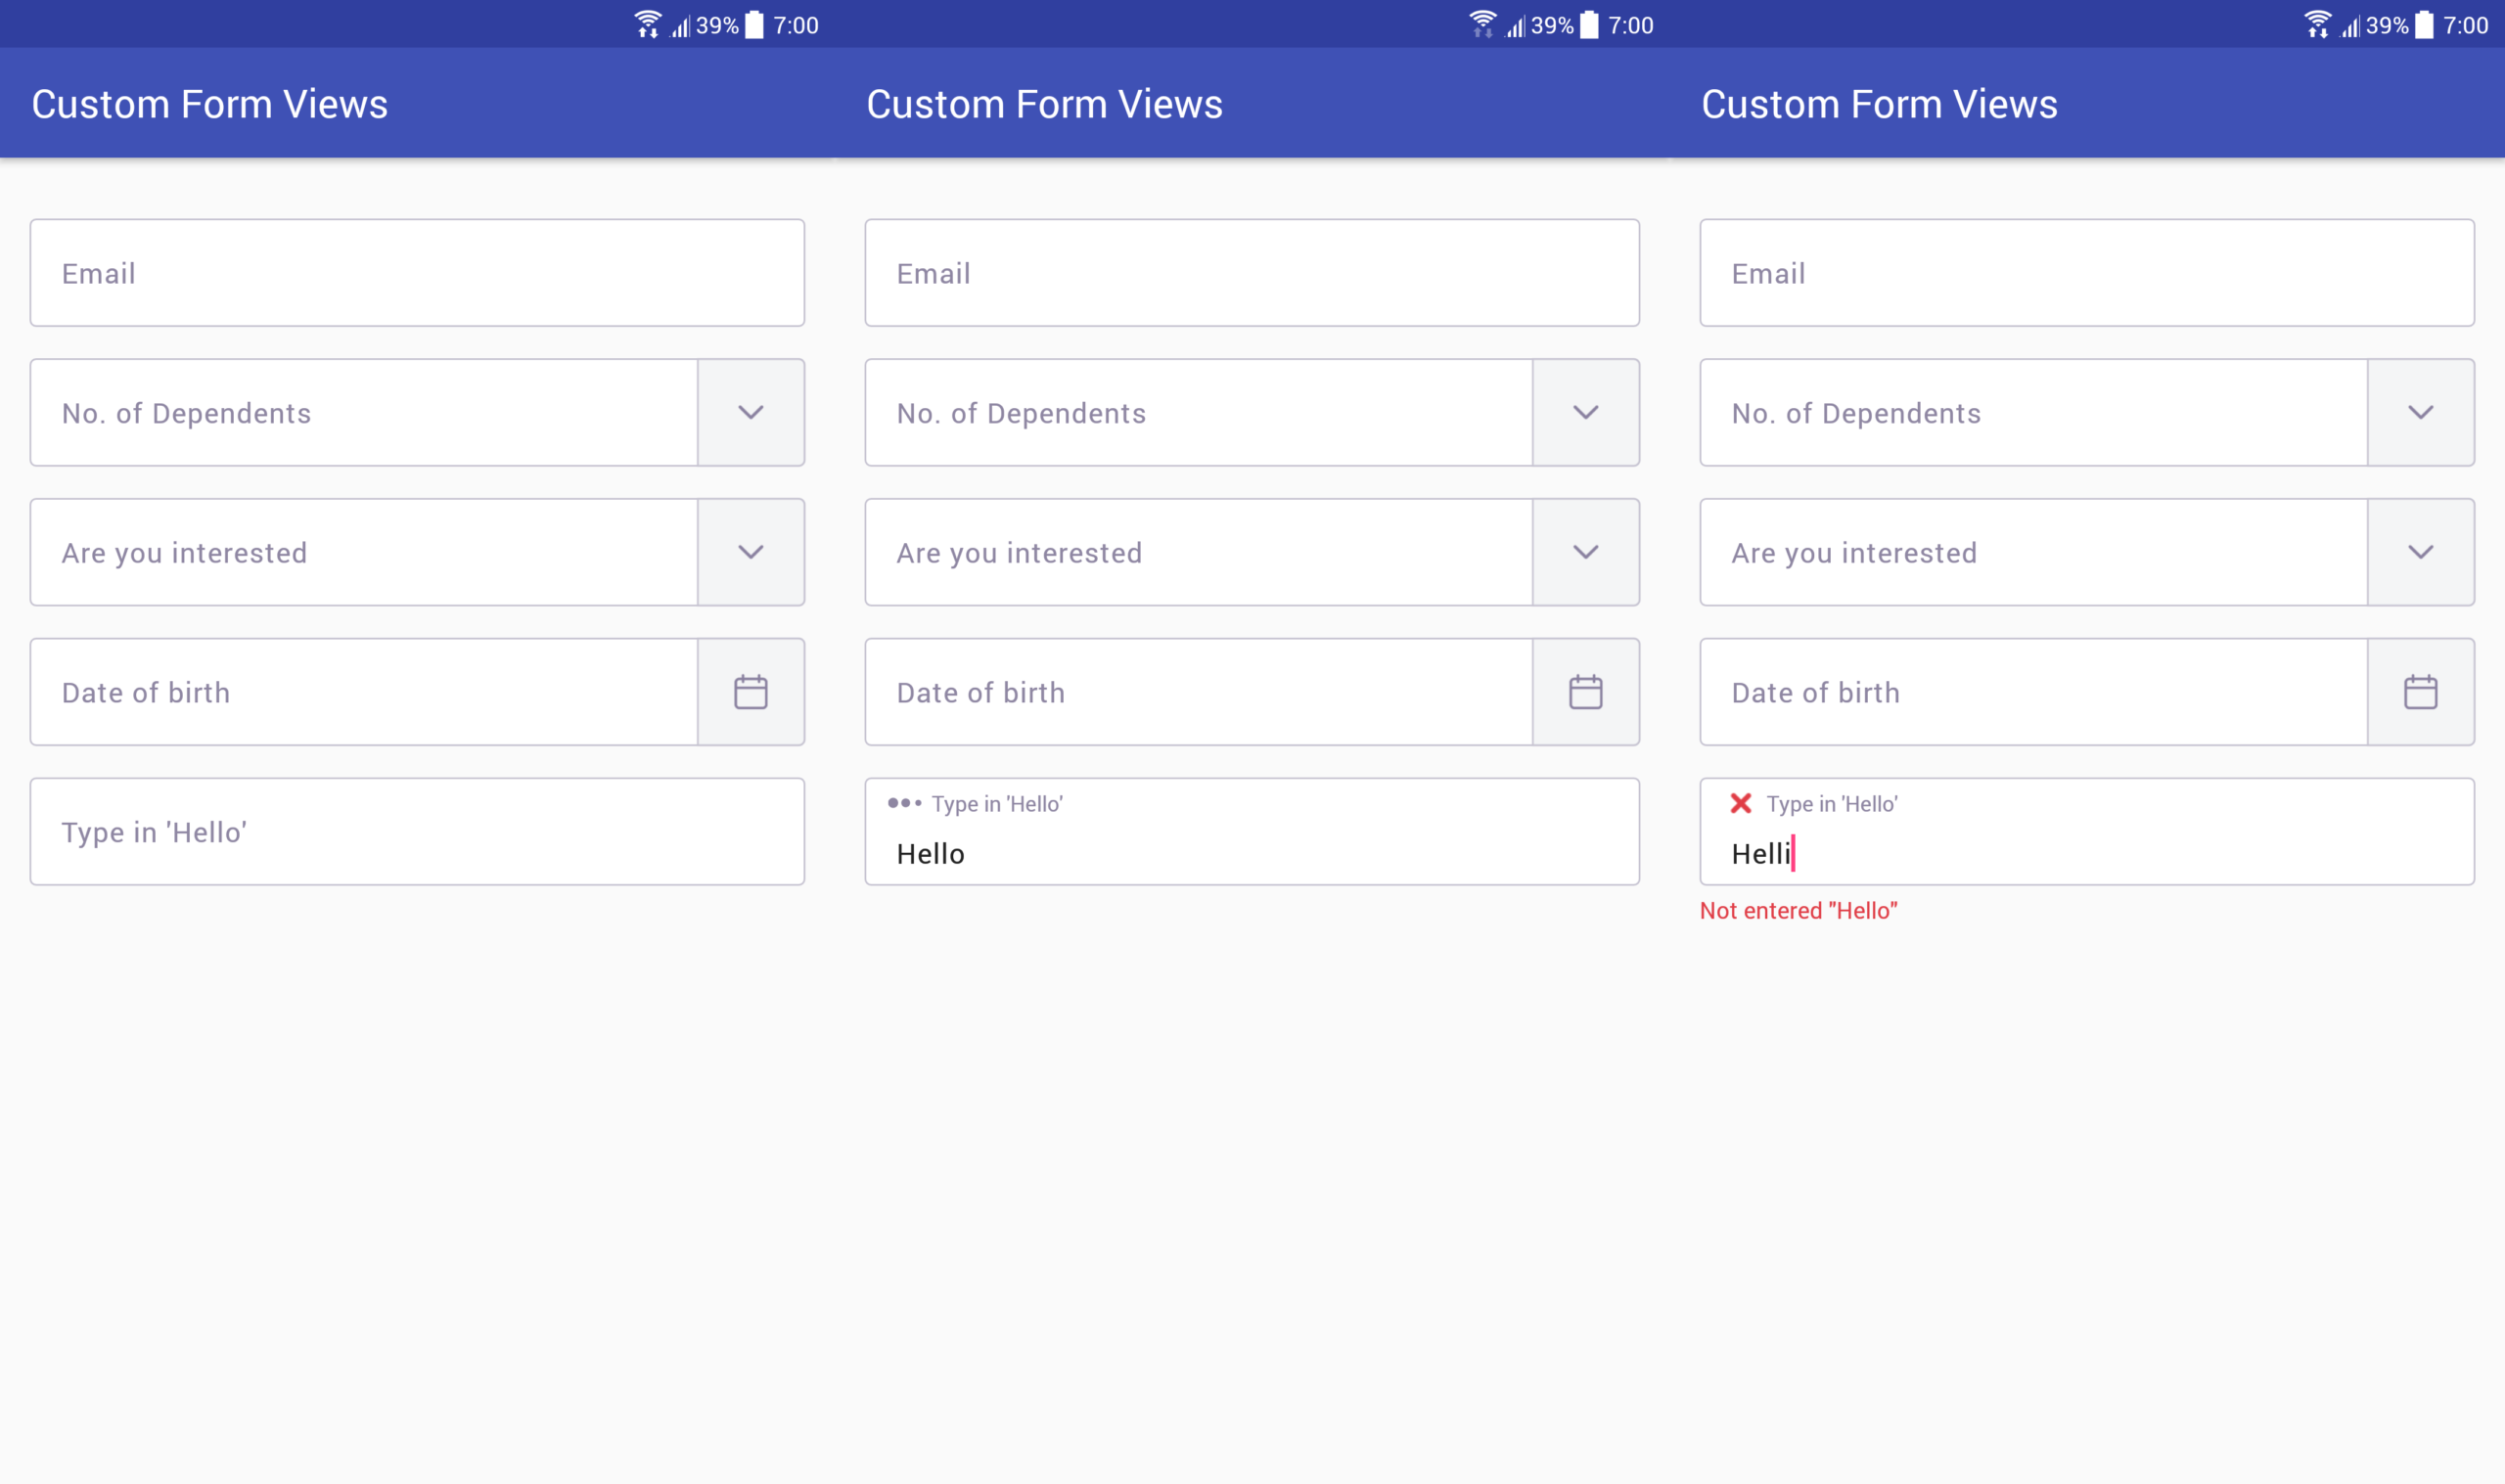
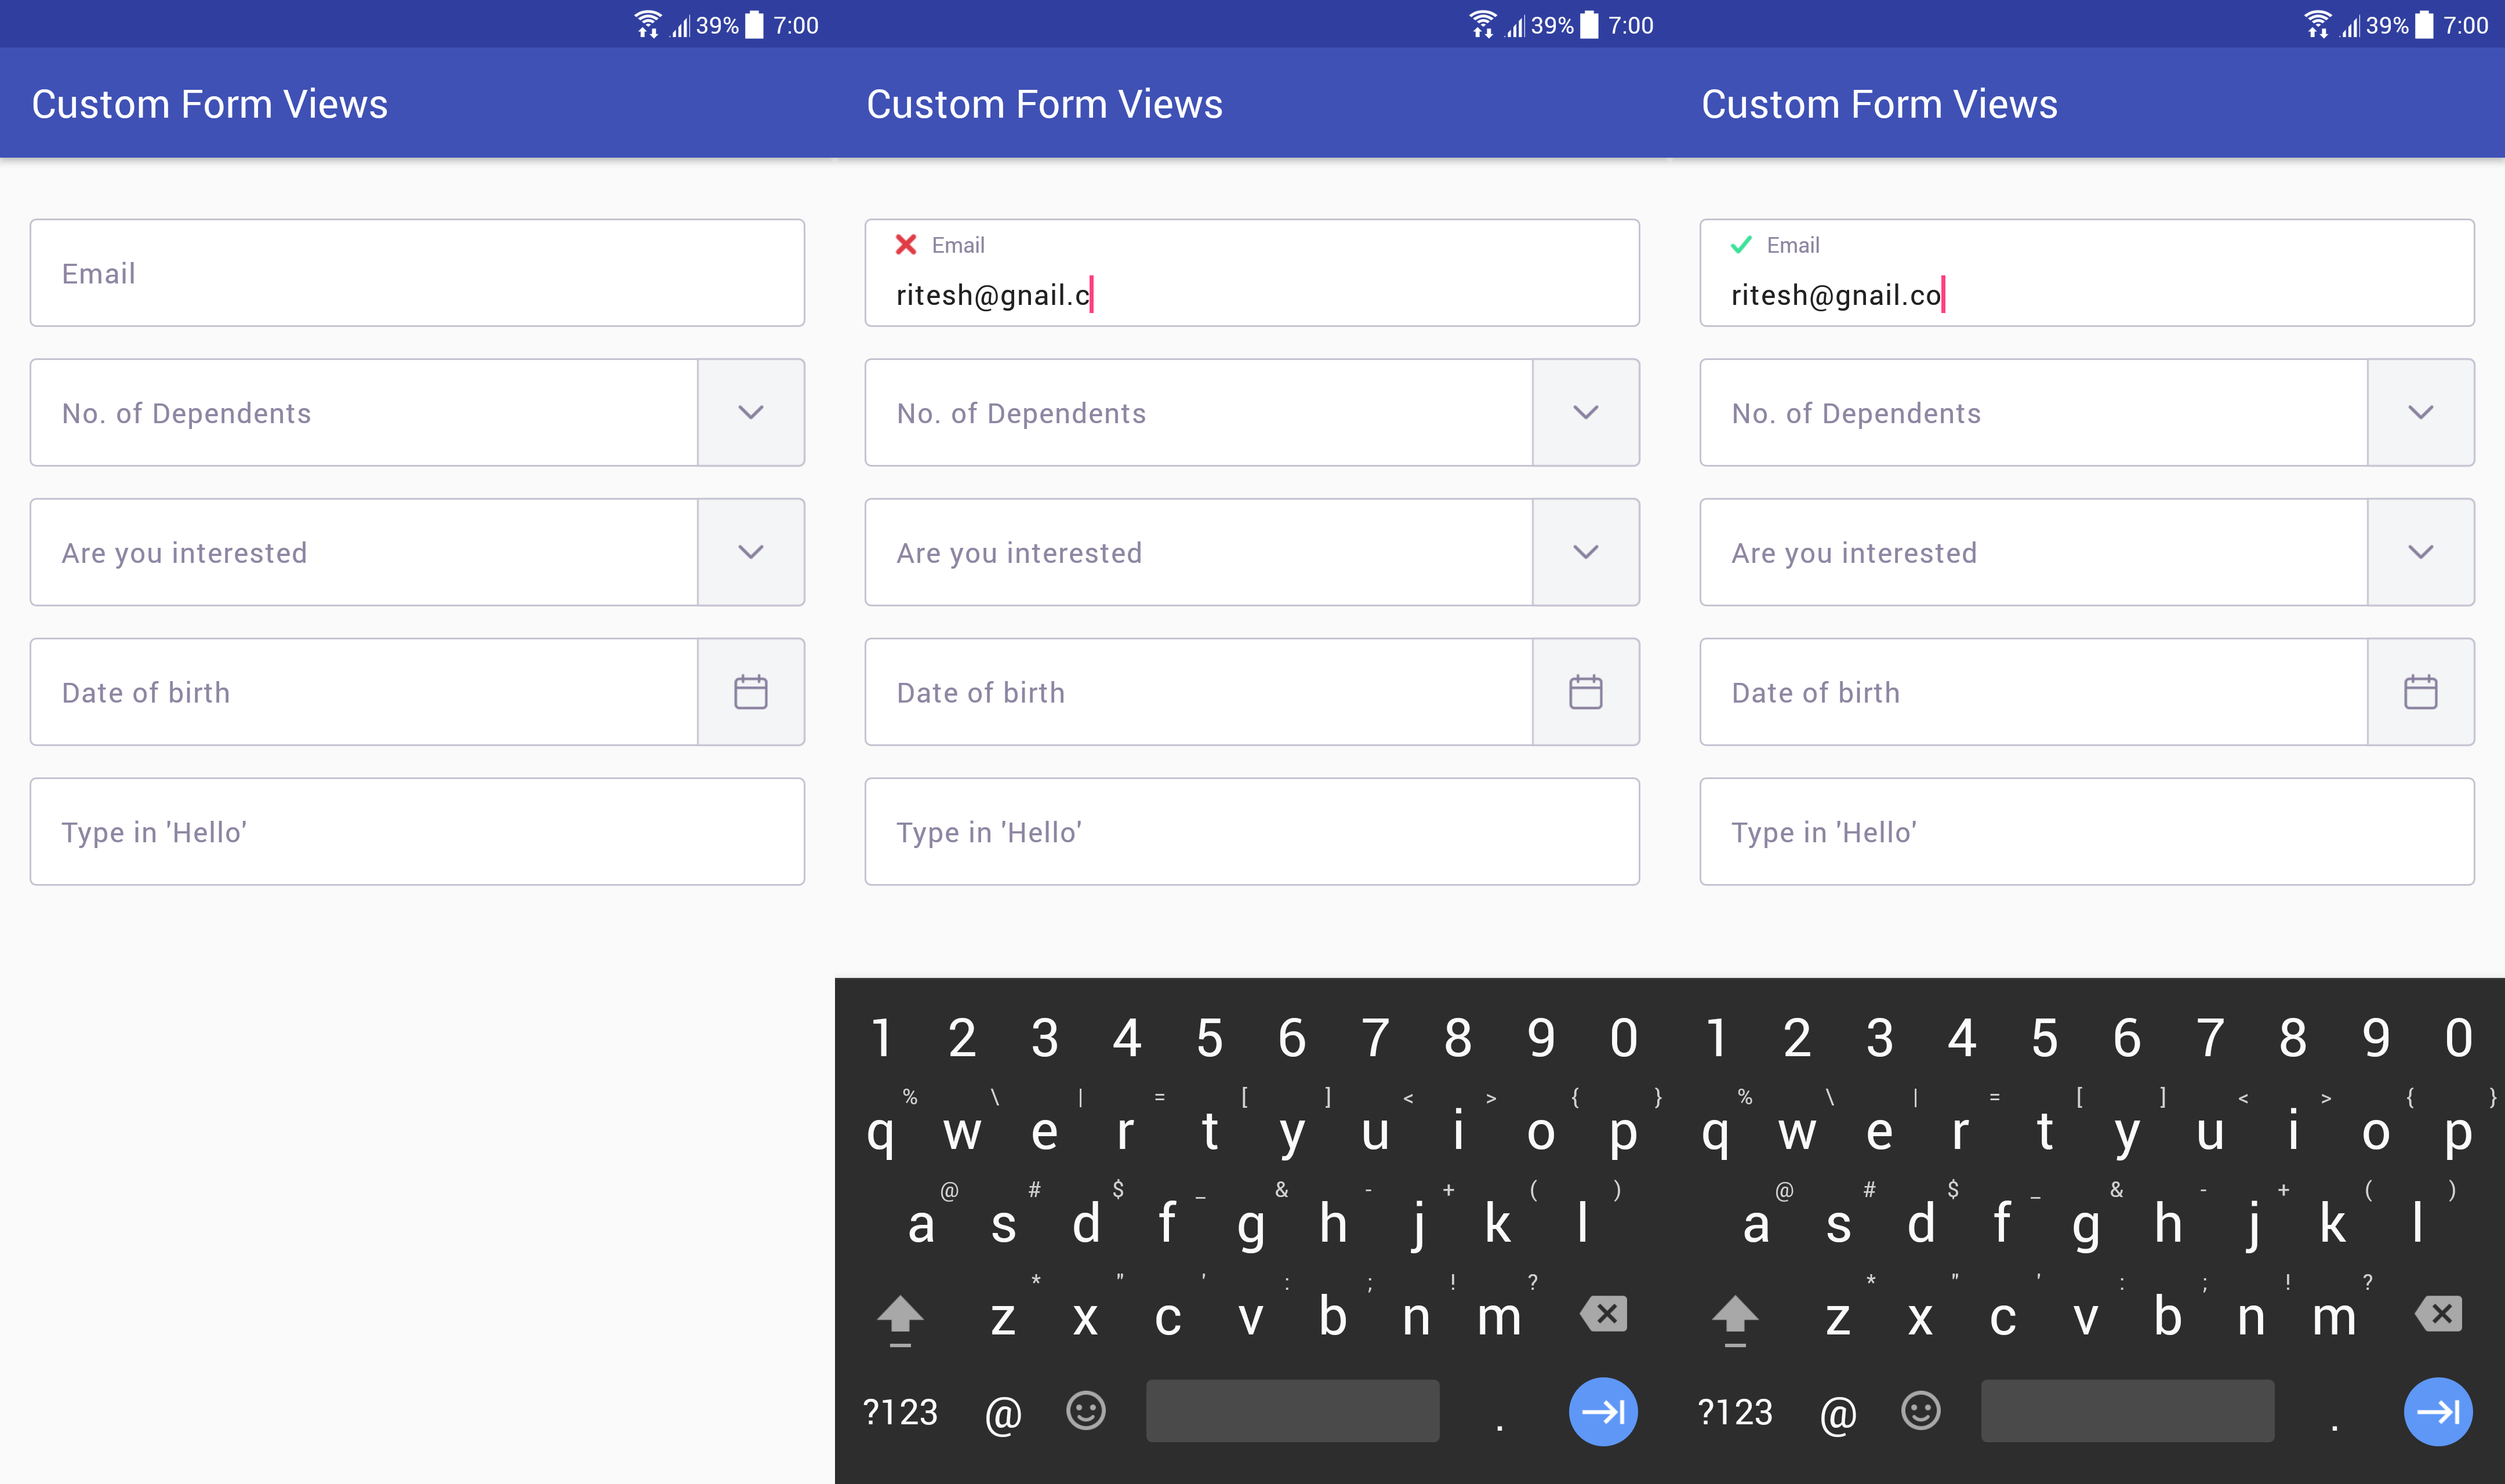
    Custom Text View

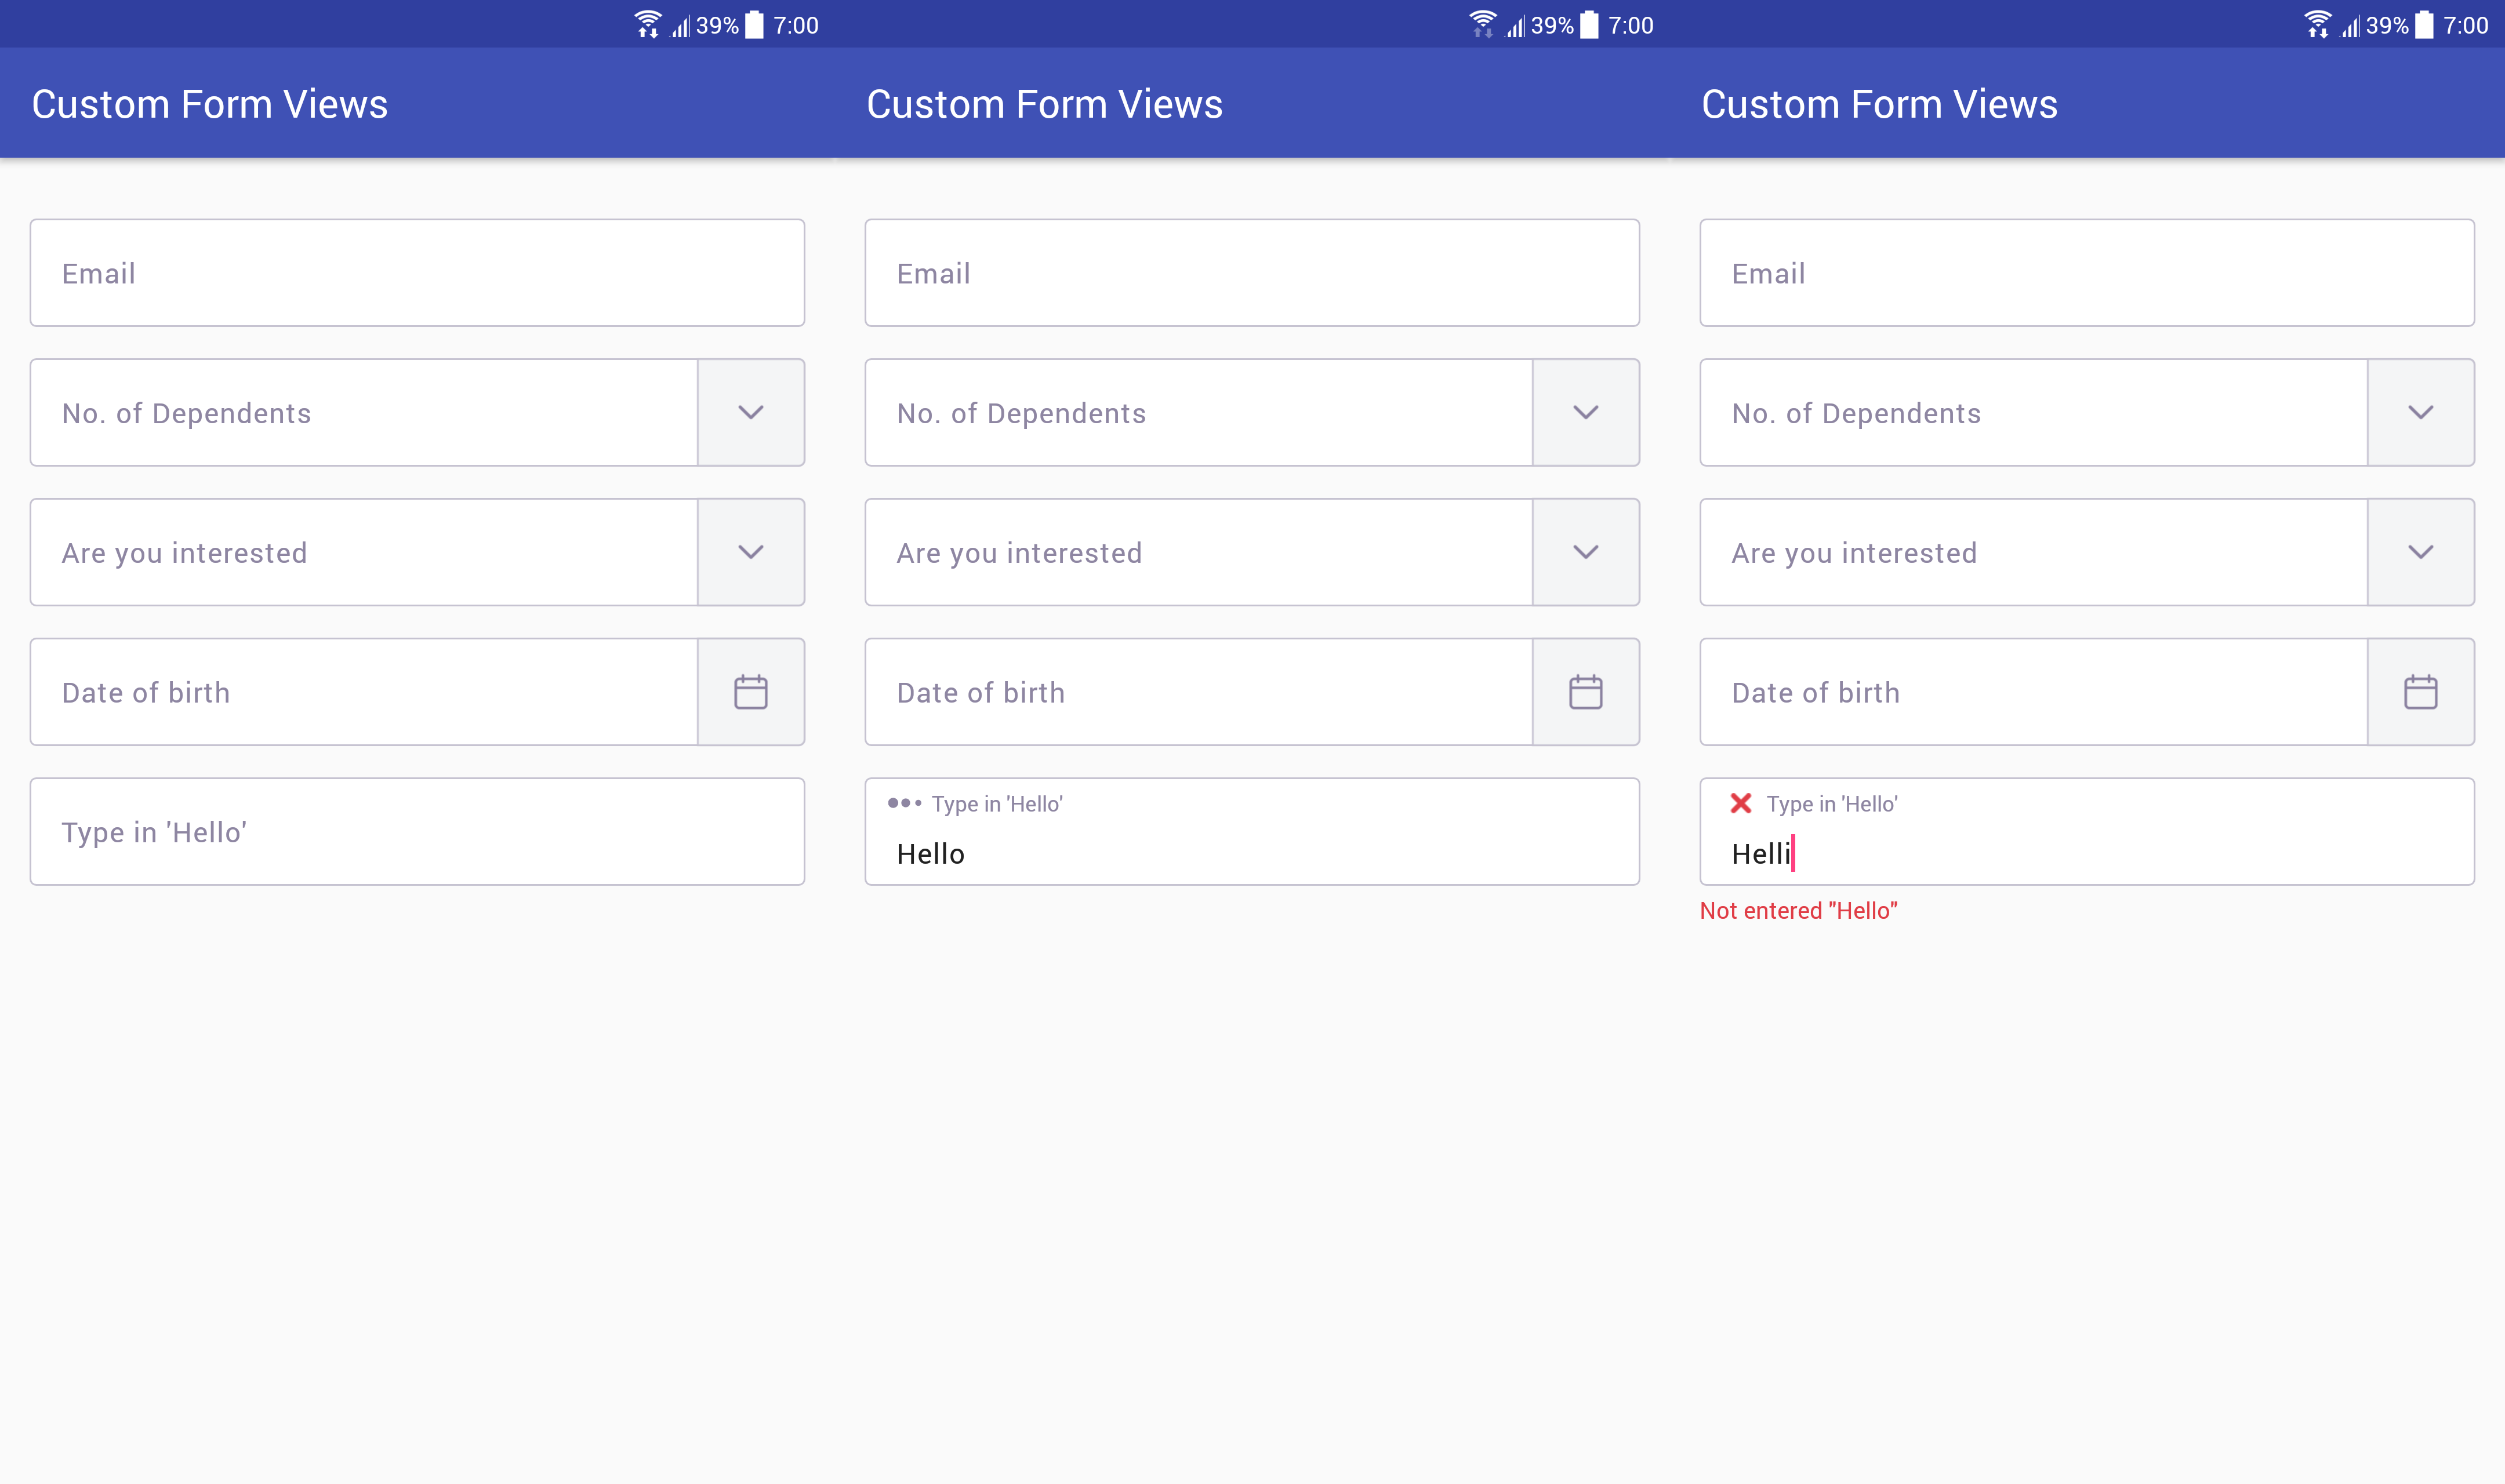
    Clean TextViews with validation callbacks providing for a clean and easy form validator.

    Also support for Asynchronous callbacks providing a loading animation while we can validate with server.

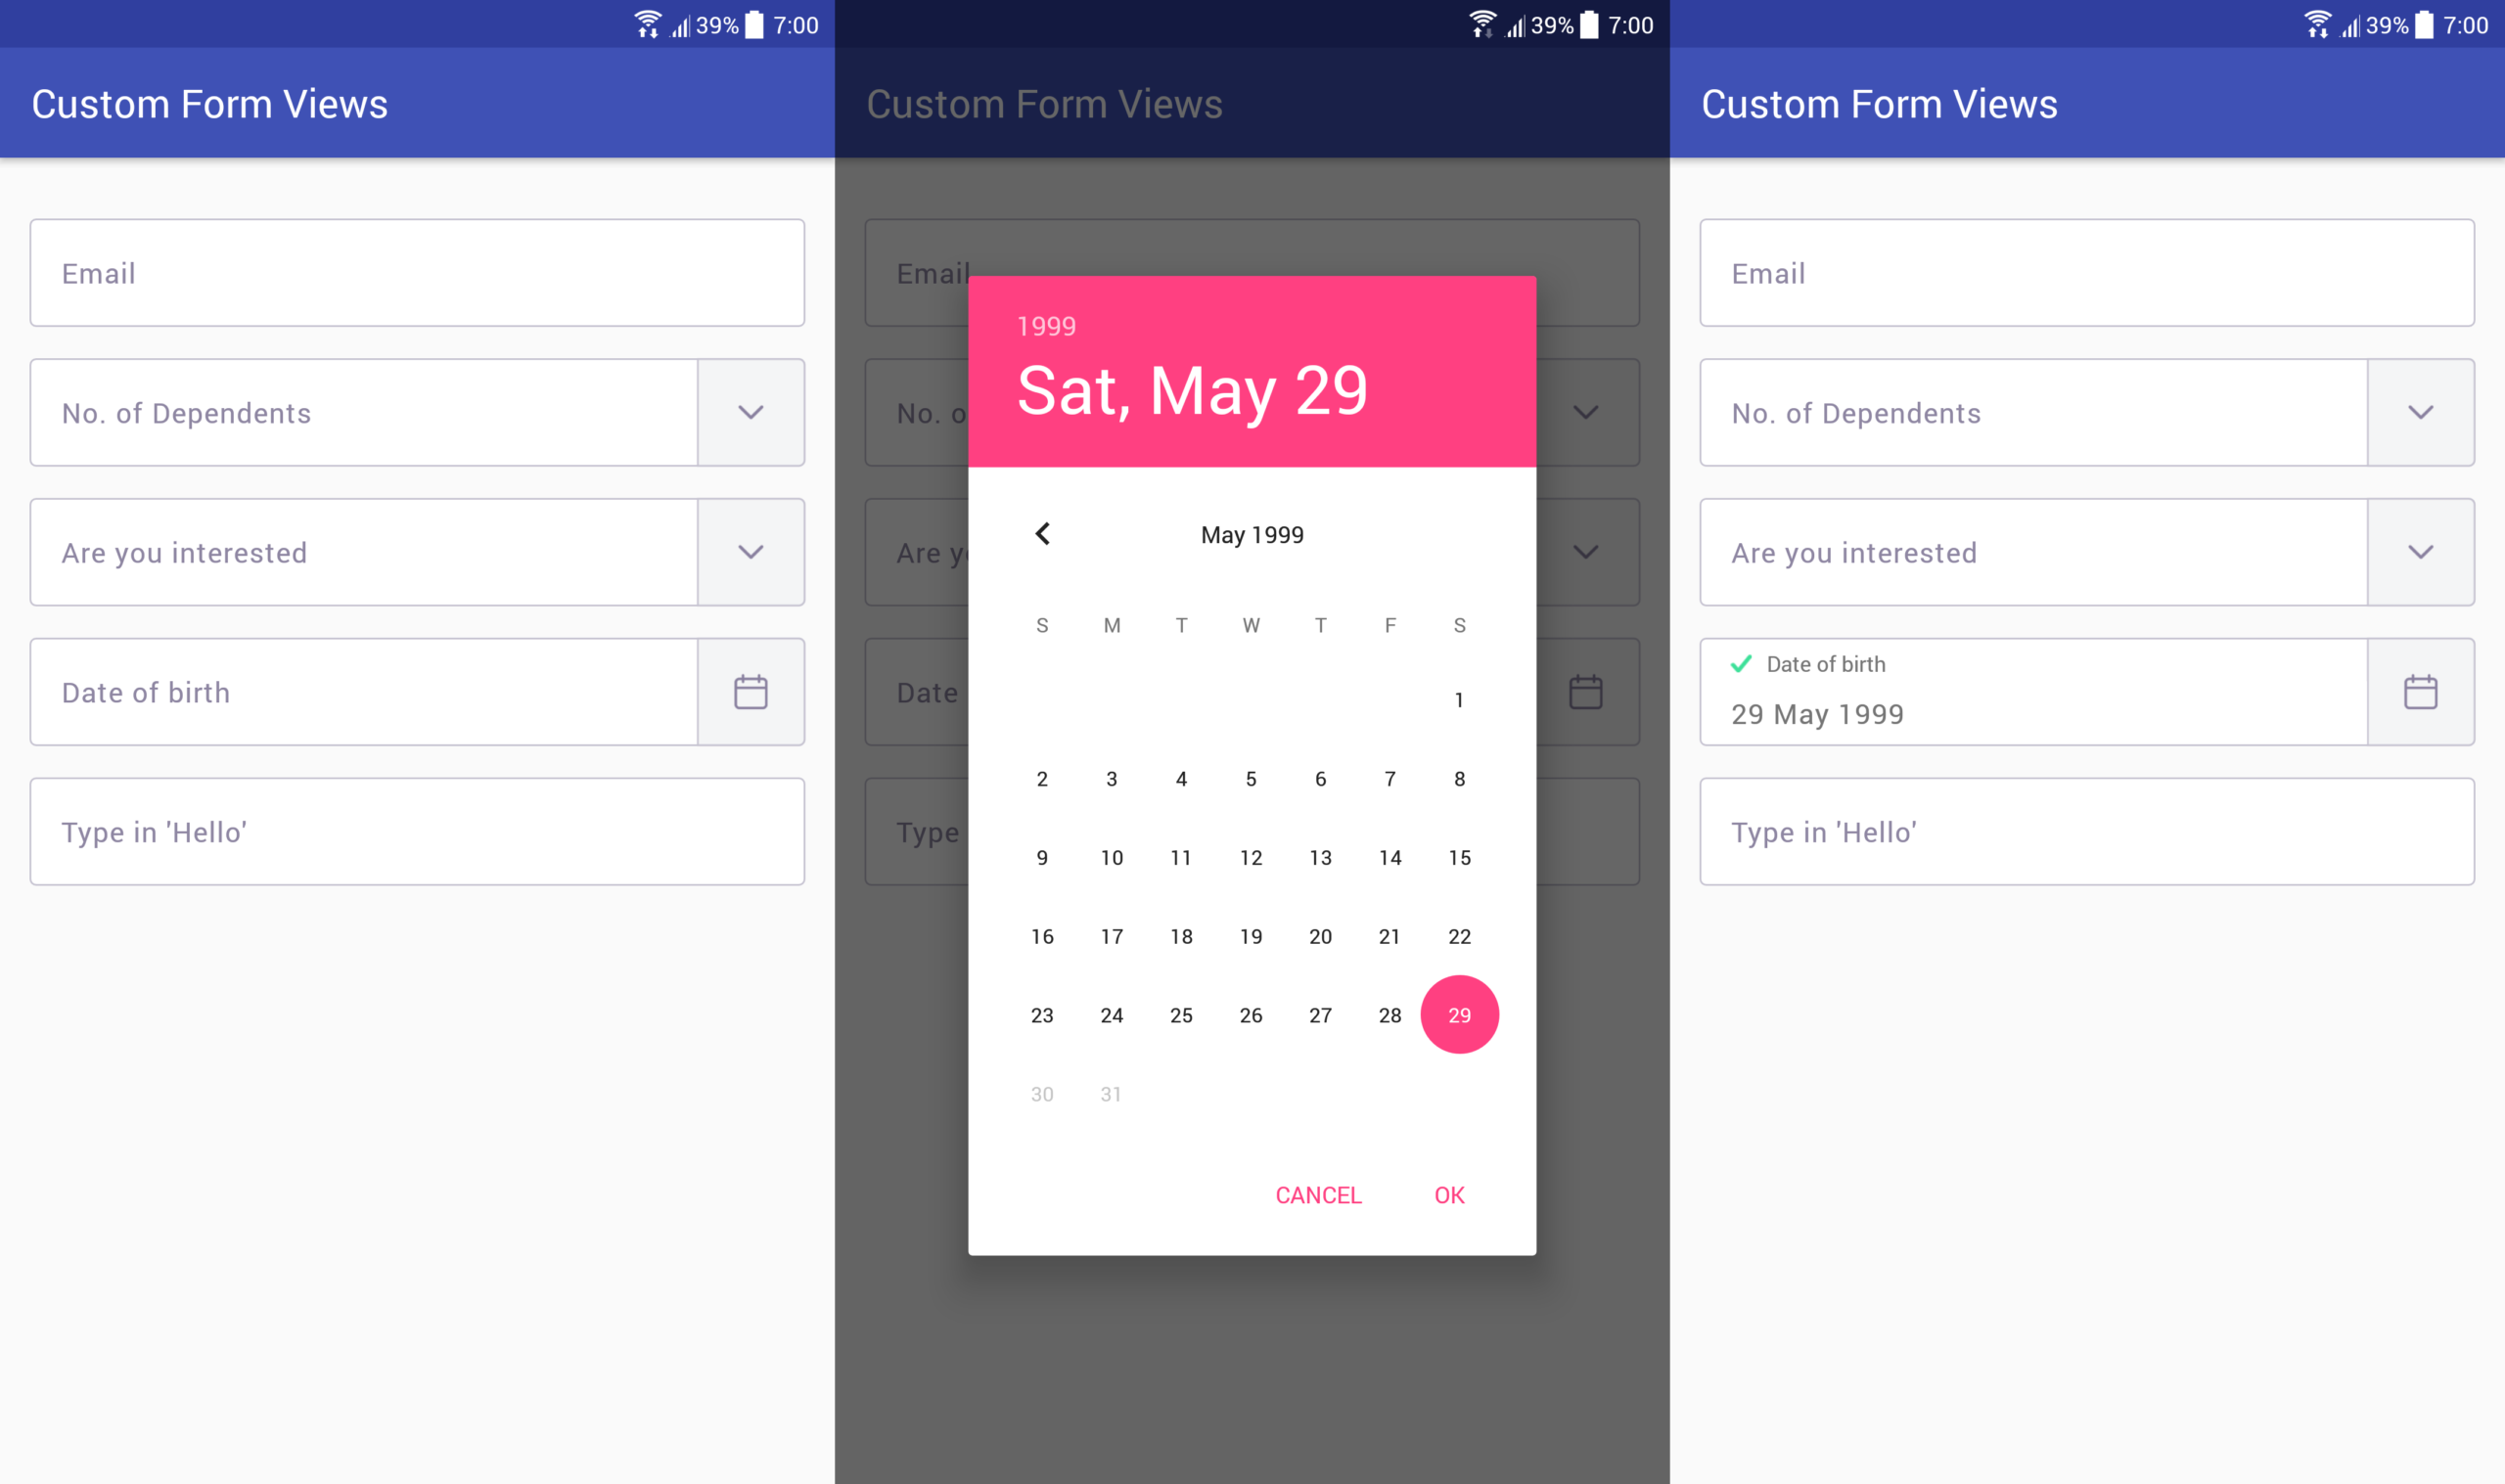
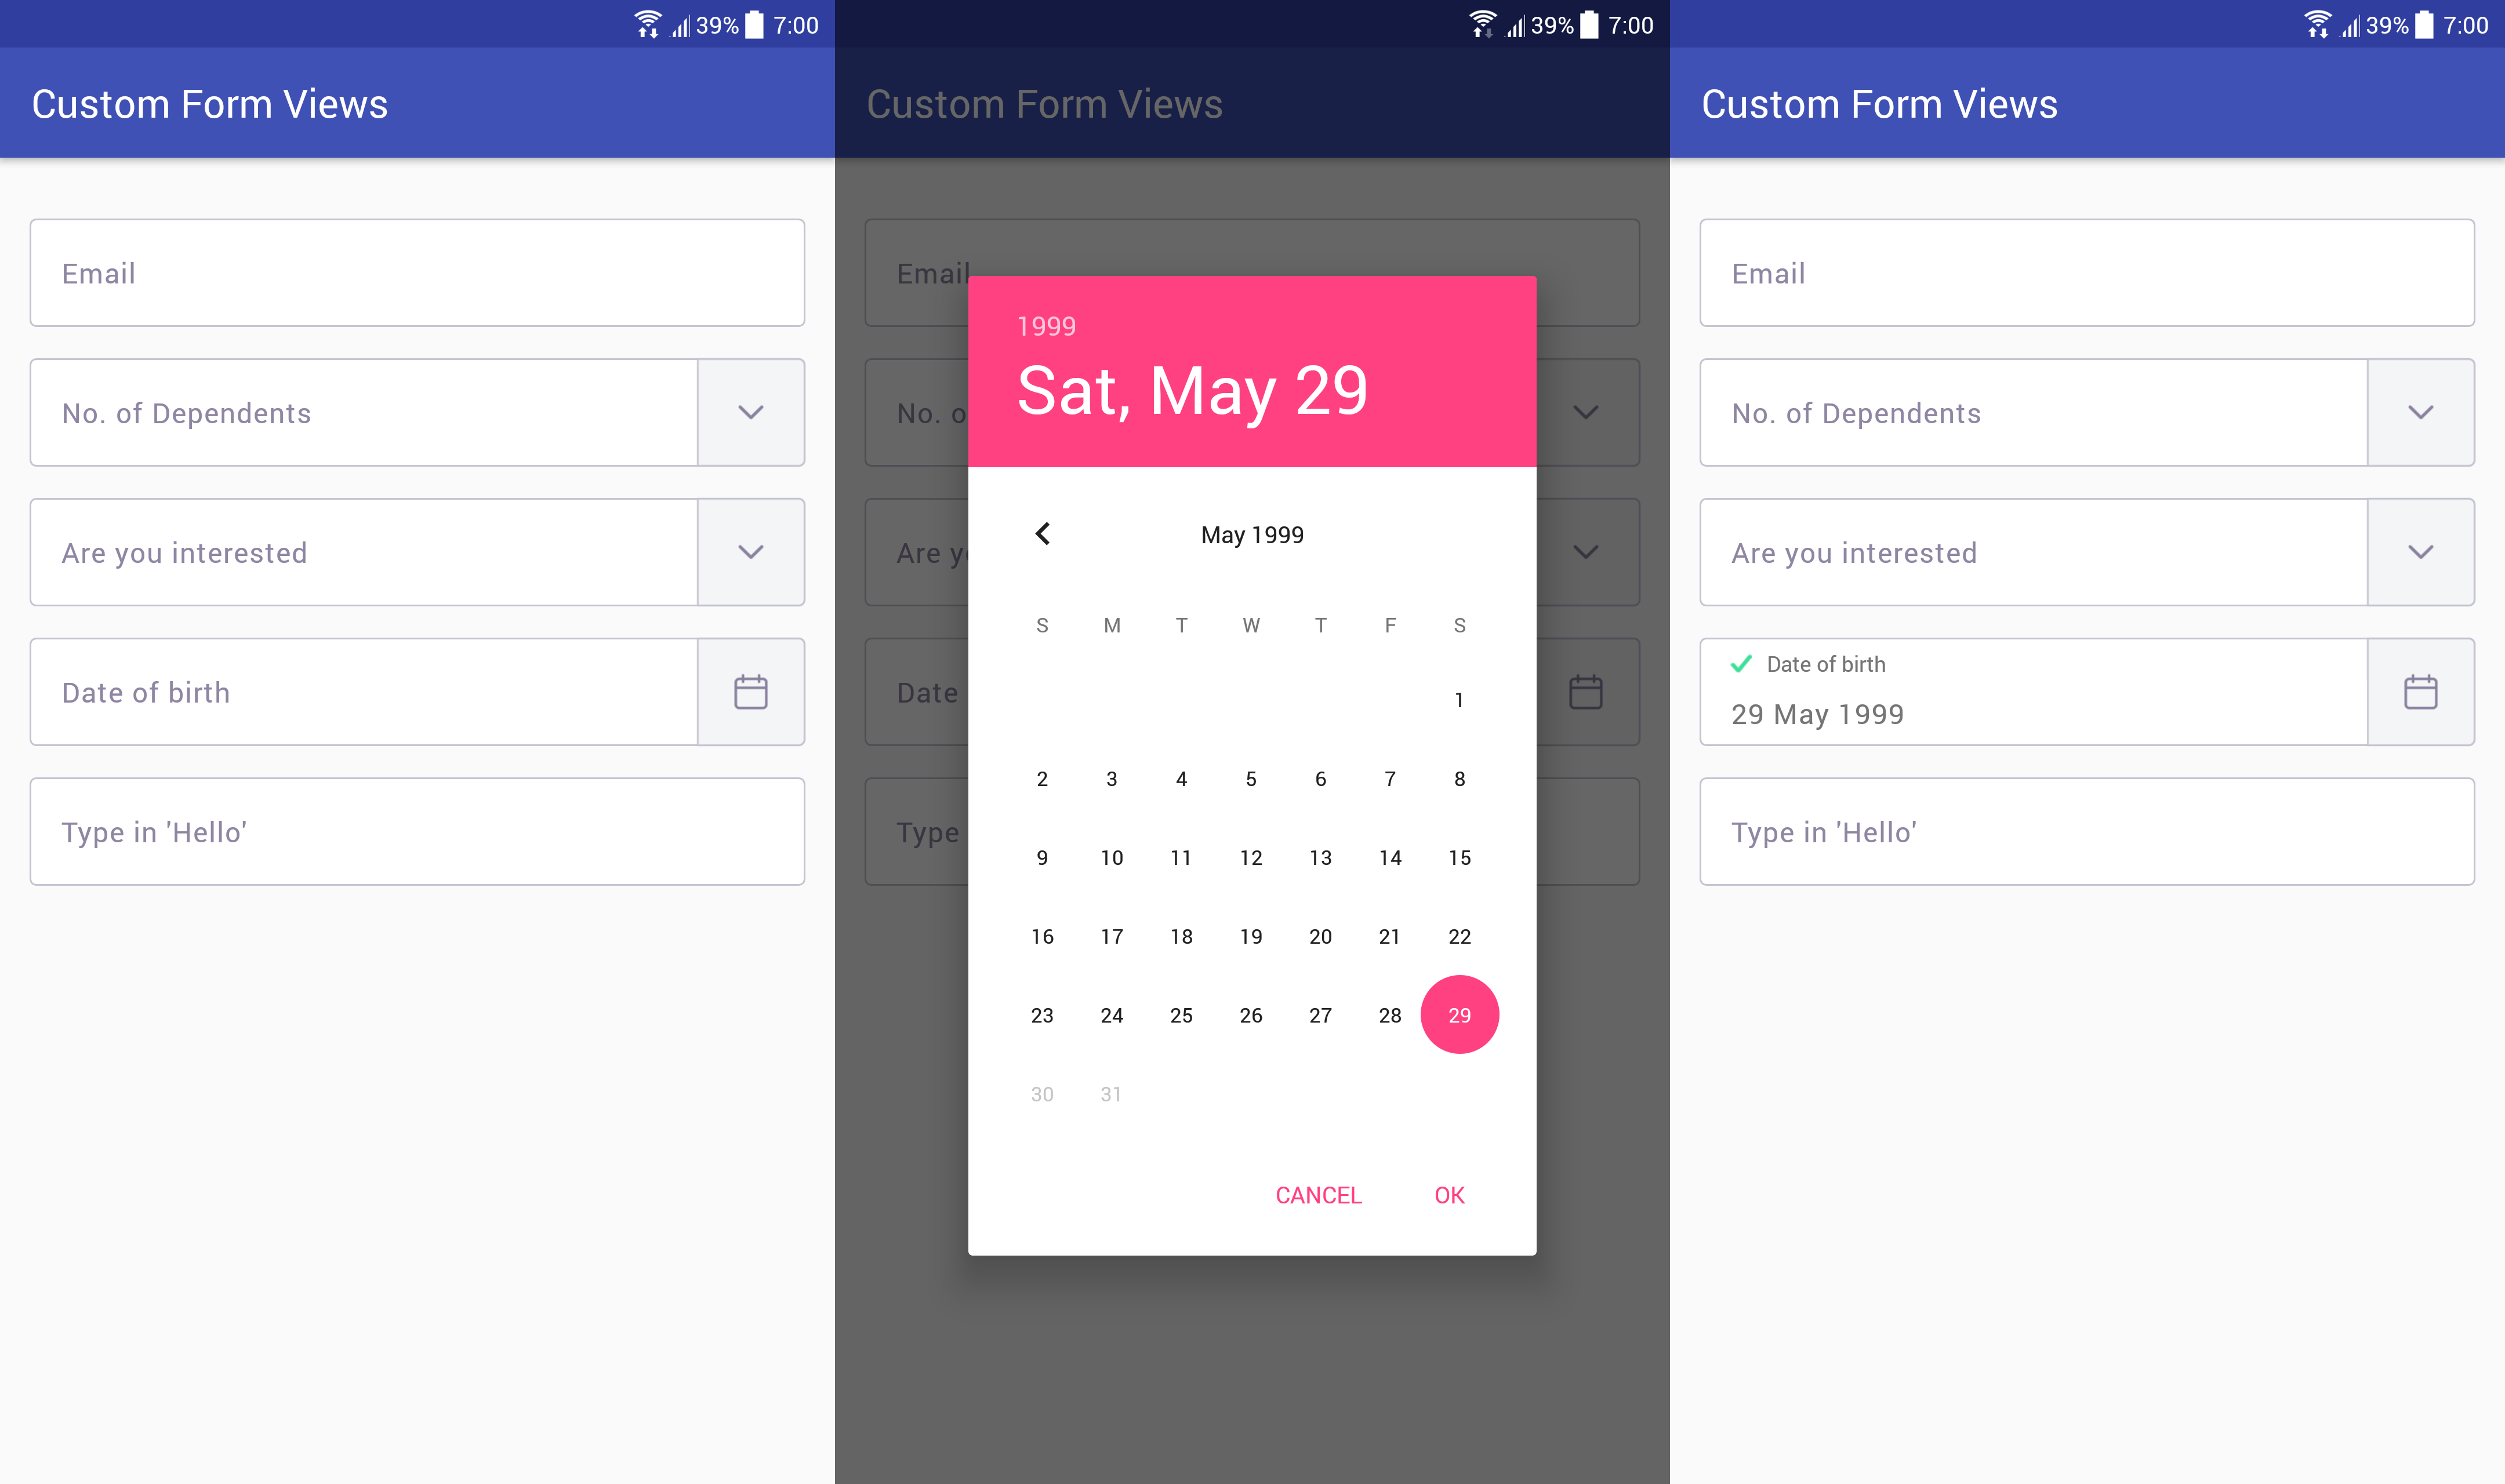
    Custom Date View

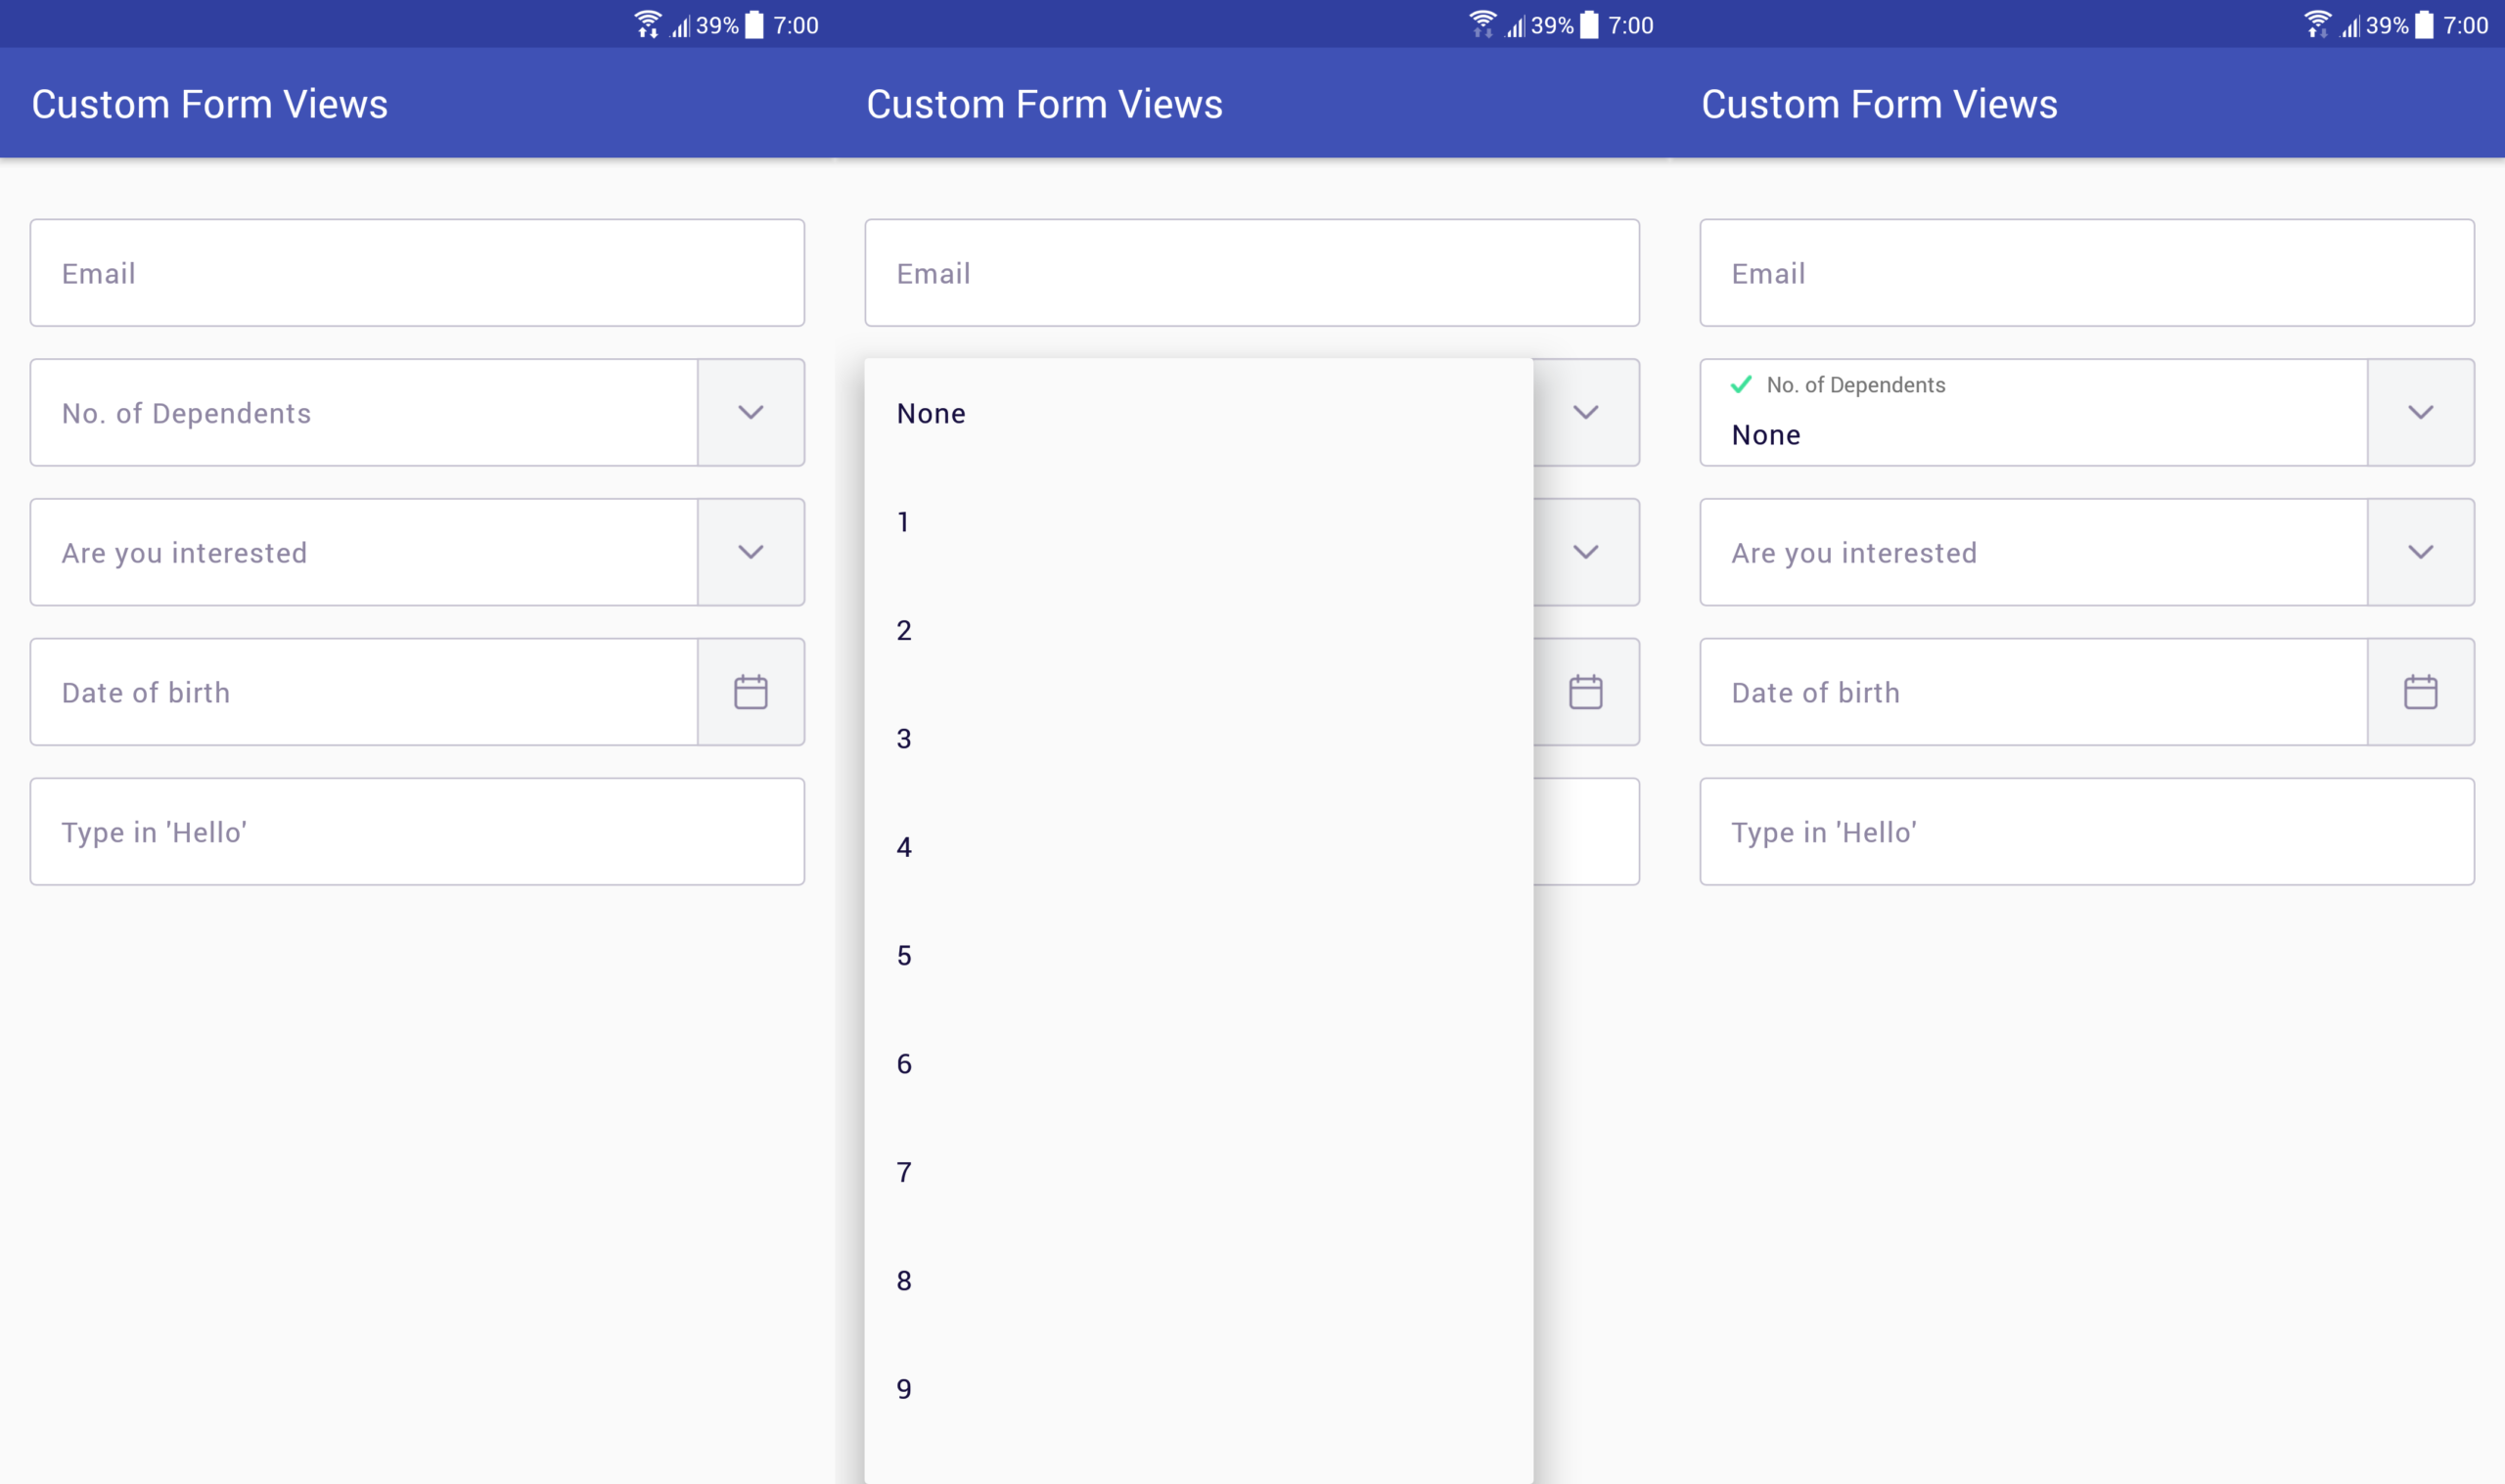
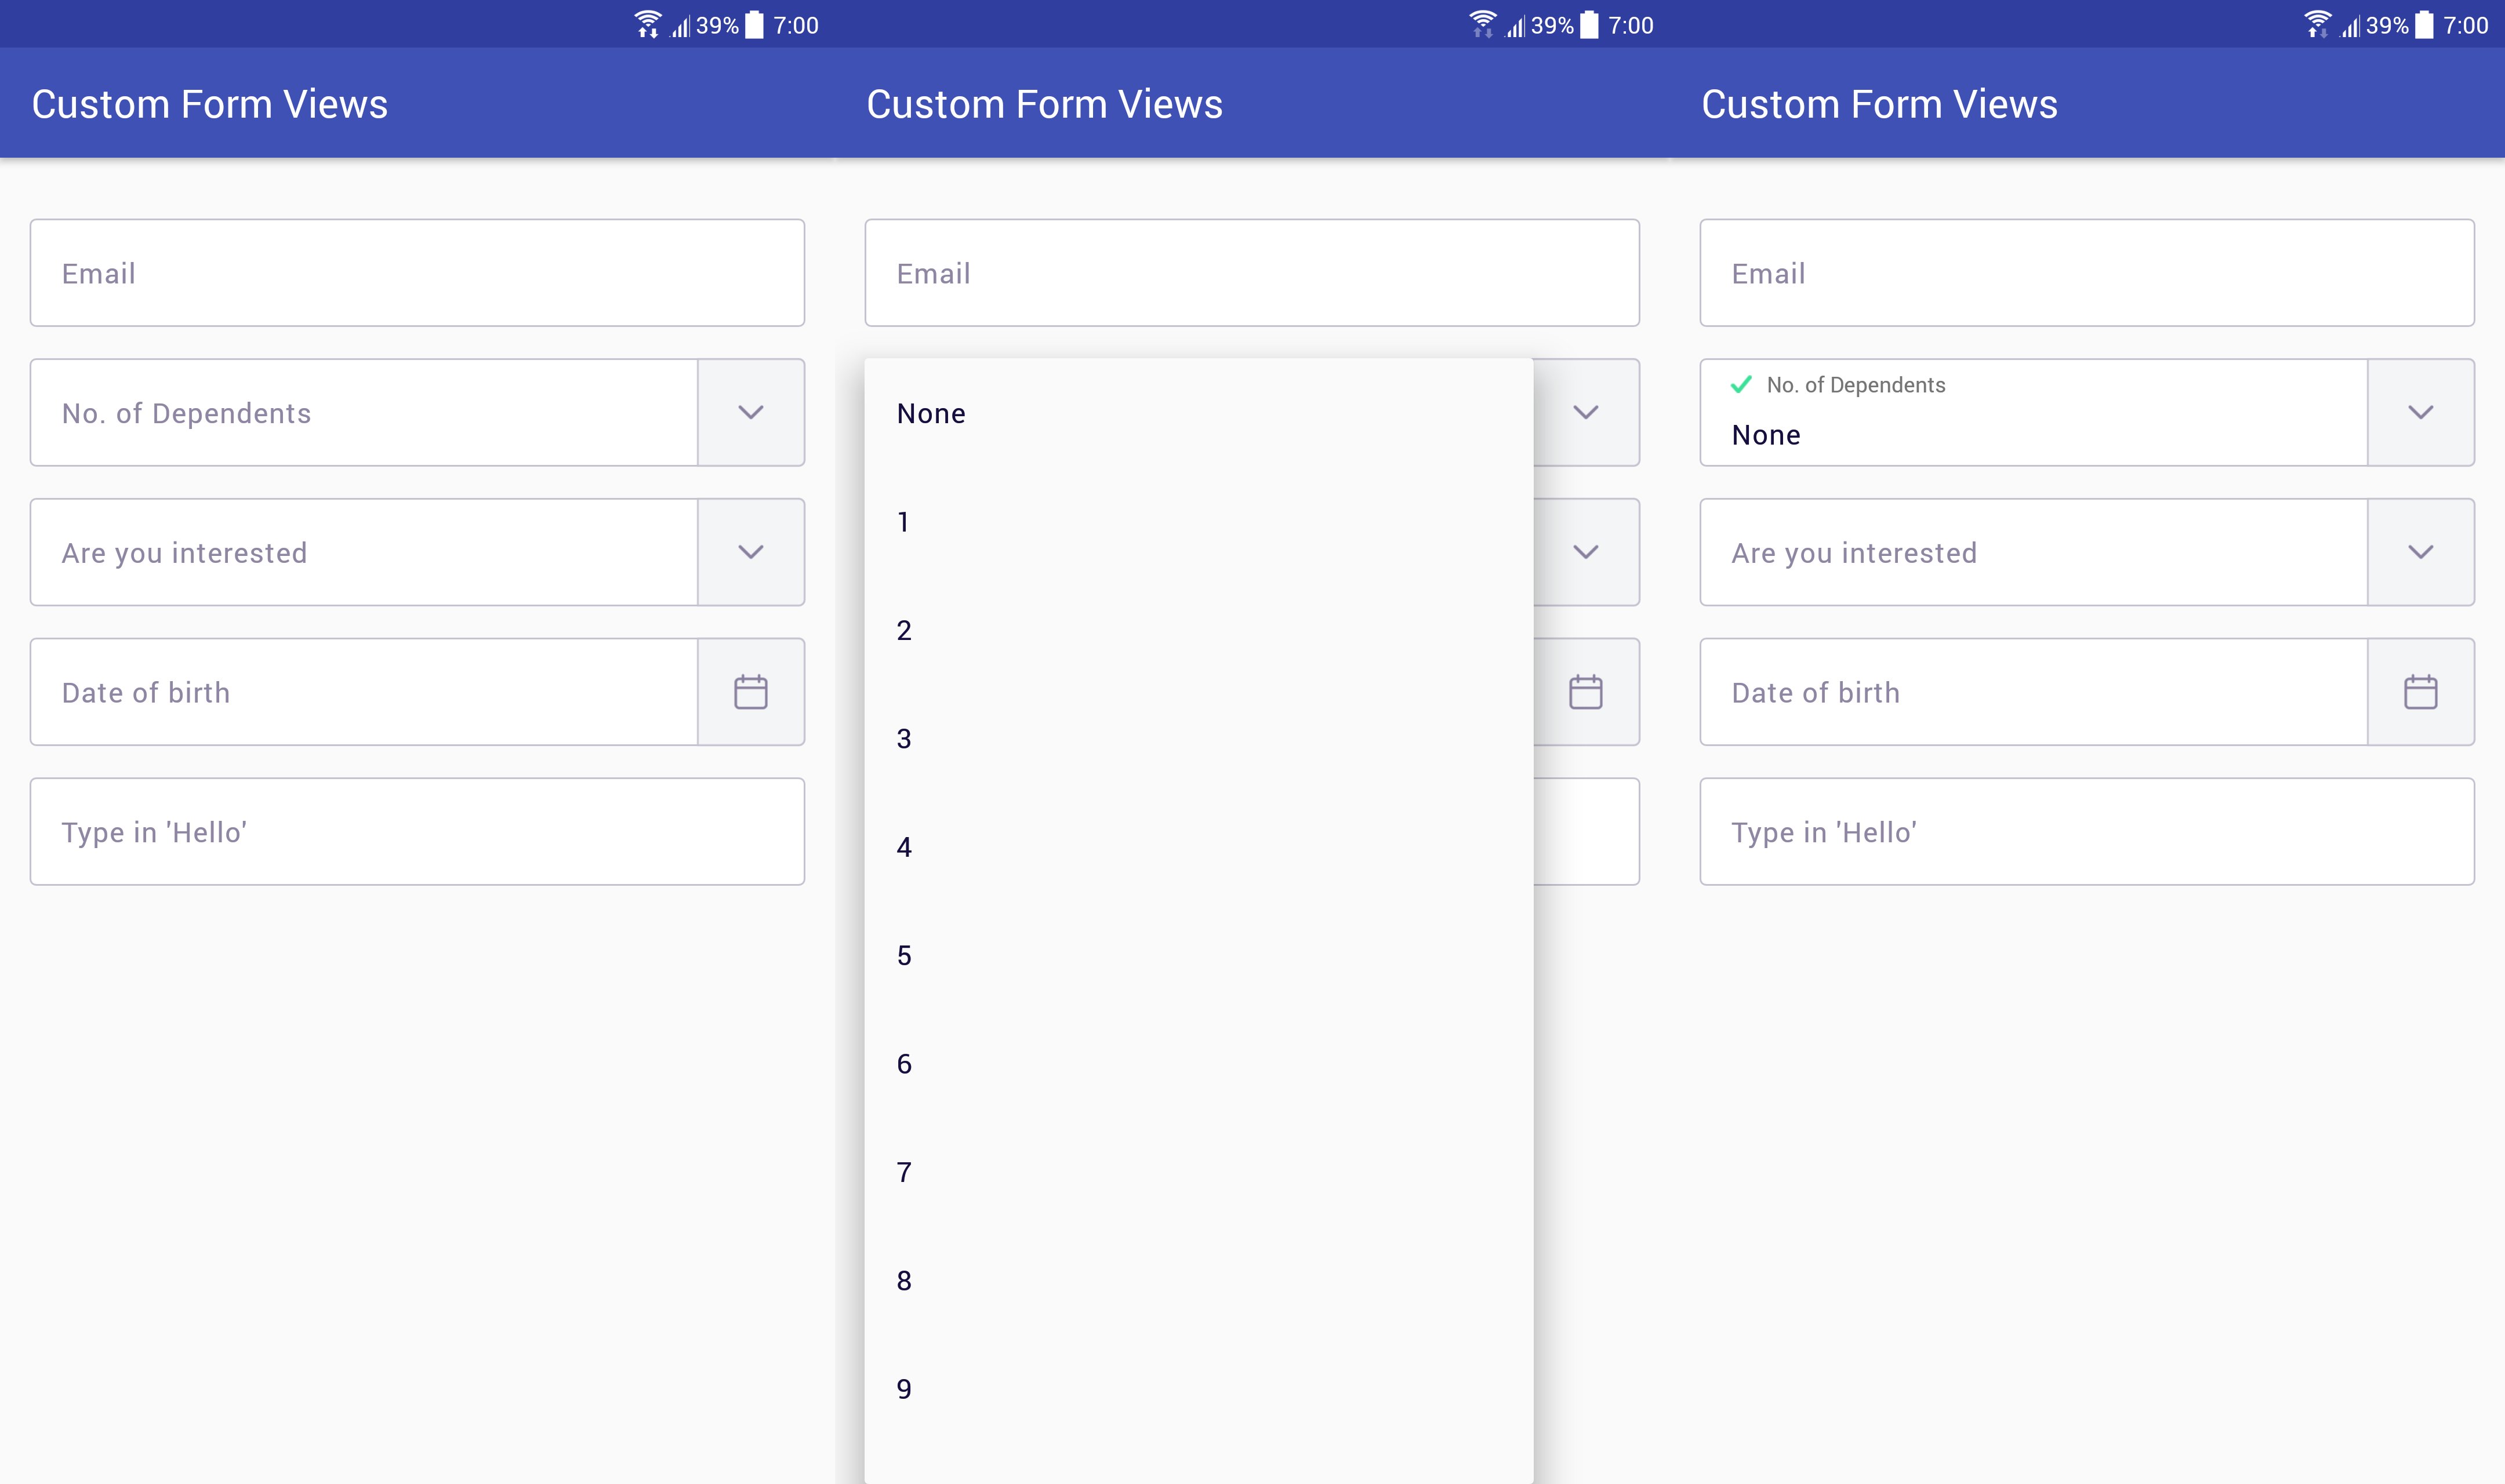
    Custom Spinner View

    Installation

    Gradle

    dependencies {
        compile 'com.ritesh:customfieldviews:1.3.1'
    }
    

    Feature

    • Clean look with support for asynchronous callbacks
    • Easy to implement

    Usage

    Define ‘app’ namespace on root view in your layout

    xmlns:app="http://schemas.android.com/apk/res-auto"

    Include this library in your layout

    <com.ritesh.customfieldviews.CustomTextView
                    android:id="@+id/activity_main_text_email"
                    android:layout_width="match_parent"
                    android:layout_height="wrap_content"
                    android:inputType="textEmailAddress"
                    app:editable="false"
                    app:hint="Email" />

    Supported Attributs

    XML Attribut View Supported in Description
    app:hint All Hint text that slides up as label.
    app:text CustomTextView Prefilled text.
    app:password CustomTextView Applies a monospace password field.
    app:editable CustomTextView Set Editable flag for TextView.
    android:inputType CustomTextView Sets teh input type of TextView.
    app:title CustomDateView Sets the title of DatePicker.
    android:entries CustomSpinnerView Set array resource to spinner.

    Please have a look at the sample project for further use cases.

    Future Works

    • Add support for customization
    • Add transition animations

    Libraries Used

    Contrbute

    • Fork the repo
    • create a branch
      git checkout -b my_branch
      
    • Add your changes
    • Commit your changes:
      git commit -am "Added some awesome stuff"
      
    • Push your branch:
      git push origin my_branch
      
    • Make a pull request to develop branch

    Changelog

    • 1.0.0 : Create library
    • 1.1.0 : Removed redundancy while initializing form views.
    • 1.2.0 : Added option to set minimum date to custom text view.
    • 1.3.1 : Removed redundancy while initializing callbacks.

    Contact me

    If you have a better idea or way on this project, please let me know, thanks 🙂

    Email

    License

    This project is licensed under the MIT License – see the LICENSE.md file for details

    Visit original content creator repository https://github.com/riteshakya037/CustomFormViews
  • CHDatePickerView

    CHDatePickerView

    目前支持简中、繁体、英文三种语言.

    内容支持年月日时分秒.也有12小时制的AM/PM

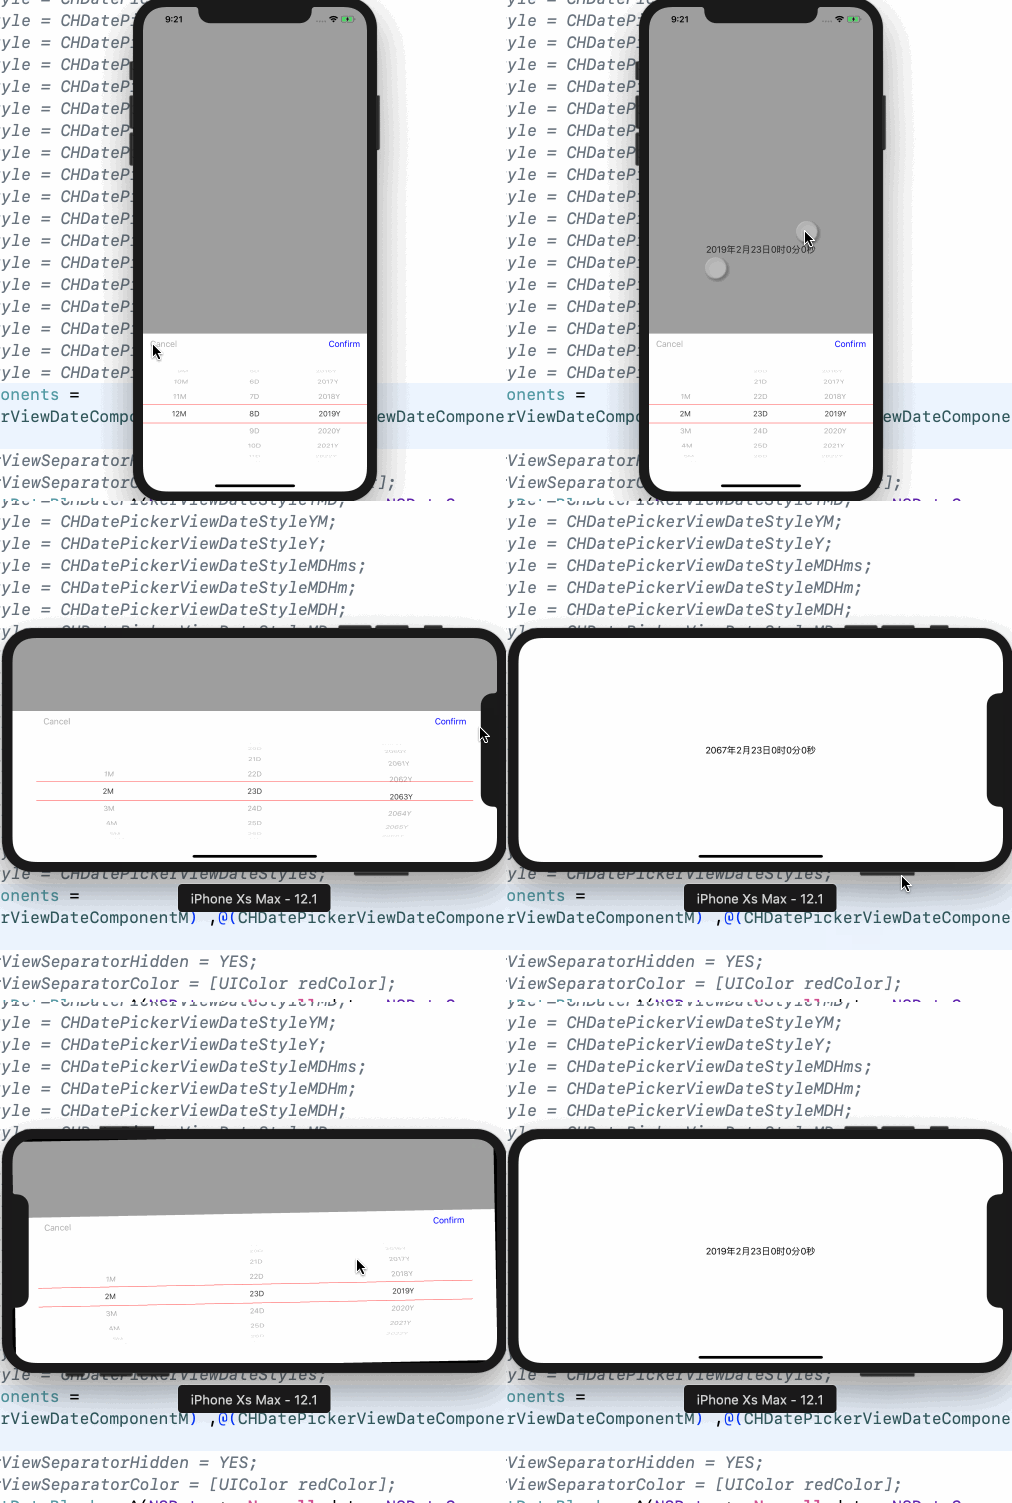
    效果

    默认为年月日

    手动设置样式.横屏/横竖屏切换支持

    0.0.6新样式

    调高了按钮背景以及row高度.以及按钮的默认大小,颜色是”自定义”的

    0.0.7新增AM/PM样式选择

    AM/PM为国际化的(如:中文的情况下显示的是上午/下午)

    0.0.8新增row上年月日调整(绿色的线是我设置的默认没有)

    CHDatePickerViewDateTextShowTypeAllRow(默认样式)

    CHDatePickerViewDateTextShowTypeNone

    CHDatePickerViewDateTextShowTypeSingleRow

    使用

    1.起调datePickerView

    CHDatePickerView *datePicker = [[CHDatePickerView alloc] init];	
    [datePicker show];
    

    2.datePickerView的显示组合设置

    datePicker.dateStyle = CHDatePickerViewDateStyleYMDHms;
    

    3.datePickerView的自定义显示组合设置

    /// 年月日时分秒的前后是根据dateComponents内的顺序决定的.
    datePicker.dateComponents = @[@(CHDatePickerViewDateComponentY) ,@(CHDatePickerViewDateComponentM) ,@(CHDatePickerViewDateComponentD) ,@(CHDatePickerViewDateComponentH) ,@(CHDatePickerViewDateComponentm) ,@(CHDatePickerViewDateComponents)];
    

    4.获取数据回调的两种方式

    // MARK: 1.block回调.
    datePicker.didSelectDateBlock = ^(NSDate * _Nonnull date, NSDateComponents * _Nonnull dateComponents) {
    
    };
        
    // MARK: 2.delegate回调.
    <CHDatePickerViewDelegate>
    - (void)datePickerViewDidSelectDate:(NSDate *)date dateComponents:(NSDateComponents *)dateComponents {
    
    }
    

    注意点: 1.使用block记得要__weak typeof(xx) weakXX = xx;以免循环引用. 2.dateComponents中有年月日时分秒属性,直接.xx调用. 3.如果要获取时间戳的话使用[date timeIntervalSince1970]即可获取.

    4.属性

    一些常用的属性我已经抛在外头了.
    
    // MARK: 0.0.1
    /// 按钮背景板
    @property (nonatomic ,strong) UIView *viewButtonBackground;
    
    /// 确认按钮
    @property (nonatomic ,strong) UIButton *buttonConfirm;
    
    /// 取消按钮
    @property (nonatomic ,strong) UIButton *buttonCancel;
    
    /// 字体大小
    @property (nonatomic ,strong) UIFont *textFont;
    
    /// 文字颜色
    @property (nonatomic ,strong) UIColor *textColor;
    
    // 默认的选中时间.默认为当前时间[NSDate date]
    @property (nonatomic, strong) NSDate *date;
    
    /// 允许选中的最小时间
    @property (nullable, nonatomic, strong) NSDate *minimumDate; // default is nil
    
    /// 允许选中的最大时间
    @property (nullable, nonatomic, strong) NSDate *maximumDate; // default is nil
    
    // MARK: 0.0.2
    /// 是否datePickerView显示分割线
    @property (nonatomic ,assign) BOOL pickerViewSeparatorHidden;
    
    /// datePickerView分割线颜色
    @property (nonatomic ,strong) UIColor *pickerViewSeparatorColor;
    
    // MARK: 0.0.3
    /// 允许tap手势使pickerView隐藏
    @property (nonatomic ,assign) BOOL allowTapToDissmiss;
    
    // MARK: 0.0.8
    /// row中间年月日显示方式
    @property (nonatomic ,assign) CHDatePickerViewDateTextShowType dateTextShowType;
    
    // MARK:SingleRow的字体(单行显示情况下可以设置这两个属性)
    @property (nonatomic ,strong) UIFont *singleRowTextFont;
    
    /// 文字颜色
    @property (nonatomic ,strong) UIColor *singleRowTextColor;


    如果想使用手动设置年月日可以使用NSDate+CHCategory内的方法

    NSDate *date = [NSDate ch_setYear:year month:month day:day hour:hour minute:minute second:second];
    

    安装

    使用 CocoaPods 集成. 首先在podfile中

    `pod ‘CHDatePickerView’

    安装一下pod

    #import <CHDatePickerView/CHDatePickerViewHeader.h>

    更新记录

    版本 更新内容
    0.2.0 支持iOS 13,不支持多窗口(multiple windows)
    0.1.0 修复最小日期设置的一个小BUG
    0.0.9 新增了一个标题,对于一些属性允许设置全局值
    0.0.8 新增三种显示”年月日时分秒”的样式,详情见上图
    0.0.7 新增12小时制的component,需要自组合的形式调用
    0.0.6 新增繁体中文支持.稍微调整了一下UI
    0.0.5 获取Bundle方式修正
    0.0.4 修复本地化语言bundle不能读取的问题
    0.0.3 直接.date设置日期未实现的BUG,0.0.3以下版本建议使用setDate: animated:方法
    0.0.2 修复iPhoneX横屏布局遮挡问题(PS:最开始写的时候没考虑到横屏).新增一个设置分割线的属性
    0.0.1 解决了一些bug,目前可以直接使用.
    Visit original content creator repository https://github.com/MeteoriteMan/CHDatePickerView