Blog

  • spell-fr.vim

    Fichiers Hunspell pour le français pour la correction orthographique avec Vim/NeoVim) et pour l’analyse morphologique.

    Le makefile permet de produire deux versions des fichiers .aff et .dic:

    • Une version compatible avec Vim, simplifiée et peu intéressante pour l’analyse morphologique.
    • Une version complète, contenant les informations morphologiques complètes des mots, avec les part-of-speech conformes à ceux définis par Universal Dependencies, mais incompatible avec Vim. (Pour l’analyse morphologique basée sur les Universal Features (temps verbaux, nombre, genre, etc.), on pourra utiliser le fichier feats_lookups.tsv.)

    # Pour installer la version compatible avec Vim
    # (par défaut dans ~/.config/nvim/spell et ~/.vim/spell, s'ils existent)
    make install-vim
    
    # Pour les versions complètes
    # (par default sous /usr/share/hunspell/)
    make install-hunspell # Requière probablement `sudo`
    
    # Pour changer le lieu d'installation:
    make install-vim VIMDIR=~/.vim NVIMDIR=~/.neovim/
    make install-hunspell HUNDIR=~/.local/hunspell

    Différences avec le dictionnaire orthographique français par défaut de Vim

    • Ne s’occupe que d’orthographe, et pas de grammaire: une forme comme “j’arrivons” ne sera pas identifiée comme incorrecte, car elle n’est pas dysorthographique (seulement agrammaticale) et qu’il n’y a donc pas de raison qu’elle soit traitée différemment de “je partons” (que Vim ne remarquera pas comme agrammatical, puisque la fonction spell de Vim ne s’occupe pas de grammaire mais uniquement d’orthographe).
    • Par conséquent, les apostrophes et traits d’unions ne sont pas considérés dans cette version comme des WORDCHARS mais comme des word boundaries.
    • Écriture inclusive: auteur·rice, auteurice, auteuricex, … (Le stemma des mots féminins ou masculins est la forme inclusive.)
    • Les mots contenant des ligatures œ et æ sont doublées de leurs versions non-ligaturées (ex. “oeuvre”).
    • Aucun nom propre par défaut.

    Formats d’écriture inclusive

    L’écriture inclusive n’est supportée, dans Vim, qu’avec le point médian et le point standard. Les formes réalisées avec un tiret ne sont pas soulignées comme fausses, mais sont analysées comme des mots composés, et ne sont par conséquent pas vérifiées (auteur-euse-s-euse ne sera par exemple pas reconnu comme dysorthographique). Pour l’analyse morphologique avec Hunspell, les formes avec le tirets sont correctement analysées (Vim ne supporte pas ICONV, utilisée pour les points standards).

    Mots composés

    Il n’y a pas de vérification des mots composés dans Vim (pour éviter des faux positifs).
    Mais l’analyse morphologique avec Hunspell les prends en compte, de façons assez sommaire, selon les formes suivantes (sans trait d’union):

    • préfixe adverbial + nom (paralittérature)
    • préfixe adverbial + adjectif (épigénétique)

    Sources

    J’ai utilisé comme base le dictionnaire de Grammalecte tel qu’il est proposée dans le package Debian hunspell-fr-comprehensive, et qui représente à mes yeux un travail formidable (et probablement gigantesque) dont ce dépôt n’est qu’une simple adaptation. Si j’ai peu modifié la liste des mots (excepté le retranchement des noms propres, l’ajout de préfixes scientifiques comme socio- et de suffixes), j’ai en revanche passablement modifié la définition, les noms et la répartition des affixes, en particuliers en ce qui concerne les noms et les adjectifs. Les définitions des verbes sont inchangées. Les part-of-speech (po:) ont systématiquement été remplacé par les universal part-of-speech tags (upos).

    Visit original content creator repository
    https://github.com/thjbdvlt/spell-fr.vim

  • devtime

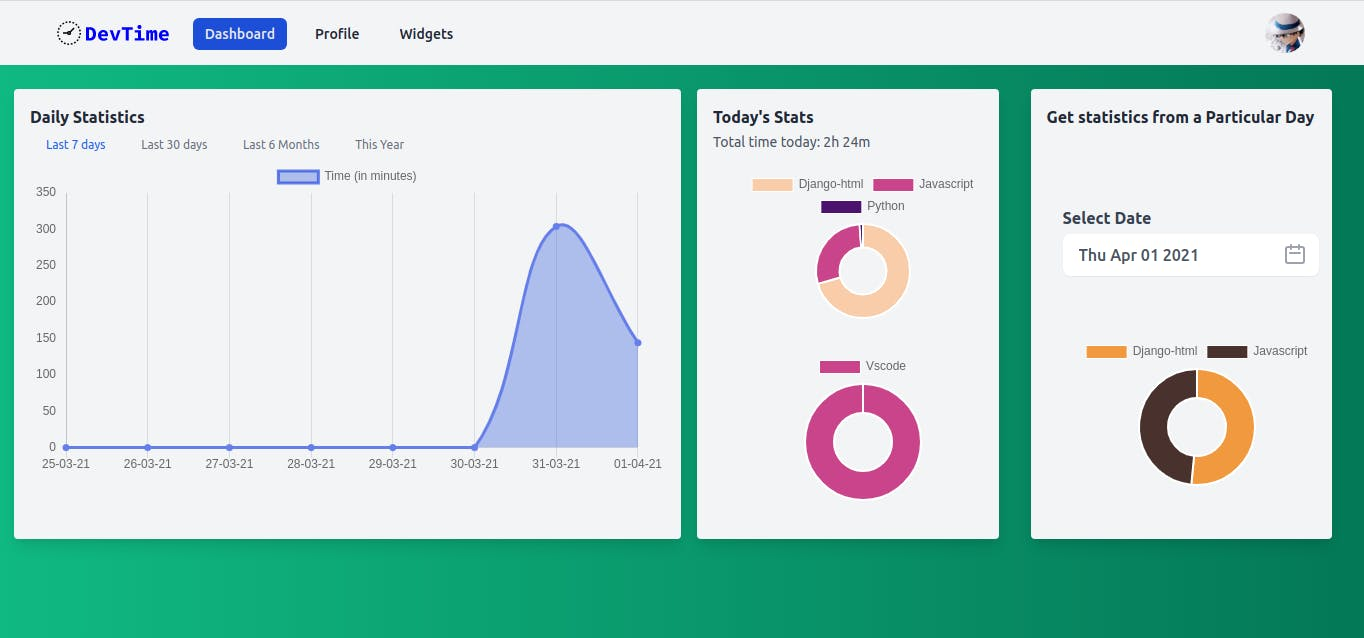
    DevTime – Code-time metrics for developers 👨‍💻

    🕒 We track time for you while you do the coding. Available at DevTime.Tech

    image

    How to use?

    1. Sign up for DevTime on https://devtime.tech. It’s still a work in progress so you might notice a few bugs
      and a few incomplete views. Report them, on the issues tracker right here.
    2. Get the DevTime extension for your editor. We have the one for VS-Code available atm – https://marketplace.visualstudio.com/items?itemName=DevTime.devtime
    3. Get your API-key from the activity tab. Now when you open VS-Code, it will prompt you for this API key. Copy/paste the key there and you’re good to go!!
    4. Now now you can just focus on writing your code. You can go to the dashboard – https://devtime.tech/dashboard and see your activity. But hey that’s not
      even half of what DevTime means to become, so you keep writing your code, we’ll keep adding new fun features. We’ll notify you when we do 😄

    Development Setup

    Techstack

    The main server is a Flask app – designed so to keep it small and lightweight. The production database
    is a PostgreSQL DB on Heroku, although the app is configured to run with SQLite without any additional
    dependencies (especially useful for development environments).

    Cloning the Repo

    To get the repository on your local device, install git and run:

    git clone https://github.com/nikochiko/devtime.git
    

    [For the server] Get the server running

    1. Make changes in the app/config.py file and edit the Auth0 keys as per your app.
      Create the app on Auth0. You’ll also have to create a GitHub OAuth
      app, and connect it from the Auth0 connections dashboard.

    2. Navigate to server/ directory in the terminal and install the dependencies.

    cd server/
    
    # optional: install and setup virtualenv
    python3 -m venv venv/  # this sets up a virtual environment in venv/ directory
    source venv/bin/activate  # activate that venv. use `deactivate` to exit it later
    
    python3 -m pip install -r requirements.txt
    1. Copy .env.example to .env. This is where we’ll keep top-level configuration.
      Saves us the hassle of going into editing code every time we change something. This is
      especially useful to store config variables that are sensitive (api-keys, secrets).
      For example, on Linux:
    cp .env.example .env
    1. Now run the server with Flask
    flask run -h 0.0.0.0 -p 8000

    Now go to your browser and head to http://localhost:8000 to see the website in action.

    Roadmap

    The project currently has:

    • Authentication setup with GitHub OAuth via Auth0
    • API-Key functionality
    • Ability to receive heartbeats from editors and store them as coding sessions in the database
    • Better UI/UX
    • Coding charts – hourly, daily, weekly

    What we want it to have in the future:

    Visit original content creator repository
    https://github.com/nikochiko/devtime

  • kofta

    kofta

    An ❗ experimental & WIP ❗ implementation of the IBFT consensus protocol, written in Python.

    This implementation is based on the Istanbul BFT Consensus Algorithm.

    Requirements

    • Python3
      • Run make deps to install all the required Python packages
    • RabbitMQ Server
      • Installing on Ubuntu:
          sudo apt-get install rabbitmq-server

    Examples

    • Even number consensus

      • The base Consensus class attempts to form consensus on some even number
      • To launch a testnet of the base Consensus class, run ./start_network.sh NUM_NODES ROUND_DURATION BYZ_QUORUM RC_THRESHOLD, where:
        • NUM_NODES is the number of nodes in the network
        • ROUND_DURATION is the duration (in seconds) of the IBFT protocol round
        • BYZ_QUORUM is the number of nodes corresponding to a Byzantine quorum
        • RC_THRESHOLD is the number of nodes corresponding to a round change threshold
    • drand consensus

      • The IBFT protocol will form consensus over drand randomness for a given drand round number
      • To launch a 4-node testnet, run ./start_drand_network.sh ROUND_DURATION DRAND_ROUND, where:
        • ROUND_DURATION is the duration (in seconds) of the IBFT protocol round
        • DRAND_ROUND is the drand round number on whose output consensus will be formed
      • There are 4 public HTTP endpoints to access drand randomness. The leader uses the first, and the other 3 nodes each use one of the rest:
      • Learn more about drand at https://drand.love/
    • Lighthouse Eth2 data consensus

      • The IBFT protocol will form consensus over Eth2 data fetched from a Lighthouse client
      • To launch a testnet, run ./start_lighthouse_network.sh NUM_NODES ROUND_DURATION BYZ_QUORUM RC_THRESHOLD LIGHTHOUSE_API ETH2_SLOT, where:
        • LIGHTHOUSE_API is the Ligthouse HTTP endpoint for fetching data
        • ETH2_SLOT is the Eth2 slot for which consensus will be formed on the corresponding block in the fork choice of the Lighthouse client

    Visit original content creator repository
    https://github.com/adiasg/kofta

  • Attend.

    Getting Started with Create React App

    This project was bootstrapped with Create React App.

    Available Scripts

    In the project directory, you can run:

    yarn start

    Runs the app in the development mode.
    Open http://localhost:3000 to view it in the browser.

    The page will reload if you make edits.
    You will also see any lint errors in the console.

    yarn test

    Launches the test runner in the interactive watch mode.
    See the section about running tests for more information.

    yarn build

    Builds the app for production to the build folder.
    It correctly bundles React in production mode and optimizes the build for the best performance.

    The build is minified and the filenames include the hashes.
    Your app is ready to be deployed!

    See the section about deployment for more information.

    yarn eject

    Note: this is a one-way operation. Once you eject, you can’t go back!

    If you aren’t satisfied with the build tool and configuration choices, you can eject at any time. This command will remove the single build dependency from your project.

    Instead, it will copy all the configuration files and the transitive dependencies (webpack, Babel, ESLint, etc) right into your project so you have full control over them. All of the commands except eject will still work, but they will point to the copied scripts so you can tweak them. At this point you’re on your own.

    You don’t have to ever use eject. The curated feature set is suitable for small and middle deployments, and you shouldn’t feel obligated to use this feature. However we understand that this tool wouldn’t be useful if you couldn’t customize it when you are ready for it.

    Learn More

    You can learn more in the Create React App documentation.

    To learn React, check out the React documentation.

    Code Splitting

    This section has moved here: https://facebook.github.io/create-react-app/docs/code-splitting

    Analyzing the Bundle Size

    This section has moved here: https://facebook.github.io/create-react-app/docs/analyzing-the-bundle-size

    Making a Progressive Web App

    This section has moved here: https://facebook.github.io/create-react-app/docs/making-a-progressive-web-app

    Advanced Configuration

    This section has moved here: https://facebook.github.io/create-react-app/docs/advanced-configuration

    Deployment

    This section has moved here: https://facebook.github.io/create-react-app/docs/deployment

    yarn build fails to minify

    This section has moved here: https://facebook.github.io/create-react-app/docs/troubleshooting#npm-run-build-fails-to-minify

    Visit original content creator repository
    https://github.com/3ba2ii/Attend.

  • Blood-Bank-Management-System

    🩸 Blood-Bank-Management-System

    This website acts like a medium/an intermediate between hospitals/clinics and donors/receivers.

    Basic functionalities:

    This project is created for two users: Donors/Receivers and Hospitals/Clinics(Doctors), where a Hospital user can add blood sample to their blood bank, request for blood, check status of their request, update their details, etc. The donor/receiver can also do the same.

    ℹ️ Languages/technologies used:

    1. Frontend: HTML, CSS, Bootstrap, JavaScript.
    2. Backend: Database-MySQL.
    3. Frontend-Backend connection: PHP.

    ❗ Requirements

    1. Xampp Software
    2. Sublime text/Visual studio code software or any software supporting php, html, css
    3. Java Jdk

    ❓ How to start?

    1. Download this code as a zip file.
    2. Place this entire folder in htdocs, in xampp(xampp path, installed as per your installation).
    3. Open Xampp server, start Apache, MySQL.
    4. In the MySQL row, select Admin.
    5. Create a database with name “bloodbank” in phpmyadmin. Import the sql file from sql folder.
    6. Open main.php in Sublime text/Visual studio code, on right click copy file path.
    7. Paste it on any web browser and clear everything before folder name, type “localhost”.
    8. Ready to go!

    ℹ️ The file named:

    1. ‘css’ contains the files for the front end pages style.
    2. ‘file’ contains the files for the backend connections.
    3. ‘image’ and ‘jastimage’ contains images used in the front end.
    4. ‘sql’ contains the database file that has to be imported.

    👨‍👩‍👦‍👦 Team:

    ✉️ Have an issues or a bug? Would like to contact?

    Report here

    If you liked the project and found it helpful

    Give a start 😄:star:

    Visit original content creator repository
    https://github.com/Chandana047/Blood-Bank-Management-System

  • demo-react-interface

    Getting Started with Create React App

    This project was bootstrapped with Create React App.

    Available Scripts

    In the project directory, you can run:

    npm start

    Runs the app in the development mode.
    Open http://localhost:3000 to view it in the browser.

    The page will reload if you make edits.
    You will also see any lint errors in the console.

    npm test

    Launches the test runner in the interactive watch mode.
    See the section about running tests for more information.

    npm run build

    Builds the app for production to the build folder.
    It correctly bundles React in production mode and optimizes the build for the best performance.

    The build is minified and the filenames include the hashes.
    Your app is ready to be deployed!

    See the section about deployment for more information.

    npm run eject

    Note: this is a one-way operation. Once you eject, you can’t go back!

    If you aren’t satisfied with the build tool and configuration choices, you can eject at any time. This command will remove the single build dependency from your project.

    Instead, it will copy all the configuration files and the transitive dependencies (webpack, Babel, ESLint, etc) right into your project so you have full control over them. All of the commands except eject will still work, but they will point to the copied scripts so you can tweak them. At this point you’re on your own.

    You don’t have to ever use eject. The curated feature set is suitable for small and middle deployments, and you shouldn’t feel obligated to use this feature. However we understand that this tool wouldn’t be useful if you couldn’t customize it when you are ready for it.

    Learn More

    You can learn more in the Create React App documentation.

    To learn React, check out the React documentation.

    Visit original content creator repository
    https://github.com/wgmilabs/demo-react-interface

  • LandTasExpress

    Visit original content creator repository
    https://github.com/CodeEditorLand/LandTasExpress

  • stistools

    stistools

    Documentation Status

    Tools for HST/STIS.

    Code Contribution Guide:

    • For new additions to stistools, a new branch off the main repository is encouraged. Use initials for the beginning of the branch title. It is also acceptable to put a PR in from a fork of stistools (necessary for an external contributor).

    • Each PR should have at least one approved review by at least one STIS team member AND one DATB/SCSB member (this could be either Sara or Robert).

    • After approved reviews, test your new content with readthedocs. You can do this by pushing to the doc_updates_rtd branch. This branch is setup to re-build the https://stistools.readthedocs.io/en/doc_updates_rtd/ page after any new commits.

    Documentation

    Minimum requirement to have at least some inline numpy style API docstrings. PR author should also review narrative docs to make sure those are appropriately updated. Any new tasks will need a new rst file for sphinx/rtd to pick up the new docs.

    Testing

    New functions and or new functionality should have appropriate unit tests. Tests that use any input and or truth files, will need to use artifactory for hosting test files.

    Pep 8

    Try to adhere to pep 8 standards when reasonable. Code comments are heartily encouraged!

    Visit original content creator repository
    https://github.com/spacetelescope/stistools

  • Machine-Learning-Tutorials

    UCL-AI-Society-ML-Tutorials

    Season 1 (2020/2021)

    Season 2 (21/22) Repo is right here -> https://github.com/UCLAIS/ML-Tutorials-Season-2

    Contributors

    Media

    On our YouTube channel, you can watch our lectures and recordings of solution walk-through.
    YouTube channel: UCL Artificial Intelligence Society

    On our Discord channel, you can ask any questions you may have on our notebooks.
    Discord channel invite link: UCL AI soc Discord

    Check our Facebook events for the zoom link of the live session – AISoc.ucl

    Tutorial notebooks & live lecture recordings

    Release Date Title Solution video Contents Remarks
    22th Oct 2020 Numerical Computation and Visualisation Notebook 1 solution Numpy, Pandas and Matplotlib movie data
    NYC taxi data
    5th Nov 2020 Supervised Learning Notebook 2 solution Regressions, Classification and Cross Validations N.A.
    19th Nov 2020 More on supervised learning and Intro to Unsupervised learning Notebook 3 solution SVM, PCA, K-Means N.A.
    3rd Dec 2020 Intro to Deep Learning Notebook 4 solution Perceptrons, Tensorflow, Keras and Pytorch MNIST Digits from Kaggle

    Pre-recorded lecture videos

    Release Date Title Lecture video Contents Slides
    5th Nov 2020 Introduction to Machine Learning Lecture 01 Introduction,
    Data preprocessing,
    Mathematical Fundamentals,
    Linear Regression
    Slide 01
    19th Nov 2020 Building Blocks of ML Lecture 02 Optimization,
    Linear algebra,
    Kernel Tricks
    Slide 02
    3rd Dec 2020 Supervised Learning (Advanced) Lecture 03 KNN,
    SVM,
    Random Forest
    Slide 03

    Specific Contents

    1. Machine Learning

    1) Machine Learning Basics

    1. Numpy, Pandas, Matplotlib

    2. Exploratory Data Analysis (EDA)

    3. Scikit-learn Basics
      a. Train test split
      b. Cross validation
      c. K-fold cross validation
      d. How to prepare your data before training

    4. Model Evaluation (Can skip this)
      a. Accuracy, precision, recall
      b. ROC Curve and AUC
      c. F1-Score


    2) Supervised Learning

    1. Regression
      a. Linear Regression
      b. Multivariate Regression
      c. Ridge, Lasso, ElasticNet
      d. Boston house price prediction

    2. Classification
      a. Logistic Regression
      b. Support Vector Machine
      i. Linear SVM
      ii. Kernel SVM
      c. Naïve Bayes

    3. Decision Trees and Ensemble
      a. Binary Tree Decision Tree
      b. Hyper-parameter Tuning with GridSearchCV()
      c. Ensemble


    3) Unsupervised Learning

    1. Unsupervised Learning: Clustering
      a. K-Means Clustering

    2. Primary Component Analysis (PCA) and Dimensionality Reduction


    2. Deep Learning

    4) Artifical Neural Networks

    1. Perceptron
      a. SLP
      b. MLP

    2. Tensorflow 2.0 + Keras Intro
      a. Now 2.0 has changed from beta to stable version so time to learn this
      b. Tensor Constant, Data type, LR with Tensorflow
      c. Keras Sequential, layers, model.compile()

    3. Optimization (if time permits)
      a. Back Propagation
      a. Gradient Descent
      b. Stochastic Gradient Descent
      c. Adagrad
      d. Adadelta
      e. RMSprop
      f. Adam
      g. RAdam

    4. Regularization Techniques
      a. Overfitting
      b. Data Augmentation (if time permits)
      c. Drop-out
      d. Batch Normalisation (if time permits)

    5. CNN
      a. Data Augmentation for Computer Vision
      b. Convolution Layer
      c. Pooling
      d. Feature Map

    6. Popular CNN Architectures
      a. AlexNet
      b. VGGNet
      c. GoogleNet
      d. ResNet
      e. Inception

    7. Application of CNN – Style Transfer

    8. Vanilla RNN

    9. Long Short Term Memory (LSTM)

    10. Bidirectional RNN

    11. Tokenizing

    12. Stopwords

    13. Stemming

    14. TF-IDF

    15. Word Embedding

    16. Word2Vec

    17. A simple Chatbot


    5) Reinforcement Learning

    1. Elements of a RL problem and mathematical definitions

    2. Morkov Decision Processes Formalism

    3. Policy gradient algorithms
      a. REINFORCE
      b. Advantage Actor Critic (A2C)
      c. Asynchronous Advantage Actor Critic (A3C)

    4. Q-learning
      a. SARSA
      b. DQN
      c. DQN Extensions

    Visit original content creator repository
    https://github.com/UCLAIS/Machine-Learning-Tutorials

  • jmxclient

    JMX client on JShell

    Pre-Requirements

    • JDK 9 b175 or later

    How to use

    $ jshell --add-exports jdk.jconsole/sun.tools.jconsole --feedback jmxclient jmxclient.jsh
    

    You need to get JMXClient instance and use it.

    • You want to access local process:
      • JMXClient client = JMXClient.getJMXClient(pid)
    • You want to access remote process with JMX URL:
      • JMXClient client = JMXClient.getJMXClient(URL, UserName, Password, Require SSL)
    • You want to access remote process with hostname:
      • JMXClient client = JMXClient.getJMXClient(hostname, Port, UserName, Password, Require SSL)

    After your JMX operation(s), you have to close the connection:

    client.close()
    

    Examples

    $ jshell --add-exports jdk.jconsole/sun.tools.jconsole --feedback jmxclient jmxclient.jsh
    JMXClient 0.1.0
    Copyright (C) 2016-2017 Yasumasa Suenaga
    |  Welcome to JShell -- Version 9
    |  For an introduction type: /help intro
    jmxclient> JMXClient.listLocalVMs()
    12881: jdk.jshell/jdk.internal.jshell.tool.JShellToolProvider --add-exports jdk.jconsole/sun.tools.jconsole --feedback jmxclient jmxclient.jsh
    12906: jdk.jshell.execution.RemoteExecutionControl 40933
    jmxclient> JMXClient client = JMXClient.getJMXClient(12906)
    jmxclient> client.listMBeans()
    java.lang:name=Metaspace,type=MemoryPool:
      Information on the management interface of the MBean
    java.lang:name=CodeHeap 'profiled nmethods',type=MemoryPool:
      Information on the management interface of the MBean
    JMImplementation:type=MBeanServerDelegate:
      Represents  the MBean server from the management point of view.
    java.lang:type=Runtime:
      Information on the management interface of the MBean
    java.lang:type=Threading:
      Information on the management interface of the MBean
    java.lang:type=OperatingSystem:
      Information on the management interface of the MBean
    java.nio:name=direct,type=BufferPool:
      Information on the management interface of the MBean
    java.lang:type=Compilation:
      Information on the management interface of the MBean
    java.lang:name=CodeHeap 'non-nmethods',type=MemoryPool:
      Information on the management interface of the MBean
    java.lang:name=G1 Young Generation,type=GarbageCollector:
      Information on the management interface of the MBean
    java.lang:name=CodeCacheManager,type=MemoryManager:
      Information on the management interface of the MBean
    java.lang:name=Compressed Class Space,type=MemoryPool:
      Information on the management interface of the MBean
    java.lang:type=Memory:
      Information on the management interface of the MBean
    java.lang:name=G1 Eden Space,type=MemoryPool:
      Information on the management interface of the MBean
    java.lang:name=G1 Old Gen,type=MemoryPool:
      Information on the management interface of the MBean
    java.nio:name=mapped,type=BufferPool:
      Information on the management interface of the MBean
    java.util.logging:type=Logging:
      Information on the management interface of the MBean
    java.lang:name=G1 Old Generation,type=GarbageCollector:
      Information on the management interface of the MBean
    java.lang:type=ClassLoading:
      Information on the management interface of the MBean
    java.lang:name=Metaspace Manager,type=MemoryManager:
      Information on the management interface of the MBean
    com.sun.management:type=DiagnosticCommand:
      Diagnostic Commands
    java.lang:name=G1 Survivor Space,type=MemoryPool:
      Information on the management interface of the MBean
    java.lang:name=CodeHeap 'non-profiled nmethods',type=MemoryPool:
      Information on the management interface of the MBean
    com.sun.management:type=HotSpotDiagnostic:
      Information on the management interface of the MBean
    jmxclient> client.dumpMBean("com.sun.management:type=DiagnosticCommand")
    com.sun.management:type=DiagnosticCommand
      Diagnostic Commands
    
    Attributes:
    
    Operations:
      java.lang.String compilerCodecache ()
      java.lang.String compilerCodelist ()
      java.lang.String compilerDirectivesAdd ([Ljava.lang.String; arguments)
      java.lang.String compilerDirectivesClear ()
      java.lang.String compilerDirectivesPrint ()
      java.lang.String compilerDirectivesRemove ()
      java.lang.String compilerQueue ()
      java.lang.String gcClassHistogram ([Ljava.lang.String; arguments)
      java.lang.String gcClassStats ([Ljava.lang.String; arguments)
      java.lang.String gcFinalizerInfo ()
      java.lang.String gcHeapInfo ()
      java.lang.String gcRun ()
      java.lang.String gcRunFinalization ()
      java.lang.String help ([Ljava.lang.String; arguments)
      java.lang.String jfrCheck ([Ljava.lang.String; arguments)
      java.lang.String jfrConfigure ([Ljava.lang.String; arguments)
      java.lang.String jfrDump ([Ljava.lang.String; arguments)
      java.lang.String jfrStart ([Ljava.lang.String; arguments)
      java.lang.String jfrStop ([Ljava.lang.String; arguments)
      java.lang.String jvmtiAgentLoad ([Ljava.lang.String; arguments)
      java.lang.String jvmtiDataDump ()
      java.lang.String threadPrint ([Ljava.lang.String; arguments)
      java.lang.String vmClassHierarchy ([Ljava.lang.String; arguments)
      java.lang.String vmClassloaderStats ()
      java.lang.String vmCommandLine ()
      java.lang.String vmDynlibs ()
      java.lang.String vmFlags ([Ljava.lang.String; arguments)
      java.lang.String vmInfo ()
      java.lang.String vmLog ([Ljava.lang.String; arguments)
      java.lang.String vmNativeMemory ([Ljava.lang.String; arguments)
      java.lang.String vmPrintTouchedMethods ()
      java.lang.String vmSetFlag ([Ljava.lang.String; arguments)
      java.lang.String vmStringtable ([Ljava.lang.String; arguments)
      java.lang.String vmSymboltable ([Ljava.lang.String; arguments)
      java.lang.String vmSystemProperties ()
      java.lang.String vmUptime ([Ljava.lang.String; arguments)
      java.lang.String vmVersion ()
    
    Notifications:
      javax.management.Notification
        jmx.mbean.info.changed
    jmxclient> String result = (String)client.invoke("com.sun.management:type=DiagnosticCommand", "gcHeapInfo", new Object[0], new String[0])
    jmxclient> System.out.println(result)
     garbage-first heap   total 256000K, used 13252K [0x00000006c6e00000, 0x00000006c6f007d0, 0x00000007c0000000)
      region size 1024K, 11 young (11264K), 1 survivors (1024K)
     Metaspace       used 17419K, capacity 19140K, committed 19328K, reserved 1067008K
      class space    used 1824K, capacity 2111K, committed 2176K, reserved 1048576K
    
    jmxclient> client.close()
    

    JMXClient reference

    • close()
      • Close JMX connection. You cannot use JMXClient instance after closing the connection.
    • listLocalVMs() (static method)
      • List local JVM process.
    • getJMXClient() (static method, overloaded method)
      • Open new JMX connection.
    • listMBeans()
      • List all MBeans on target.
    • dumpMBean(name)
      • Dump MBean information.
    • invoke(name, operationName, params, signature)
      • Invoke JMX method. It returns result of JMX method.
    • AttributeList getAttributes(String objectName, String... attrNames)
      • Get AttributeList from MBean which is named objectName . You need to choose attributes what you want via attrNames .

    License

    GNU General Public License, version 2

    Visit original content creator repository
    https://github.com/YaSuenag/jmxclient