This is the official code for the BONAI (TPAMI 2022). BONAI (Buildings in Off-Nadir Aerial Images) is a dataset for building footprint extraction (BFE) in off-nadir aerial images.
BONAI contains 268,958 building instances across 3,300 aerial images with fully annotated instance-level roof and footprint for each building as well as the corresponding offset vector. Compared to BONAI, existing BFE datasets only annotate building footprints.
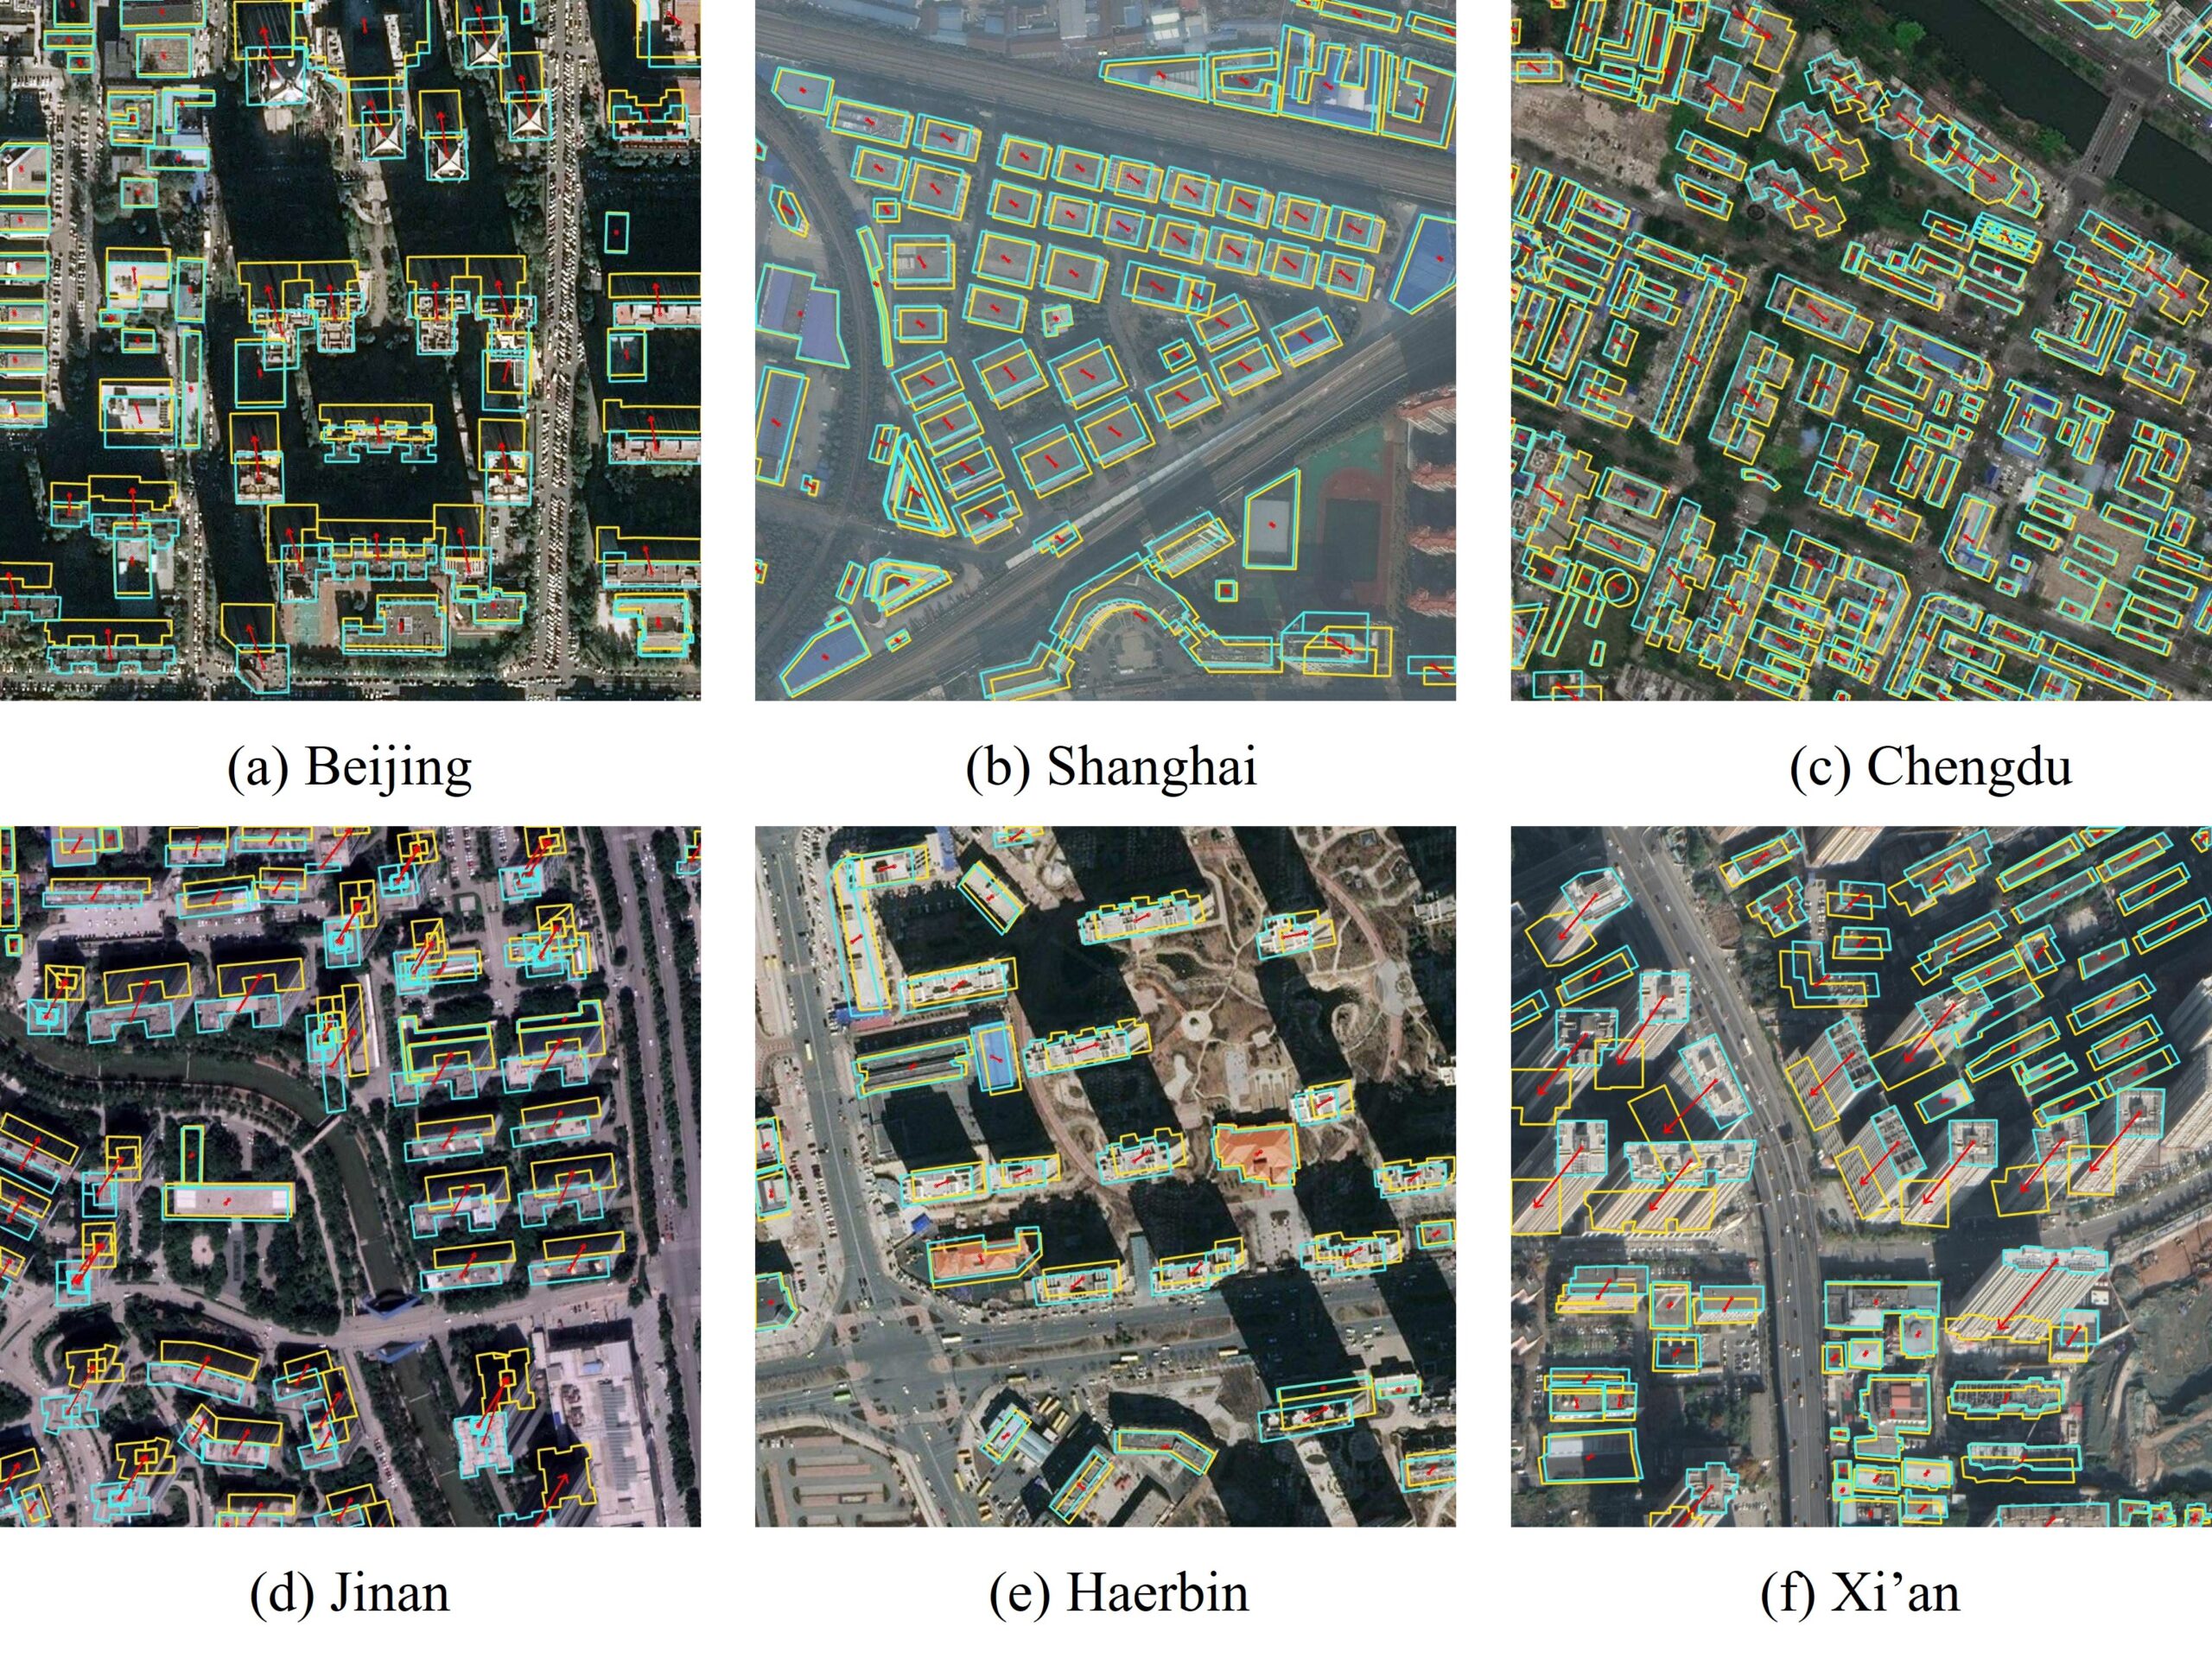
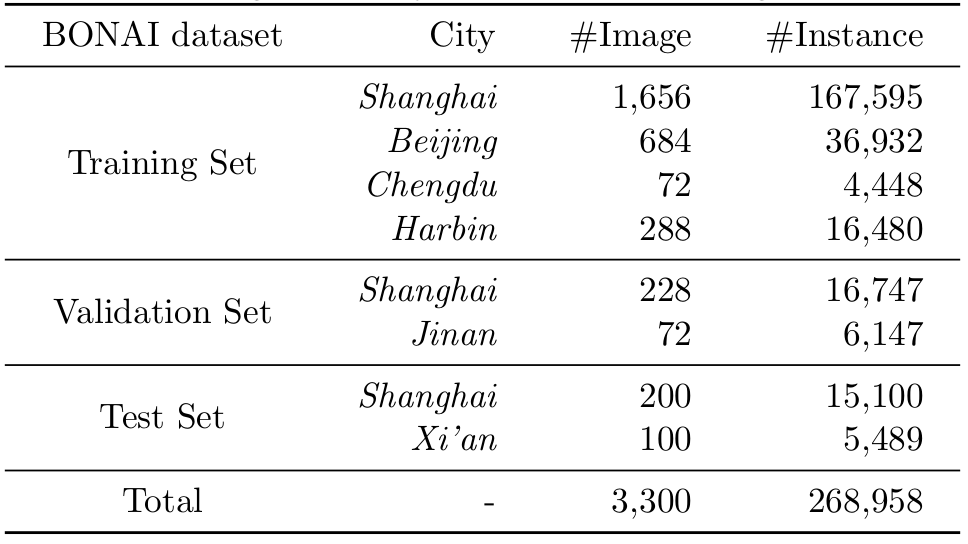
The images of BONAI are taken from six representative cities of China, i.e., Shanghai, Beijing, Harbin, Jinan, Chengdu, and Xi’an, the detailed number of images and object instances per image set and city are reported in the below table.
Training, Validation and Testing sets are publicly available. The evaluation code has been updated in bonai_evaluation.py. You can evaluate the model by:
If you use BONAI dataset, codebase or models in your research, please consider cite.
@article{wang2022bonai,
  author={Wang, Jinwang and Meng, Lingxuan and Li, Weijia and Yang, Wen and Yu, Lei and Xia, Gui-Song},
  journal={IEEE Transactions on Pattern Analysis and Machine Intelligence},
  title={Learning to Extract Building Footprints from Off-Nadir Aerial Images},
  year={2022},
  volume={},
  number={},
  pages={1-1},
  doi={10.1109/TPAMI.2022.3162583}}
This is the official code for the BONAI (TPAMI 2022). BONAI (Buildings in Off-Nadir Aerial Images) is a dataset for building footprint extraction (BFE) in off-nadir aerial images.
BONAI contains 268,958 building instances across 3,300 aerial images with fully annotated instance-level roof and footprint for each building as well as the corresponding offset vector. Compared to BONAI, existing BFE datasets only annotate building footprints.
The images of BONAI are taken from six representative cities of China, i.e., Shanghai, Beijing, Harbin, Jinan, Chengdu, and Xi’an, the detailed number of images and object instances per image set and city are reported in the below table.
Training, Validation and Testing sets are publicly available. The evaluation code has been updated in bonai_evaluation.py. You can evaluate the model by:
If you use BONAI dataset, codebase or models in your research, please consider cite.
@article{wang2022bonai,
  author={Wang, Jinwang and Meng, Lingxuan and Li, Weijia and Yang, Wen and Yu, Lei and Xia, Gui-Song},
  journal={IEEE Transactions on Pattern Analysis and Machine Intelligence},
  title={Learning to Extract Building Footprints from Off-Nadir Aerial Images},
  year={2022},
  volume={},
  number={},
  pages={1-1},
  doi={10.1109/TPAMI.2022.3162583}}
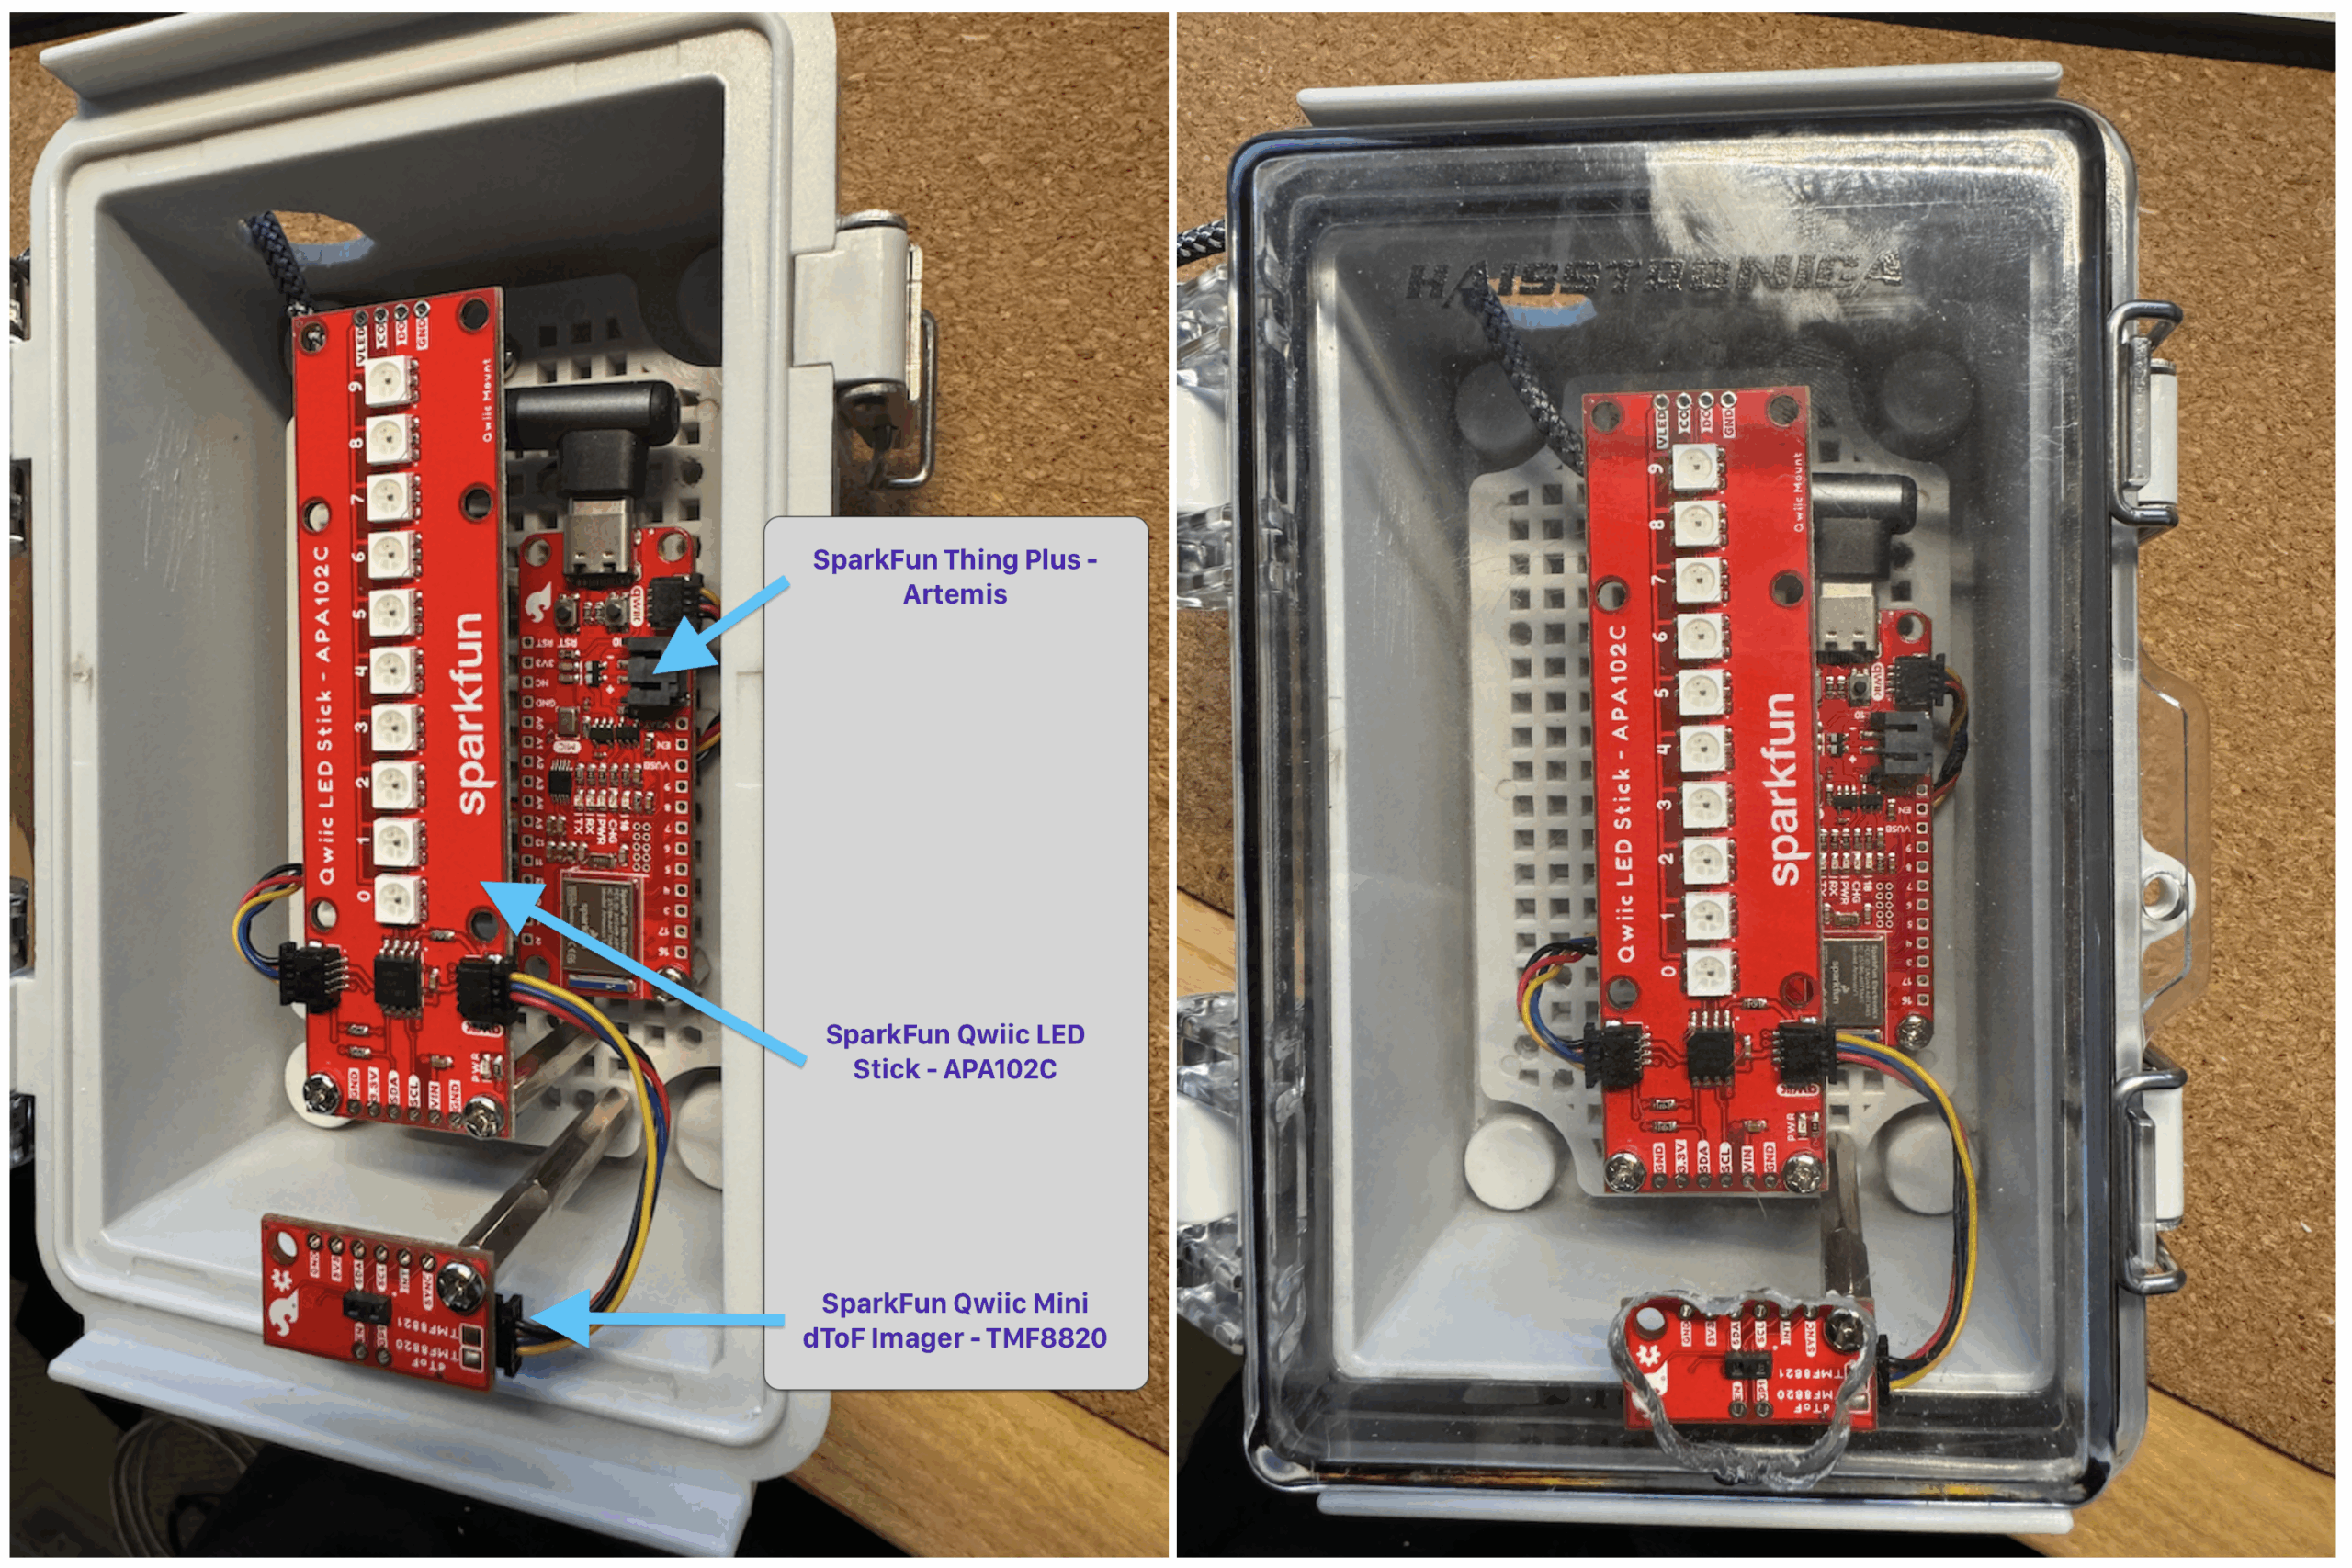
This is my first foray into this kind of computing. I’ve had a couple of Arduinos for years and have never done anything with them other than blink. My best buddy is a teacher in the Pacific Northwest and built a split-flap display. He has to jump through some hoops to use it, and I think I could make it much more efficient. But to help him, I needed to gain some experience with this kind of programming. This is the result.
I occasionally have difficulty judging how far into the garage I am. Sure, I could command tape a marker to the garage wall or use the car’s own parking sensor to tell me I’m getting close to the wall. But that’s no fun.
This repository contains Packer templates and scripts to build a Raspbian image with k3s pre-installed.
k3s: Lightweight Kubernetes. Easy to install, half the memory, all in a binary less than 100 MB.
Beside k3s, also cloud-init is available to initialize and configure a Raspian instance. With cloud-init you can customize e.g. hostname, authorized ssh keys, a static ip, token for k3s, …
This setup includes the following images:
k3s-agent.img: a Raspbian image with k3s as a systemd service, configured to run as agent (k3s agent).
k3s-server.img: a Raspbian image with k3s as a systemd service, configured to run as server (k3s server).
How to use these images
Download the image of the latest release or build the image.
Flash the image to an SD card.
Customize the /boot/user-data with e.g. authorized ssh keys, k3s environment variables …
Insert the SD card into the Raspberry Pi and power it up.
A few moments later, the k3s will be up and running
Building a k3s cluster
Preparing the master node
After downloading and writing the image to an SD card, edit the cloud-init /boot/user-data file to:
configure a hostname
configure the k3s token
configure a static ip address
E.g.
#cloud-config
# vim: syntax=yaml
#

# Set your hostname here, the manage_etc_hosts will update the hosts file entries as well
hostname: k3s-server
manage_etc_hosts: true

write_files:
# Configure k3s environment file
- path: /etc/systemd/system/k3s.service.env
  content: |
    K3S_TOKEN=i1F2tDzvHQsWvy5MnDsF
    K3S_KUBECONFIG_OUTPUT=/etc/k3s/kubeconfig.yaml
    K3S_KUBECONFIG_MODE=666
# Configure a static ip address for the master
- path: /etc/dhcpcd.conf
  content: |
    persistent
    # Generate Stable Private IPv6 Addresses instead of hardware based ones
    slaac private

    # static IP configuration:
    interface eth0
    static ip_address=192.168.0.30/24
    static routers=192.168.0.1
    static domain_name_servers=192.168.0.1 8.8.8.8
Preparing the agent nodes
After downloading and writing the image to an SD card, edit the cloud-init /boot/user-data file to:
configure a hostname
configure the k3s token
configure the k3s url (to join the master node)
E.g.
#cloud-config
# vim: syntax=yaml
#

# Set your hostname here, the manage_etc_hosts will update the hosts file entries as well
hostname: k3s-agent
manage_etc_hosts: true

write_files:
# Configure k3s environment file
- path: /etc/systemd/system/k3s.service.env
  content: |
    K3S_TOKEN=i1F2tDzvHQsWvy5MnDsF
    K3S_URL=https://192.168.0.30:6443
If you are adding multiple agents, make sure you give them unique hostnames!
pro tip:
flash is a command line script to write SD card images of any kind, with handy features like adding user-data and setting the hostname.
After booting the master and agents, ssh into your master node to get the kubeconfig file located at e.g. /etc/k3s/kubeconfig.yaml, depending on the K3S_KUBECONFIG_OUTPUT variable. Use this file to configure kubectl and you are good to go.
Building the images
This project includes a Vagrant file and some scripts to build the images in an isolated environment.
To use the Vagrant environment, start by cloning this repository:
git clone https://github.com/jsiebens/rpi-k3s
cd rpi-k3s
Next, start the Vagrant box and ssh into it:
vagrant up
vagrant ssh
When connected with the Vagrant box, run make in the /vagrant directory:
Meoʍatch is a cat-themed memory game where players flip cards to match random cat images or gifs. It features local multiplayer for shared fun, score tracking, card shuffling for a fresh challenge each round, and a helpful guide to get started. You can also switch between light and dark themes. Website also works perfectly in mobile devices Meoʍatch
Features
🐱 Cat-Themed Matching: Flip cards to match random cat images and gifs.
👥 Local Multiplayer: Play with a friend in turn-based mode.
🏆 Score Tracking: Keep track of your best scores.
🔄 Shuffle Cards: Shuffle the deck for a fresh start.
🌓 Light/Dark Mode: Toggle between black and white themes for a personalized look.
Getting Started
Prerequisites
Node.js (version 12.x or later)
npm or yarn
Installation
Clone the repository:
git clone https://github.com/tahrijouteyamer/meomatch.git
cd meomatch
Install dependencies:
npm install
# OR
yarn install
Run the project:
npm run dev
# OR
yarn dev
License
This project is licensed under the MIT License. See the LICENSE file for more details.
Acknowledgements
Thanks to TheCatAPI for providing the images and gifs used in the game!
Cross-platform (React Native and Web Browser) React, React Native‘s UI components to re-use everywhere.
Platforms
Native platforms: iOs, Android (for Mac, Windows or Linux we could just use Atom to bring our React Native code on it’s web and have that same code-base run on Native environment when they got better support for React Native building block).
“React Universal UI” is a cross-platform React’s UI Kit – which could be run on both Web Browser and React Native environment, write once and use everywhere.
See home page for detailed documentation and tutorials (the site is under construction and will be ready soon)
require env
require yarn, react-native-cli
npm install -g yarn react-native-cli
Quick start
Existing Web or React Native project:
Install react-universal-ui package (no further config required)
npm install --save react-universal-ui
Install and configure react-native-web using their instruction (optional, only need on Web project)
React Universal UI come with it’s own cli (command line interface), install it by..
npm install -g ruui-cli
With ruui-cli installed globally.. we should now able to use ruui command to create a new project:
ruui init SuperCoolProject
This will take a while when cli create the project structure for us as well as install necessary dependencies..
Run ruui dev under your React Universal UI project folder..
cd SuperCoolProject
ruui dev
*note: the project totally generated using react-native-cli, which mean it is a valid React Native project.. we could run it normally with:
react-native run-ios
react-native run-android
How it work
React Native:
Essentially this is just a normal React Native UI Library – which absolutely work with React Native‘s ecosystem. Feel free to use those UI with your favorite React Native library even if you don’t care aboutBrowseryet (but believe me, you’ll love it – Browser run give us tons of cool stuff).
There’re some differences between React Native and Web building block – such as Routing, Touch/Mouse handling… this project cares and provide support for those differences (there’re helpers under utils module), which save your time and let you focus on write your Universal App.
Components and status
Cross-platform Navigation, Routing integration
Native Navigation (based on React Native’s ExperimentalNavigation)
React-Router for Web/Native (Full-featured Browser support, fallback to Memory Navigation History for React Native)
Redux helpers
Context Provider
Reactive device common info (e.g Network info, Screen size..)
We’re exciting to see more contribution from community, by contributing your code to ruui you agree to license your contribution under the MIT license.
Stashvision is a proof-of-concept private stash indexing tool and
overlay for Path of Exile.
Rationale
Better search
Naive stash searching is something many players have complained about
over the years, with few solutions other than just dealing with it until
GGG develops more powerful searching functionality.
A number of open source tools exist for searching the stash locally,
outside of the game, but it’s just as painful having to lookup the item
position in-game.
Recipe discovery
Chaos recipes are great for passively making currency, but a time
investment trade-off must be made; either play stash tab tetris prior
to mapping in an effort to “optimize” rapid stashing of items
post-grind, or spend a considerable amount of time (only after your
tab(s) are full, granted) searching for the right item classes for each
set.
Maybe GGG will implement some form of a premium recipe fulfilling tab
in the distant dystopian future, but until then, the only way to truly
optimize vendor recipe discovery (WITHOUT buying 10 quad tabs) is to
augment your brain with an AI implant, improving chaos recipe item
recognition by a factor of 10. As an added bonus, the AI will be able
to discern what killed you in Blight encounters when your screen looks
like a bowl of spaghetti.
Or just use Stashvision.
Stashvision provides a stash tab item indexing framework and CLI
utility for indexing, querying, and recipe scanning your private stash
tabs, as well as an AutoHotkey-based overlay that highlights the items
at the press of a hotkey.
No auto-clicking is involved, so Stashvision should be 100% ToS
compliant.
Features
Private stash tab indexing and full-text search (powered by Bleve).
Customizable stash tab item highlighting for search results and recipes.
Portable as heck, the user is not expected to install any developer
frameworks or runtimes other than AutoHotkey, which many PoE players
have installed regardless for PoE-TradeMacro.
Non-intrusive to the game client. Completely hotkey-driven, and
absolutely no auto-clicking.
Caveats
Avoid manipulating your stash tabs (or at least the one being scanned)
excessively, as updates are nowhere close to real-time. For chaos
recipes, the ideal workflow would be to start with a full quad tab,
highlight the recipe, move items from the stash to your inventory,
vendor, cycle to the next set of items, rinse and repeat, all without
moving any items around, or adding new ones to the stash tab.
The overlay only works if your game is running in windowed borderless
mode. The language will also likely need to be set to English, much
like PoE-TradeMacro and other tools that consume PoE’s stash API.
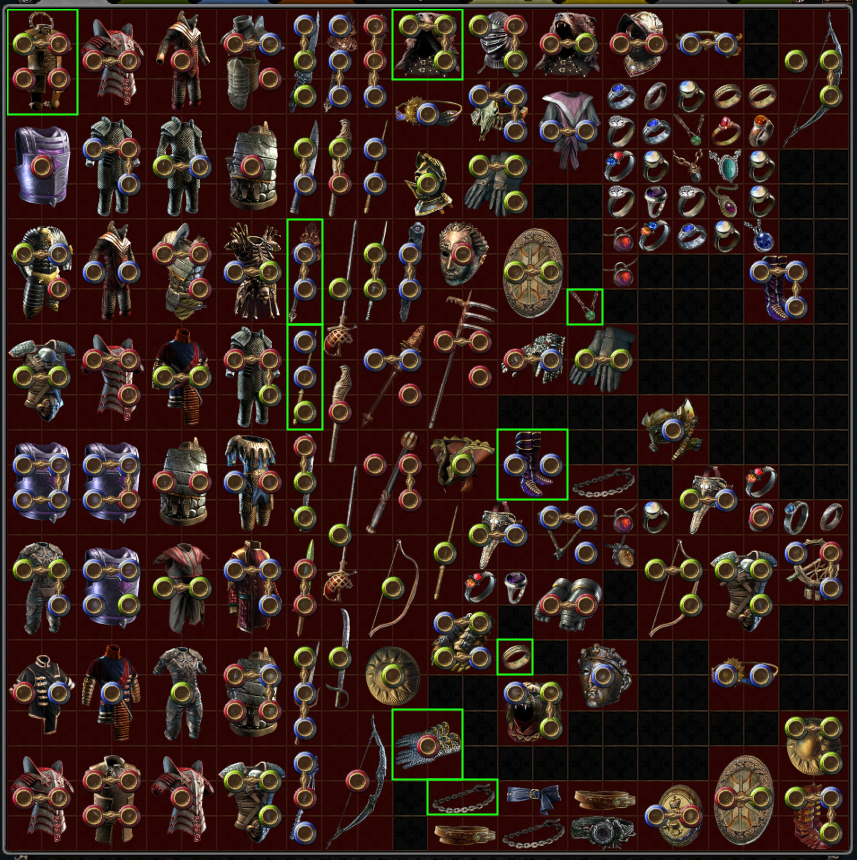
Screenshots
Quickstart
Download the current version of AutoHotkey (not V2).
Copy stashvision.ini.example to stashvision.ini, and fill in your
POESESSID, account name, and any other desired configuration.
Run stashvision.ahk.
Note: Ensure your game client is running in borderless mode, and
the language is set to English.
Default Hotkeys
shift + alt + c:
Highlight chaos recipe in configured stash tab. Subsequent triggers
will cycle through multiple recipe item sets. After all sets have
been cycled through, a new index scan will occur.
shift + alt + s:
Search and highlight items in configured stash tab.
escape:
Close the overlay or search window.
Configuration (stashvision.ini)
Account settings
[General]SessionId = xxx
AccountName = xxx
SessionId is your POESESSID.
Stash settings
[Stash]DumpTabIndex = 0
DumpTabQuad = true
Currently, Stashvision only supports searching and highlighting one tab
at a time.
Stashvision provides a Golang-based indexer application that can be
invoked separately from the AutoHotkey script, to manually manage a
local index, search for items, or scan a stash index for sets of items
that meet vendor recipe criteria.
$ ./stashvision.exe
stashvision - Index and analyze your Path of Exile stash.

commands:
  q, query     query stash items index
  r, recipe    evaluate recipes against index
  s, server    run stash indexing server

usage:
  stashvision query [--json] -s=<querystring>
  stashvision server -s=<poesessionid> -a=<account_name>

arguments:
  --help             show this screen
  --version          show version
Numeric queries (e.g. field:>8, field:<=9, or field:10)
In addition to robust searching capability, Stashvision adds a
number of fields to item metadata that are not easily searchable
in-game.
Note: Due to shortcomings of the indexing library used, Stashvision
stores boolean fields as integers. So a query string for
identified:true should actually be identified:1.
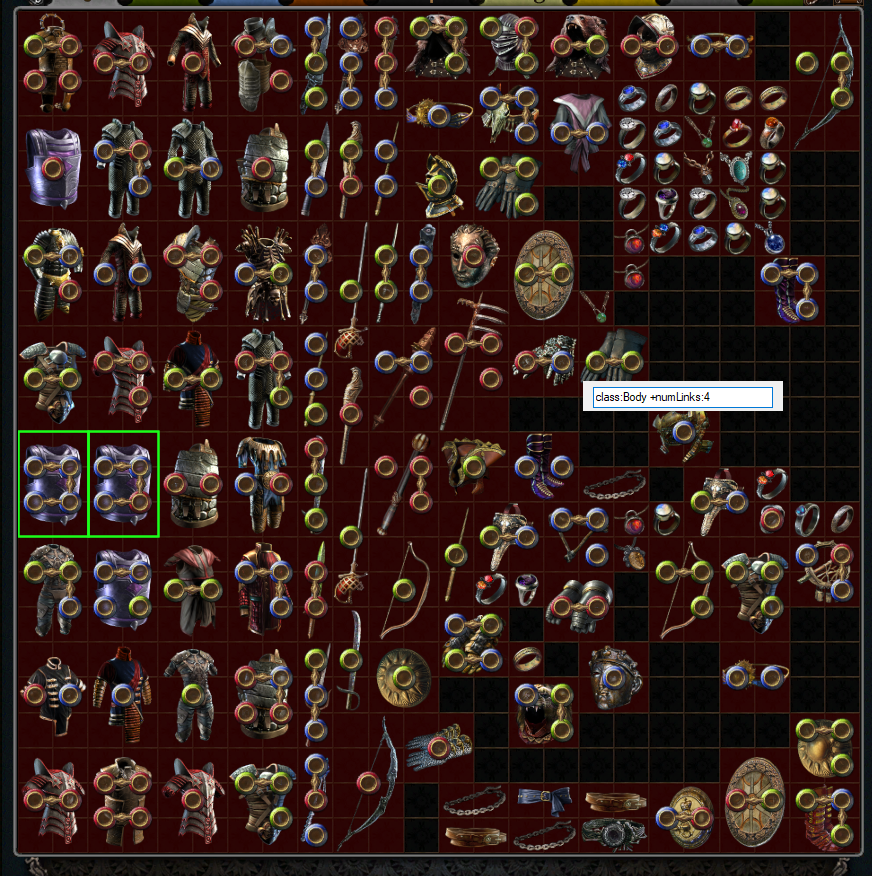
Fields
class
corrupted
frameType
h
icon
id
identified
ilvl
inventoryId
league
name
numLinks
numSockets
properties
tabIndex
typeLine
verified
w
x
y
Convenience fields
class:
The class name of an item, e.g. Gloves, Body Armour, or Boots.
numSockets:
The total number of sockets on an item.
numLinks:
The name is a bit of a misnomer, as this is really just the maximum
number of links across all socket groups.
Roadmap
In no particular order…
Settings GUI
Autocomplete search
OAuth
Multiple stash tab support
Detect in-game stash tab state non-intrusively
More vendor recipe support
Automatically find item sets (i.e. ring + ring + amulet) that fulfill
missing resistance values
Total potential chaos recipe reward displayed as another overlay
In Laravel failed jobs are stored into the database. But maybe you want to instruct some other process to also do
something with the message.
When you want to instruct RabbitMQ to reroute failed messages to a exchange or a specific queue, then this is possible
by adding extra options.
When the exchange is omitted, RabbitMQ will use the amq.direct exchange for the routing-key
When routing-key is omitted, the routing-key by default the queue name is substituted with '.failed'.
When using %s in the routing-key the queue_name will be substituted.
Note: When using failed_job exchange with routing-key, you probably need to create your exchange/queue with bindings
yourself.
Starting with 8.0, this package supports Laravel Horizon out of the box. Firstly,
install Horizon and then set RABBITMQ_WORKER to horizon.
Horizon is depending on events dispatched by the worker.
These events inform Horizon what was done with the message/job.
This Library supports Horizon, but in the config you have to inform Laravel to use the QueueApi compatible with horizon.
'connections' => [
// ...'rabbitmq' => [
// .../* Set to "horizon" if you wish to use Laravel Horizon. */'worker' => env('RABBITMQ_WORKER', 'default'),
],
// ...
],
Use your own RabbitMQJob class
Sometimes you have to work with messages published by another application.
Those messages probably won’t respect Laravel’s job payload schema.
The problem with these messages is that, Laravel workers won’t be able to determine the actual job or class to execute.
You can extend the build-in RabbitMQJob::class and within the queue connection config, you can define your own class.
When you specify a job key in the config, with your own class name, every message retrieved from the broker will get
wrapped by your own class.
You can extend the built-in PhpAmqpLib\Connection\AMQPStreamConnection::class
or PhpAmqpLib\Connection\AMQPSLLConnection::class and within the connection config, you can define your own class.
When you specify a connection key in the config, with your own class name, every connection will use your own class.
If you want to use your own RabbitMQQueue::class this is possible by
extending VladimirYuldashev\LaravelQueueRabbitMQ\Queue\RabbitMQQueue.
and inform laravel to use your class by setting RABBITMQ_WORKER to \App\Queue\RabbitMQQueue::class.
Note: Worker classes must extend VladimirYuldashev\LaravelQueueRabbitMQ\Queue\RabbitMQQueue
'connections' => [
// ...'rabbitmq' => [
// .../* Set to a class if you wish to use your own. */'worker' => \App\Queue\RabbitMQQueue::class,
],
// ...
],
<?phpnamespaceApp\Queue;
useVladimirYuldashev\LaravelQueueRabbitMQ\Queue\RabbitMQQueueasBaseRabbitMQQueue;
class RabbitMQQueue extends BaseRabbitMQQueue
{
// ...
}
For Example: A reconnect implementation.
If you want to reconnect to RabbitMQ, if the connection is dead.
You can override the publishing and the createChannel methods.
Note: this is not best practice, it is an example.
The connection does use a default queue with value ‘default’, when no queue is provided by laravel.
It is possible to change te default queue by adding an extra parameter in the connection config.
By default, your connection will be created as a lazy connection.
If for some reason you don’t want the connection lazy you can turn it off by setting the following config.
By default, the network protocol used for connection is tcp.
If for some reason you want to use another network protocol, you can add the extra value in your config options.
Available protocols : tcp, ssl, tls
For network timeouts configuration you can use option parameters.
All float values are in seconds and zero value can mean infinite timeout.
Example contains default values.
Starting with 13.3.0, this package supports Laravel Octane out of the box.
Firstly, install Octane and don’t forget to warm ‘rabbitmq’ connection in the octane config.
Once you completed the configuration you can use the Laravel Queue API. If you used other queue drivers you do not
need to change anything else. If you do not know how to use the Queue API, please refer to the official Laravel
documentation: http://laravel.com/docs/queues
Lumen Usage
For Lumen usage the service provider should be registered manually as follow in bootstrap/app.php:
queue:work command which is Laravel’s built-in command. This command utilizes basic_get. Use this if you want to consume multiple queues.
rabbitmq:consume command which is provided by this package. This command utilizes basic_consume and is more performant than basic_get by ~2x, but does not support multiple queues.
Testing
Setup RabbitMQ using docker-compose:
docker compose up -d
To run the test suite you can use the following commands:
# To run both style and unit tests.
composer test# To run only style tests.
composer test:style
# To run only unit tests.
composer test:unit
If you receive any errors from the style tests, you can automatically fix most,
if not all the issues with the following command:
composer fix:style
Contribution
You can contribute to this package by discovering bugs and opening issues. Please, add to which version of package you
create pull request or issue. (e.g. [5.2] Fatal error on delayed job)


 https://github.com/jwwangchn/BONAI