Voice cloning is the process of converting text input into natural and expressive synthetic speech using a pre-trained Text-to-Speech (TTS) model. In this project, we utilized the coqui-TTS model, which involves two main stages: Text and Audio Preprocessing and Acoustic Model Training. The text data undergoes tokenization and normalization, while the audio data is converted into Mel-frequency cepstral coefficients (MFCCs) or spectrograms. The acoustic model, typically implemented using neural networks like RNNs or transformers, learns the mapping between text representations and acoustic features. Finally, the vocoder synthesizes the acoustic features into high-quality waveforms, generating the desired speech output.
For this project, we used a dataset consisting of 212 data points of Priyanka Chopra’s voice notes and their corresponding transcriptions. The dataset was meticulously prepared in the following steps:
Extracted voice and subtitles from Priyanka Chopra’s interview using yt-dlp.
Filtered the data to remove voices of other speakers from both audio and text data.
Cleaned the audio dataset using Audacity to enhance its usability.
Used this rnnoise to enhance the audio data for better model performance.
 !tts --text "Hi, I am an excellent Text to Speech cloning AI" \
      --model_path $model.pth\
      --config_path $comfig.json \
      --out_path out.wav
  import IPython
  IPython.display.Audio("out.wav")
Feedback:
If you have any feedback, please reach out to me at:
Clean Architecture on Android: the Teamwork.com way!
The purpose of this repository is to showcase, with a very simple (but hopefully clear) sample Android project, how we implement Uncle Bob’s Clean Architecture in our applications.
This is not a working demo app: the only purpose of the classes in the project is to demonstrate how the dependency graphs work with the configuration explained below, and to illustrate which dependencies are typically involved in this type of architecture.
Given that broad nature of the topic and the amount of implementation details necessary to implement a working production project, we have simplified our example as much as possible and focused solely on the following areas:
Module structure: each architecture layer has its own module, following closely the Clean principles and naming.
Separation of layers: how to configure Gradle making use of api/implementation to hide unwanted dependencies
Dependency Injection: how to set up Dagger 2 for a multi-module environment, but still ensuring the above points
Our requirements
There is no such thing as “the best architecture” when it comes to mobile applications: the best architecture approach for a project (or team) always depends on a series of factors and assumptions.
Our solution is based on specific requirements, and, although it might not be the silver bullet for every project, it works well and could help you define your own architecture or, at least, inspire you to think about it a bit more.
We came up with our solution (and we iteratively try to improve it) based on the following items:
Software is our craft. We aim for our applications to be fast, as bug-free as possible and always suiting our customers’ needs: the only way to achieve that is to ensure the quality and maintainability of our code through the use of best practices.
We believe in code reusability. Modularising components is the only way to ensure that our code is reusable across products, maximise our bandwidth as a team and ensure that bug fixes are promptly delivered to all of our clients.
Our applications are big. Most of our applications are complex, with non-trivial logic and a significant amount of screens and use cases: structuring our code in a formal and clear way is essential.
Our applications should endure time. We don’t like technical debt, and we don’t like rewriting the same software, using the same technologies, only because that code is broken.
We need to scale fast and make new developers onboarding smooth. Using a shared, well-defined architecture helps new developers in the team, who should then be able to get into the codebase faster and contribute to it from the get-go.
Modules
Listed below, a quick description of each module and a class diagram with their relationships.
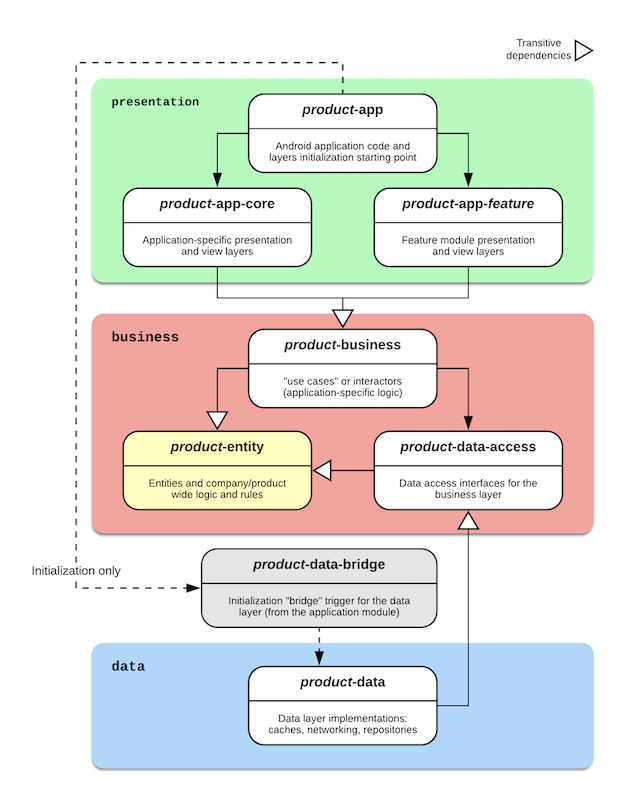
Modules relationships
The following diagram illustrates the above mentioned modules relationships in this sample project.
In order to support feature modules and (if properly configured) Instant Apps, the project’s view/presentation layer is split into three modules; this is not a requirement and it can be avoided for small projects.
Modules description
Module
Description
Module dependencies (direct or indirect)
entity
Business entities (the Entity layer in Clean)
No dependencies
data-bridge
“Bridge” module only used for the initialization of the Data layer. Prevents implementation details in the data layer from being accessible in the app module.
data, data-access, entity
data-access
The Data Access layer, interfaces for the business layer to access the data layer
entity
data
The Data layer, which includes networking, caching and data delivery for the business layer to manipulate. Exposes via Dagger the DataRepo dependencies to the business layer
data-access, entity
business
Business layer, contains interactors and business logic (which can then exposed to the presentation layer if necessary).
data-access, entity
app-core
Core, base module for the view and presentation layer. Contains themes, styles, resources, strings and components that are used across apps and feature modules.
business, entity
app-feature1
View and presentation module for a “big” feature. This can be then extracted to use with Instant Apps if desired
app-core, business, entity
app
View and presentation layers for the application module
Google has done a very good job at producing a set of code examples in their Android Architecture Blueprints repository.
We took inspiration from it (especially from the todo-mvp-clean, todo-mvp-dagger and dagger-android branches), but found that the examples are quite simple and not suited for more complex applications.
More specifically:
It is well suited for small projects, but the “monolith module” approach doesn’t scale well for medium/large applications
The package-based separation of layers cannot be enforced at compile-time and is therefore very error-prone (especially when working in a big team)
It is only a partial implementation of Clean: there is no real separation between presentation and business layer (presenters and use cases)
It does not allow sharing code across applications, nor it is suitable for feature modules or Instant Apps
Dependency Injection
Our Gradle modules use Dagger (and its Android extension) for dependency injection. As an architectural choice to ensure encapsulation and enforce layer boundaries,
the modules at lower layers do not have access at compile time to the higher layers except its closest dependency (see graph – i.e., the presentation layer can only access the business layer, not the data(-access) layer).
Any exception to this rule must be explicitly declared and made available through a provision method in a public component.
Dagger doesn’t work well with this kind of requirement out of the box when using Subcomponents, since it needs to have access at compile time to all of the implementation classes to build the dependency graph (which is what we want to avoid in the first place).
The sample project doesn’t cover other useful Dagger features such scopes and “feature” components; however, both can be easily plugged into our core project structure.
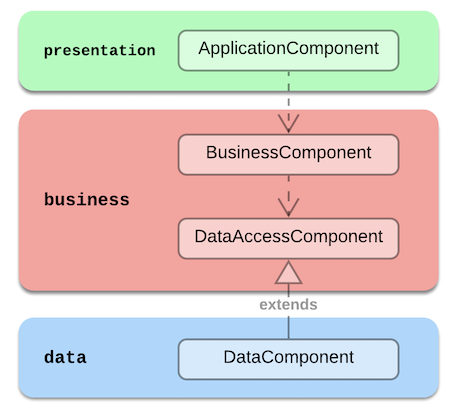
Components relationships
The following diagram illustrates the dependencies between components in our sample project.
Notice how all dependency/inheritance arrows point to the business layer. The entity layer does not need a component as it mainly comprises pure entity objects and business logic.
Goals
In order to allow using Dagger with our encapsulation constraints, we ensure that:
Each layer owns its Dagger component
Each Dagger Component is internal, and it is created and initialized within the module itself, so that each dependency graph is only fully visible inside the module. This guarantees encapsulation and allows us to declare both classes and the bound interfaces as internal if we don’t want to provide access to them outside of the module.
Modules and dependencies are, by default, only accessible by components in the same layer.
Each layer’s Dagger component inherits a public plain interface
This interface only includes the dependencies that we want to expose outside of the module, e.g.:
interface BusinessComponent {
    // provision methods for dependencies exposed to the presentation layer
}

@Component
internal interface InternalBusinessComponent : BusinessComponent
interface DataAccessComponent { // in the `data-access` module
    // provision methods for data layer dependencies exposed to the business layer
}

@Component // in the `data` module
internal interface DataComponent : DataAccessComponent
By doing so, we also encapsulate the usage of Dagger within the module itself, without forcing external “client code” to use the framework, and simplifying injecting a mock of the whole component for testing when needed.
Dependencies between layers are fully managed by Dagger
Each layer which has a direct dependency to a component from another layer, will declare so in its Dagger component as a component dependency:
Dagger has recently introduced component factories, which allow (sub)components to provide an interface, annotated with @Component.Factory (or @Subcomponent.Factory). The interface provides a single function, which contains dependencies (modules, components or any other) that the Component requires at dependency graph creation.
We use component factories to pass the components which are dependencies in the layer we are initialising, along with other classes that might be passed on from lower level layers (e.g. the application Context) with @BindsInstance.
Note: initialization code is ugly! The sample provides the simplest way to kick off the dependency graphs for each component and trigger initialization of dependencies that require it at application startup. Each project could require a different approach, the only requirement here is to follow the same layer initialisation order shown below.
The trigger for the initialization process is, as usual, the Application.onCreate() method.
In order to provide layer-specific initialization on each module, the sample provides a SampleBusinessApplication abstract class in the business layer, and a SampleApplication class, usually in the application module.
These classes provide callbacks to initialize the layers’ components (in this order):
initializeDataComponent()
val businessComponent: BusinessComponent = initializeBusinessComponent()
initializeAppComponent(businessComponent) // the presentation/view layers need the business layer to be initialized
The data-bridge module
In order to fulfill the desired level of encapsulation dictated by Clean Architecture, the data layer is not directly accessible from other layers (and modules), and it is used by the business layer through the data-access layer.
The data-bridge only purpose is to temporarily “break” the dependency inversion rule at initialization time to provide a DataBridgeInitializer; this is accessed by the application module to call to the data layer and trigger the Dagger dependency graph initialization for DataComponent.
Initialization steps
data layer through the data-bridge module: DataBridgeInitializer calls to DataLayerInitializer, which executes the component factory’s create() method for DataComponent and sets the singleton instance into DataComponent.INSTANCE and DataAccessComponent.INSTANCE (for access from the business layer)
business layer:BusinessLayerInitializer, called by SampleBusinessApplication, which executes the component factory’s create() method for BusinessInternalComponent and sets the singleton instance into BusinessInternalComponent.INSTANCE (DataAccessComponent.INSTANCE is passed to create())
presentation/view layer:initializeAppComponent(businessComponent) is called, and the ApplicationComponent.create() factory method is executed
Once all the Dagger dependency graphs are created, the application can then move on to the rest of its initialization process.
Dependency Injection: example
Note: this section is intentionally verbose and requires you to go through the code while reading. You can probably skip it if you are already familiar with Dagger.
We have three separate public Dagger Components in our codebase: ApplicationComponent (view/presentation layer), BusinessComponent and DataAccessComponent.
These are declared in the corresponding layer’s module to make sure that the Dagger annotation processor and compiler have access to all the required dependencies from the generated provider classes.
Let’s take our Feature2DetailsPresenter example and follow its dependencies from the bottom-up in the architecture hierarchy:
Presentation layer
When the default activity Feature2DetailsActivity is created, an injector method is called in the onCreate()
An instance of Feature2DetailsPresenter must be created: the class has an @Inject constructor that Dagger uses to instantiate it
Feature2DetailsInteractor is required by the constructor: we need to access the class provider, which is declared in BusinessComponent
A named GLOBAL_COMPUTATION_EXECUTOR is also injected in the constructor. Note that this is provided by BusinessComponent but exposed all the way from DataAccessComponent (this kind of transitive dependency is sometimes useful)
Business layer
BusinessComponent exposes Feature2DetailsInteractor via a provision method (feature2DetailsInteractor())
Interactor bindings between interface and concrete implementation are declared in InteractorsBindingModule (Feature2DetailsInteractor binds to Feature2DetailsInteractorImpl)
The bound implementation Feature2DetailsInteractorImpl has dependencies from the data access layer: Entity1Repo is one of those
Feature2DetailsInteractorImpl also requires InternalInteractor, which is bound in InteractorsBindingModule, but not exposed in BusinessComponent (but available in InternalBusinessComponent)
Data (Access) layers
The Dagger component DataComponent extends from the DataAccessComponent: all the provision methods for data access layer classes which are needed in the business layer are available here
DataAccessComponent exposes the needed provision method: entity1Repo(): Entity1Repo
SampleDataComponent includes DataRepoBindingModule, which, finally, contains the binding method which provides an instance of Entity1RepoImpl for the Entity1Repo interface
Copyright 2018-2020 Teamwork.com

Licensed under the Apache License, Version 2.0 (the "License");
you may not use this file except in compliance with the License.
You may obtain a copy of the License at

    http://www.apache.org/licenses/LICENSE-2.0

Unless required by applicable law or agreed to in writing, software
distributed under the License is distributed on an "AS IS" BASIS,
WITHOUT WARRANTIES OR CONDITIONS OF ANY KIND, either express or implied.
See the License for the specific language governing permissions and
limitations under the License.
Clean Architecture on Android: the Teamwork.com way!
The purpose of this repository is to showcase, with a very simple (but hopefully clear) sample Android project, how we implement Uncle Bob’s Clean Architecture in our applications.
This is not a working demo app: the only purpose of the classes in the project is to demonstrate how the dependency graphs work with the configuration explained below, and to illustrate which dependencies are typically involved in this type of architecture.
Given that broad nature of the topic and the amount of implementation details necessary to implement a working production project, we have simplified our example as much as possible and focused solely on the following areas:
Module structure: each architecture layer has its own module, following closely the Clean principles and naming.
Separation of layers: how to configure Gradle making use of api/implementation to hide unwanted dependencies
Dependency Injection: how to set up Dagger 2 for a multi-module environment, but still ensuring the above points
Our requirements
There is no such thing as “the best architecture” when it comes to mobile applications: the best architecture approach for a project (or team) always depends on a series of factors and assumptions.
Our solution is based on specific requirements, and, although it might not be the silver bullet for every project, it works well and could help you define your own architecture or, at least, inspire you to think about it a bit more.
We came up with our solution (and we iteratively try to improve it) based on the following items:
Software is our craft. We aim for our applications to be fast, as bug-free as possible and always suiting our customers’ needs: the only way to achieve that is to ensure the quality and maintainability of our code through the use of best practices.
We believe in code reusability. Modularising components is the only way to ensure that our code is reusable across products, maximise our bandwidth as a team and ensure that bug fixes are promptly delivered to all of our clients.
Our applications are big. Most of our applications are complex, with non-trivial logic and a significant amount of screens and use cases: structuring our code in a formal and clear way is essential.
Our applications should endure time. We don’t like technical debt, and we don’t like rewriting the same software, using the same technologies, only because that code is broken.
We need to scale fast and make new developers onboarding smooth. Using a shared, well-defined architecture helps new developers in the team, who should then be able to get into the codebase faster and contribute to it from the get-go.
Modules
Listed below, a quick description of each module and a class diagram with their relationships.
Modules relationships
The following diagram illustrates the above mentioned modules relationships in this sample project.
In order to support feature modules and (if properly configured) Instant Apps, the project’s view/presentation layer is split into three modules; this is not a requirement and it can be avoided for small projects.
Modules description
Module
Description
Module dependencies (direct or indirect)
entity
Business entities (the Entity layer in Clean)
No dependencies
data-bridge
“Bridge” module only used for the initialization of the Data layer. Prevents implementation details in the data layer from being accessible in the app module.
data, data-access, entity
data-access
The Data Access layer, interfaces for the business layer to access the data layer
entity
data
The Data layer, which includes networking, caching and data delivery for the business layer to manipulate. Exposes via Dagger the DataRepo dependencies to the business layer
data-access, entity
business
Business layer, contains interactors and business logic (which can then exposed to the presentation layer if necessary).
data-access, entity
app-core
Core, base module for the view and presentation layer. Contains themes, styles, resources, strings and components that are used across apps and feature modules.
business, entity
app-feature1
View and presentation module for a “big” feature. This can be then extracted to use with Instant Apps if desired
app-core, business, entity
app
View and presentation layers for the application module
Google has done a very good job at producing a set of code examples in their Android Architecture Blueprints repository.
We took inspiration from it (especially from the todo-mvp-clean, todo-mvp-dagger and dagger-android branches), but found that the examples are quite simple and not suited for more complex applications.
More specifically:
It is well suited for small projects, but the “monolith module” approach doesn’t scale well for medium/large applications
The package-based separation of layers cannot be enforced at compile-time and is therefore very error-prone (especially when working in a big team)
It is only a partial implementation of Clean: there is no real separation between presentation and business layer (presenters and use cases)
It does not allow sharing code across applications, nor it is suitable for feature modules or Instant Apps
Dependency Injection
Our Gradle modules use Dagger (and its Android extension) for dependency injection. As an architectural choice to ensure encapsulation and enforce layer boundaries,
the modules at lower layers do not have access at compile time to the higher layers except its closest dependency (see graph – i.e., the presentation layer can only access the business layer, not the data(-access) layer).
Any exception to this rule must be explicitly declared and made available through a provision method in a public component.
Dagger doesn’t work well with this kind of requirement out of the box when using Subcomponents, since it needs to have access at compile time to all of the implementation classes to build the dependency graph (which is what we want to avoid in the first place).
The sample project doesn’t cover other useful Dagger features such scopes and “feature” components; however, both can be easily plugged into our core project structure.
Components relationships
The following diagram illustrates the dependencies between components in our sample project.
Notice how all dependency/inheritance arrows point to the business layer. The entity layer does not need a component as it mainly comprises pure entity objects and business logic.
Goals
In order to allow using Dagger with our encapsulation constraints, we ensure that:
Each layer owns its Dagger component
Each Dagger Component is internal, and it is created and initialized within the module itself, so that each dependency graph is only fully visible inside the module. This guarantees encapsulation and allows us to declare both classes and the bound interfaces as internal if we don’t want to provide access to them outside of the module.
Modules and dependencies are, by default, only accessible by components in the same layer.
Each layer’s Dagger component inherits a public plain interface
This interface only includes the dependencies that we want to expose outside of the module, e.g.:
interface BusinessComponent {
    // provision methods for dependencies exposed to the presentation layer
}

@Component
internal interface InternalBusinessComponent : BusinessComponent
interface DataAccessComponent { // in the `data-access` module
    // provision methods for data layer dependencies exposed to the business layer
}

@Component // in the `data` module
internal interface DataComponent : DataAccessComponent
By doing so, we also encapsulate the usage of Dagger within the module itself, without forcing external “client code” to use the framework, and simplifying injecting a mock of the whole component for testing when needed.
Dependencies between layers are fully managed by Dagger
Each layer which has a direct dependency to a component from another layer, will declare so in its Dagger component as a component dependency:
Dagger has recently introduced component factories, which allow (sub)components to provide an interface, annotated with @Component.Factory (or @Subcomponent.Factory). The interface provides a single function, which contains dependencies (modules, components or any other) that the Component requires at dependency graph creation.
We use component factories to pass the components which are dependencies in the layer we are initialising, along with other classes that might be passed on from lower level layers (e.g. the application Context) with @BindsInstance.
Note: initialization code is ugly! The sample provides the simplest way to kick off the dependency graphs for each component and trigger initialization of dependencies that require it at application startup. Each project could require a different approach, the only requirement here is to follow the same layer initialisation order shown below.
The trigger for the initialization process is, as usual, the Application.onCreate() method.
In order to provide layer-specific initialization on each module, the sample provides a SampleBusinessApplication abstract class in the business layer, and a SampleApplication class, usually in the application module.
These classes provide callbacks to initialize the layers’ components (in this order):
initializeDataComponent()
val businessComponent: BusinessComponent = initializeBusinessComponent()
initializeAppComponent(businessComponent) // the presentation/view layers need the business layer to be initialized
The data-bridge module
In order to fulfill the desired level of encapsulation dictated by Clean Architecture, the data layer is not directly accessible from other layers (and modules), and it is used by the business layer through the data-access layer.
The data-bridge only purpose is to temporarily “break” the dependency inversion rule at initialization time to provide a DataBridgeInitializer; this is accessed by the application module to call to the data layer and trigger the Dagger dependency graph initialization for DataComponent.
Initialization steps
data layer through the data-bridge module: DataBridgeInitializer calls to DataLayerInitializer, which executes the component factory’s create() method for DataComponent and sets the singleton instance into DataComponent.INSTANCE and DataAccessComponent.INSTANCE (for access from the business layer)
business layer:BusinessLayerInitializer, called by SampleBusinessApplication, which executes the component factory’s create() method for BusinessInternalComponent and sets the singleton instance into BusinessInternalComponent.INSTANCE (DataAccessComponent.INSTANCE is passed to create())
presentation/view layer:initializeAppComponent(businessComponent) is called, and the ApplicationComponent.create() factory method is executed
Once all the Dagger dependency graphs are created, the application can then move on to the rest of its initialization process.
Dependency Injection: example
Note: this section is intentionally verbose and requires you to go through the code while reading. You can probably skip it if you are already familiar with Dagger.
We have three separate public Dagger Components in our codebase: ApplicationComponent (view/presentation layer), BusinessComponent and DataAccessComponent.
These are declared in the corresponding layer’s module to make sure that the Dagger annotation processor and compiler have access to all the required dependencies from the generated provider classes.
Let’s take our Feature2DetailsPresenter example and follow its dependencies from the bottom-up in the architecture hierarchy:
Presentation layer
When the default activity Feature2DetailsActivity is created, an injector method is called in the onCreate()
An instance of Feature2DetailsPresenter must be created: the class has an @Inject constructor that Dagger uses to instantiate it
Feature2DetailsInteractor is required by the constructor: we need to access the class provider, which is declared in BusinessComponent
A named GLOBAL_COMPUTATION_EXECUTOR is also injected in the constructor. Note that this is provided by BusinessComponent but exposed all the way from DataAccessComponent (this kind of transitive dependency is sometimes useful)
Business layer
BusinessComponent exposes Feature2DetailsInteractor via a provision method (feature2DetailsInteractor())
Interactor bindings between interface and concrete implementation are declared in InteractorsBindingModule (Feature2DetailsInteractor binds to Feature2DetailsInteractorImpl)
The bound implementation Feature2DetailsInteractorImpl has dependencies from the data access layer: Entity1Repo is one of those
Feature2DetailsInteractorImpl also requires InternalInteractor, which is bound in InteractorsBindingModule, but not exposed in BusinessComponent (but available in InternalBusinessComponent)
Data (Access) layers
The Dagger component DataComponent extends from the DataAccessComponent: all the provision methods for data access layer classes which are needed in the business layer are available here
DataAccessComponent exposes the needed provision method: entity1Repo(): Entity1Repo
SampleDataComponent includes DataRepoBindingModule, which, finally, contains the binding method which provides an instance of Entity1RepoImpl for the Entity1Repo interface
Copyright 2018-2020 Teamwork.com

Licensed under the Apache License, Version 2.0 (the "License");
you may not use this file except in compliance with the License.
You may obtain a copy of the License at

    http://www.apache.org/licenses/LICENSE-2.0

Unless required by applicable law or agreed to in writing, software
distributed under the License is distributed on an "AS IS" BASIS,
WITHOUT WARRANTIES OR CONDITIONS OF ANY KIND, either express or implied.
See the License for the specific language governing permissions and
limitations under the License.
This app creates a simple CLI tool used to create and verify multi-factor auth codes using Bandwidth’s Multi-Factor Auth API. The app will prompt the user for their phone number, followed by their preferred method of code delivery; either messaging or voice. The app will then text or call the phone number provided with a 6 digit MFA code that the user can enter back into the CLI to verify.
Pre-Requisites
In order to use the Bandwidth API users need to set up the appropriate application at the Bandwidth Dashboard and create API tokens.
To create an application log into the Bandwidth Dashboard and navigate to the Applications tab. Fill out the New Application form selecting the service (Messaging or Voice) that the application will be used for. All Bandwidth services require publicly accessible Callback URLs, for more information on how to set one up see Callback URLs.
For more information about API credentials see our Account Credentials page.
Running the Application
To install the required packages for this app, run the command:
npm i
Use the following command to run the application:
npm start
Environmental Variables
The sample app uses the below environmental variables.
BW_ACCOUNT_ID                 # Your Bandwidth Account Id
BW_USERNAME                   # Your Bandwidth API Token
BW_PASSWORD                   # Your Bandwidth API Secret
BW_NUMBER                     # Your The Bandwidth Phone Number
BW_VOICE_APPLICATION_ID       # Your Voice Application Id created in the dashboard
BW_MESSAGING_APPLICATION_ID   # Your Messaging Application Id created in the dashboard
USB Socket board came into existence as alternative to cheap miniUSB adapters which we not good enough for me.
These cheap boards do not care about D+/D- traced being equally long which is essential for USB wiring.
I had to design my own microUSB adapter board to fit my needs.
Following types of boards are available:
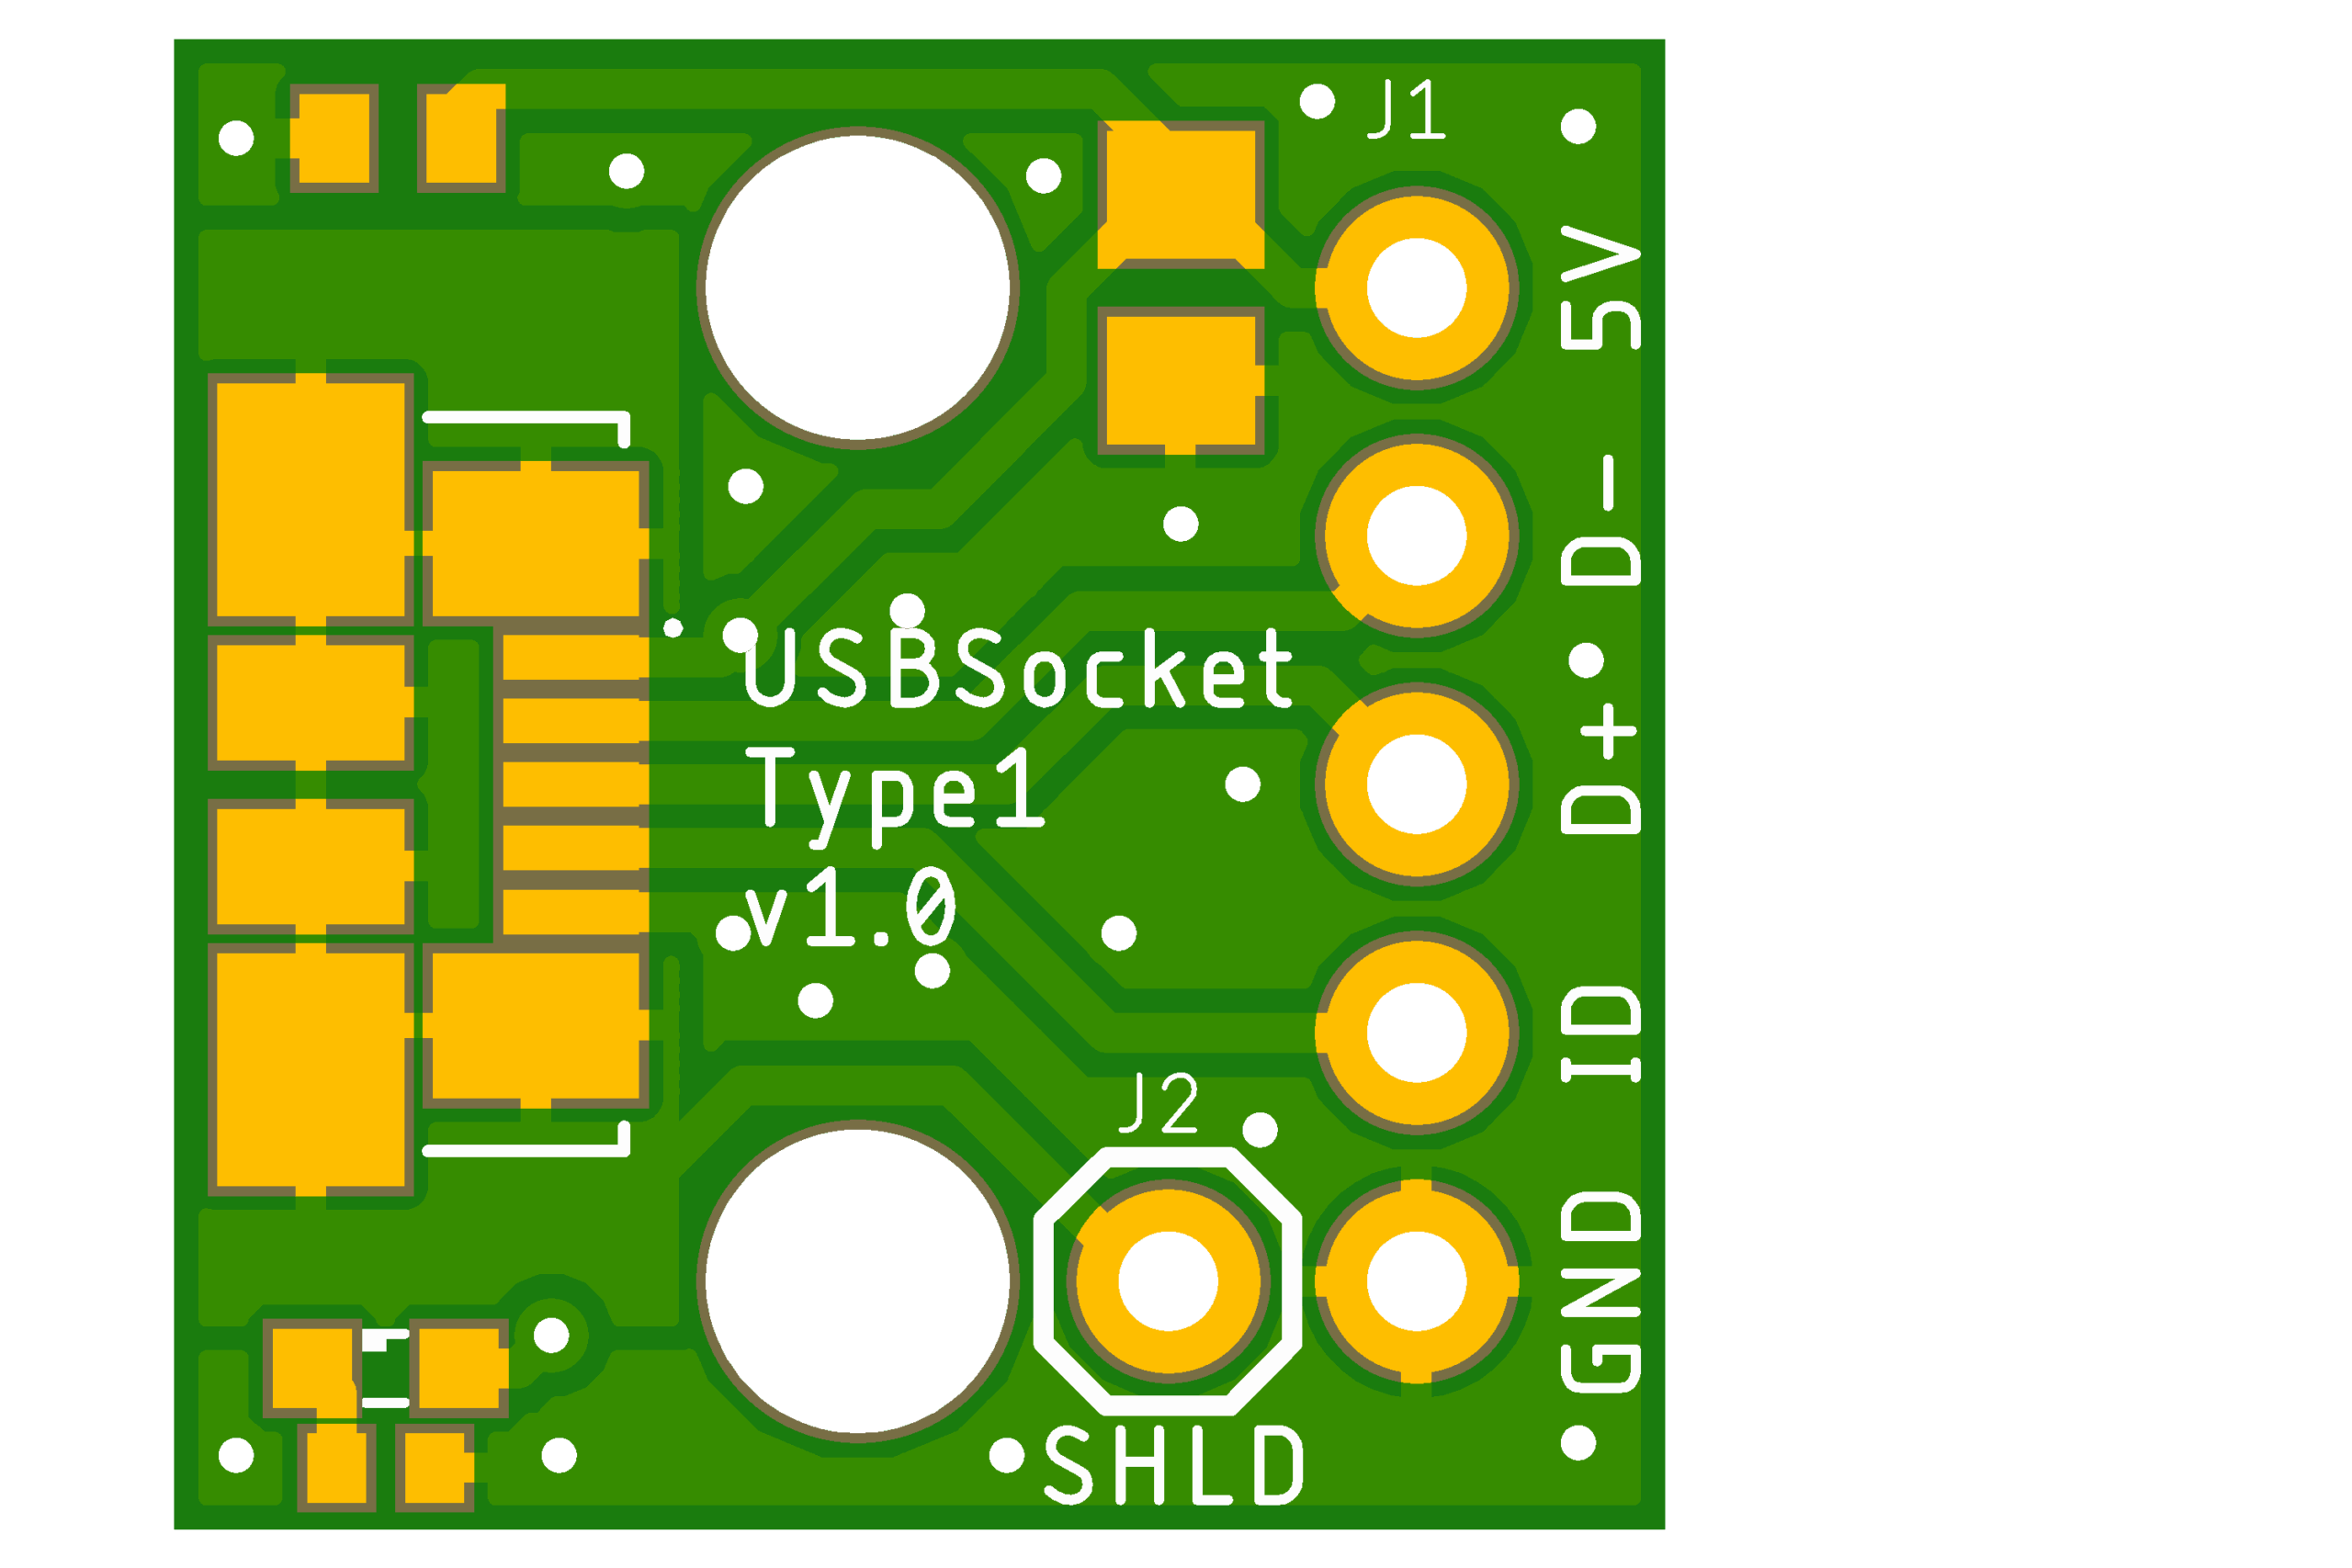
Type1 is breadboard friendly microUSB socket
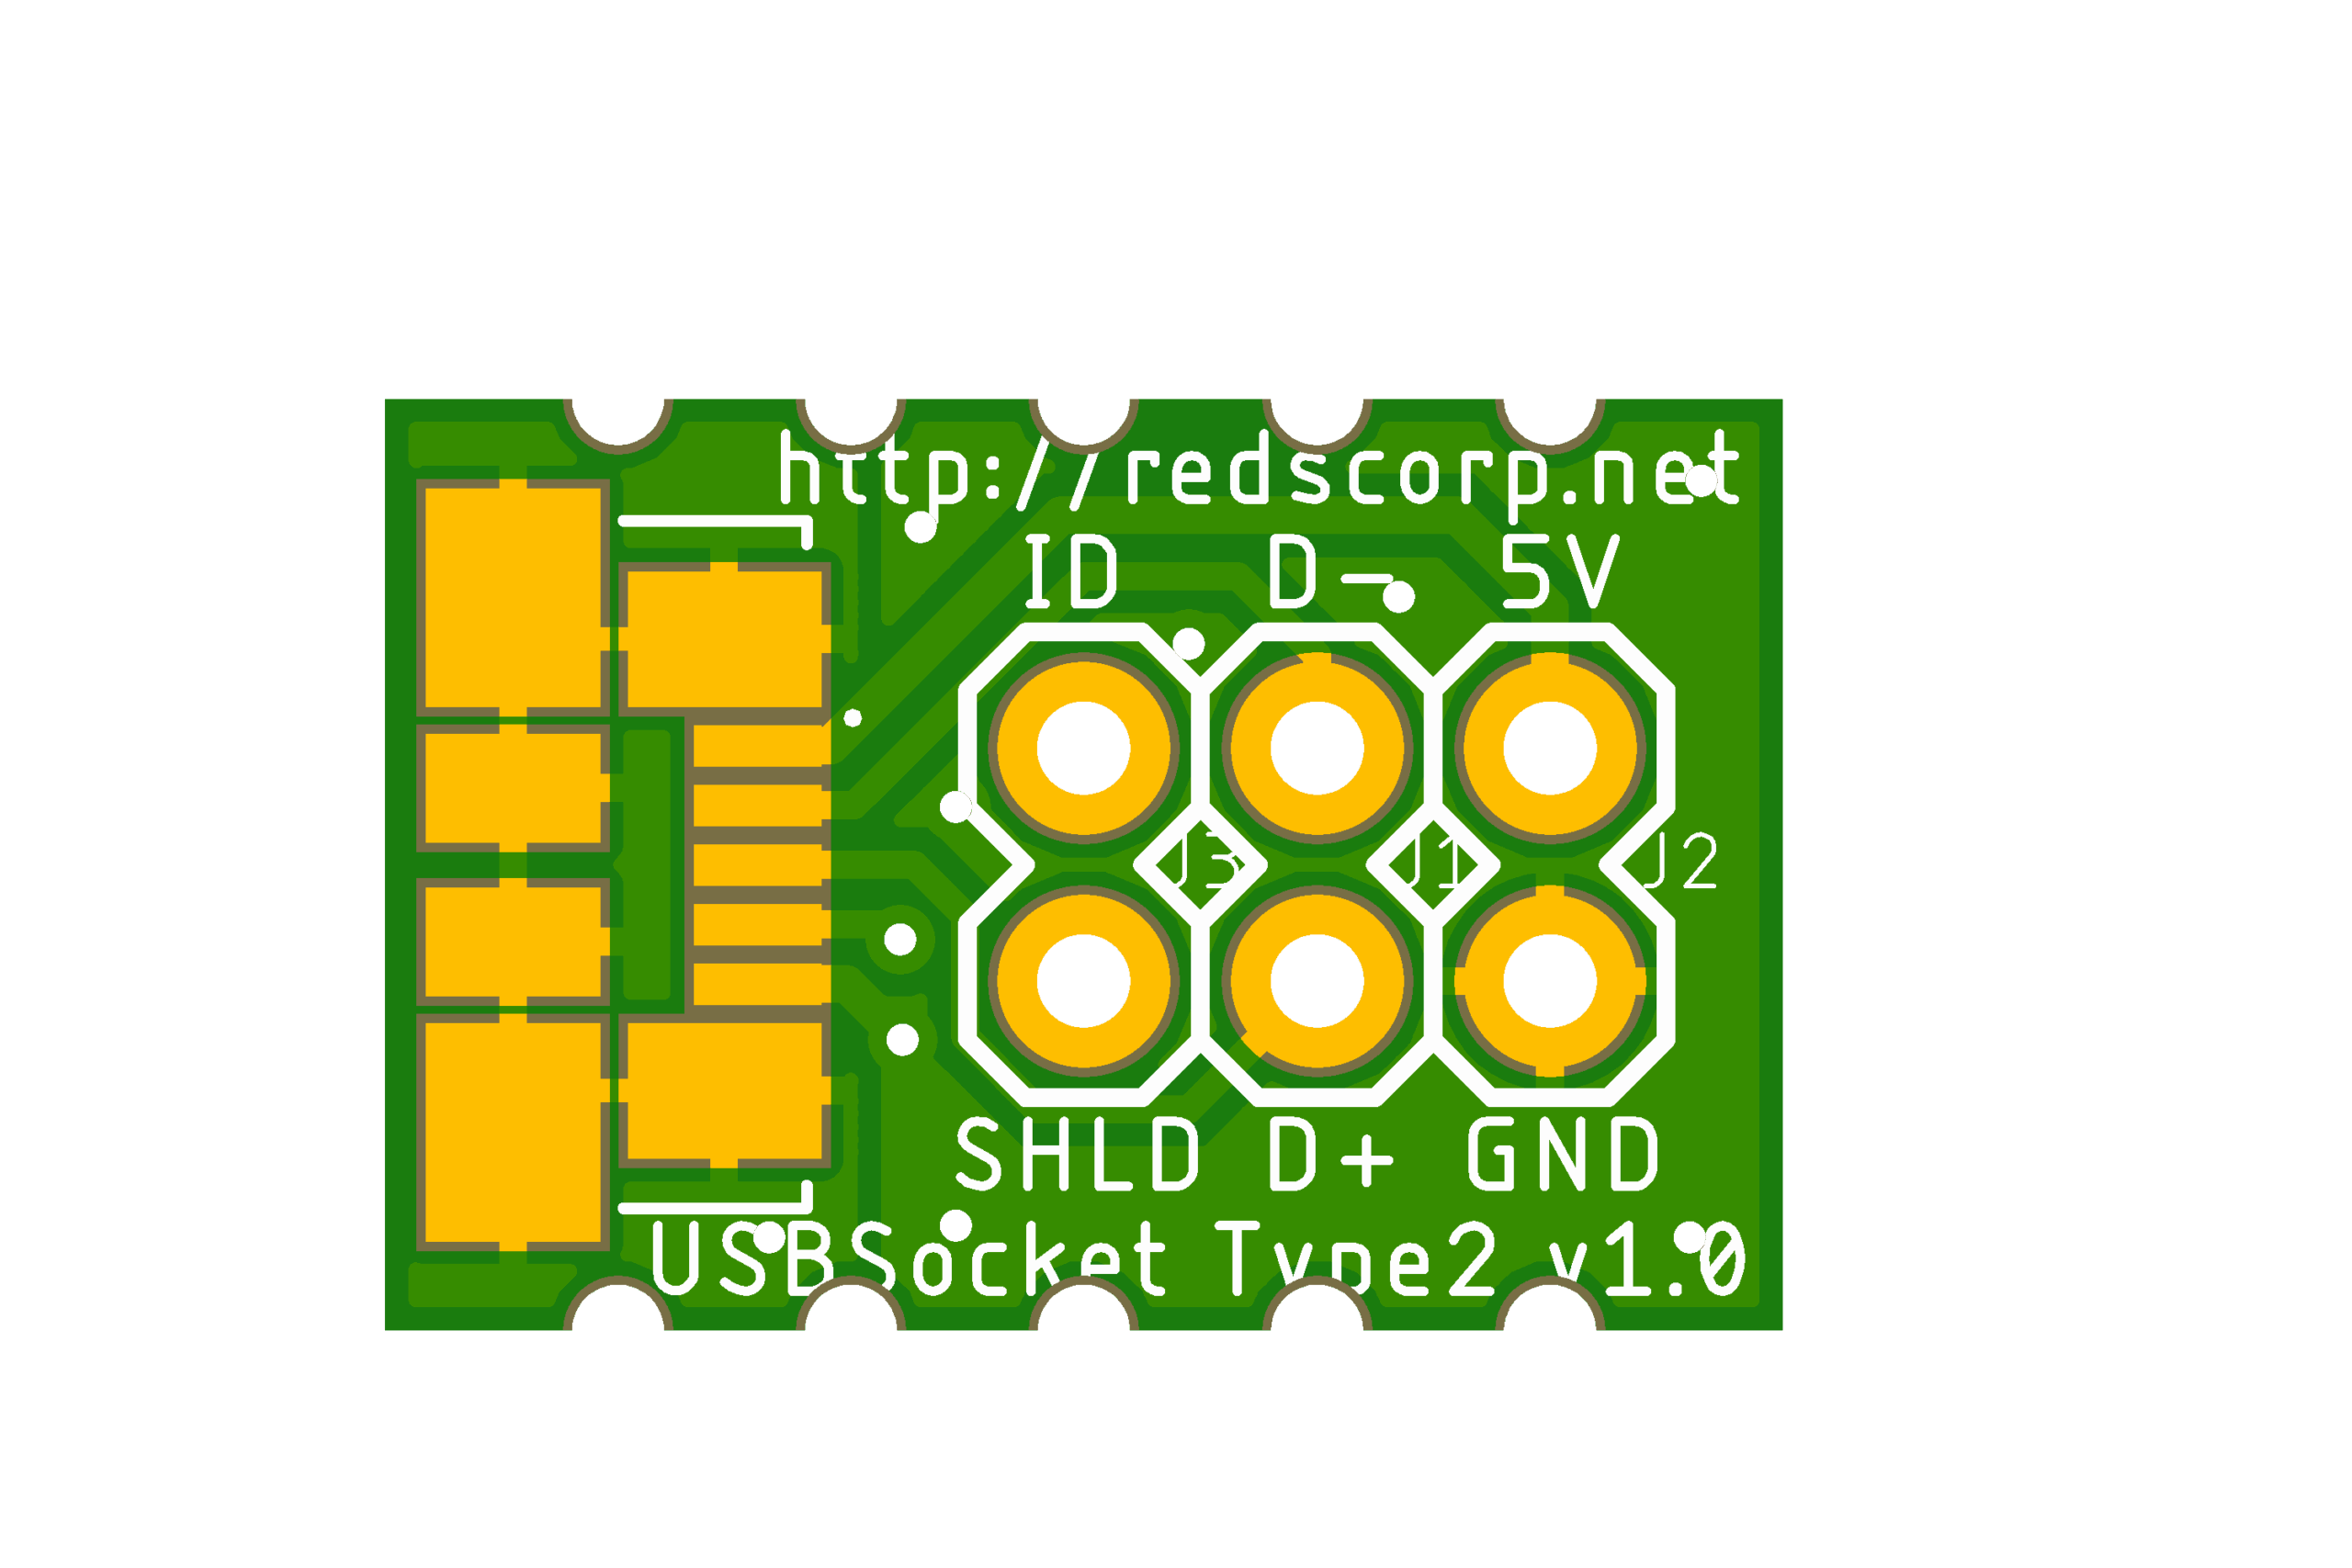
Type2 is cable mount friendly microUSB socket
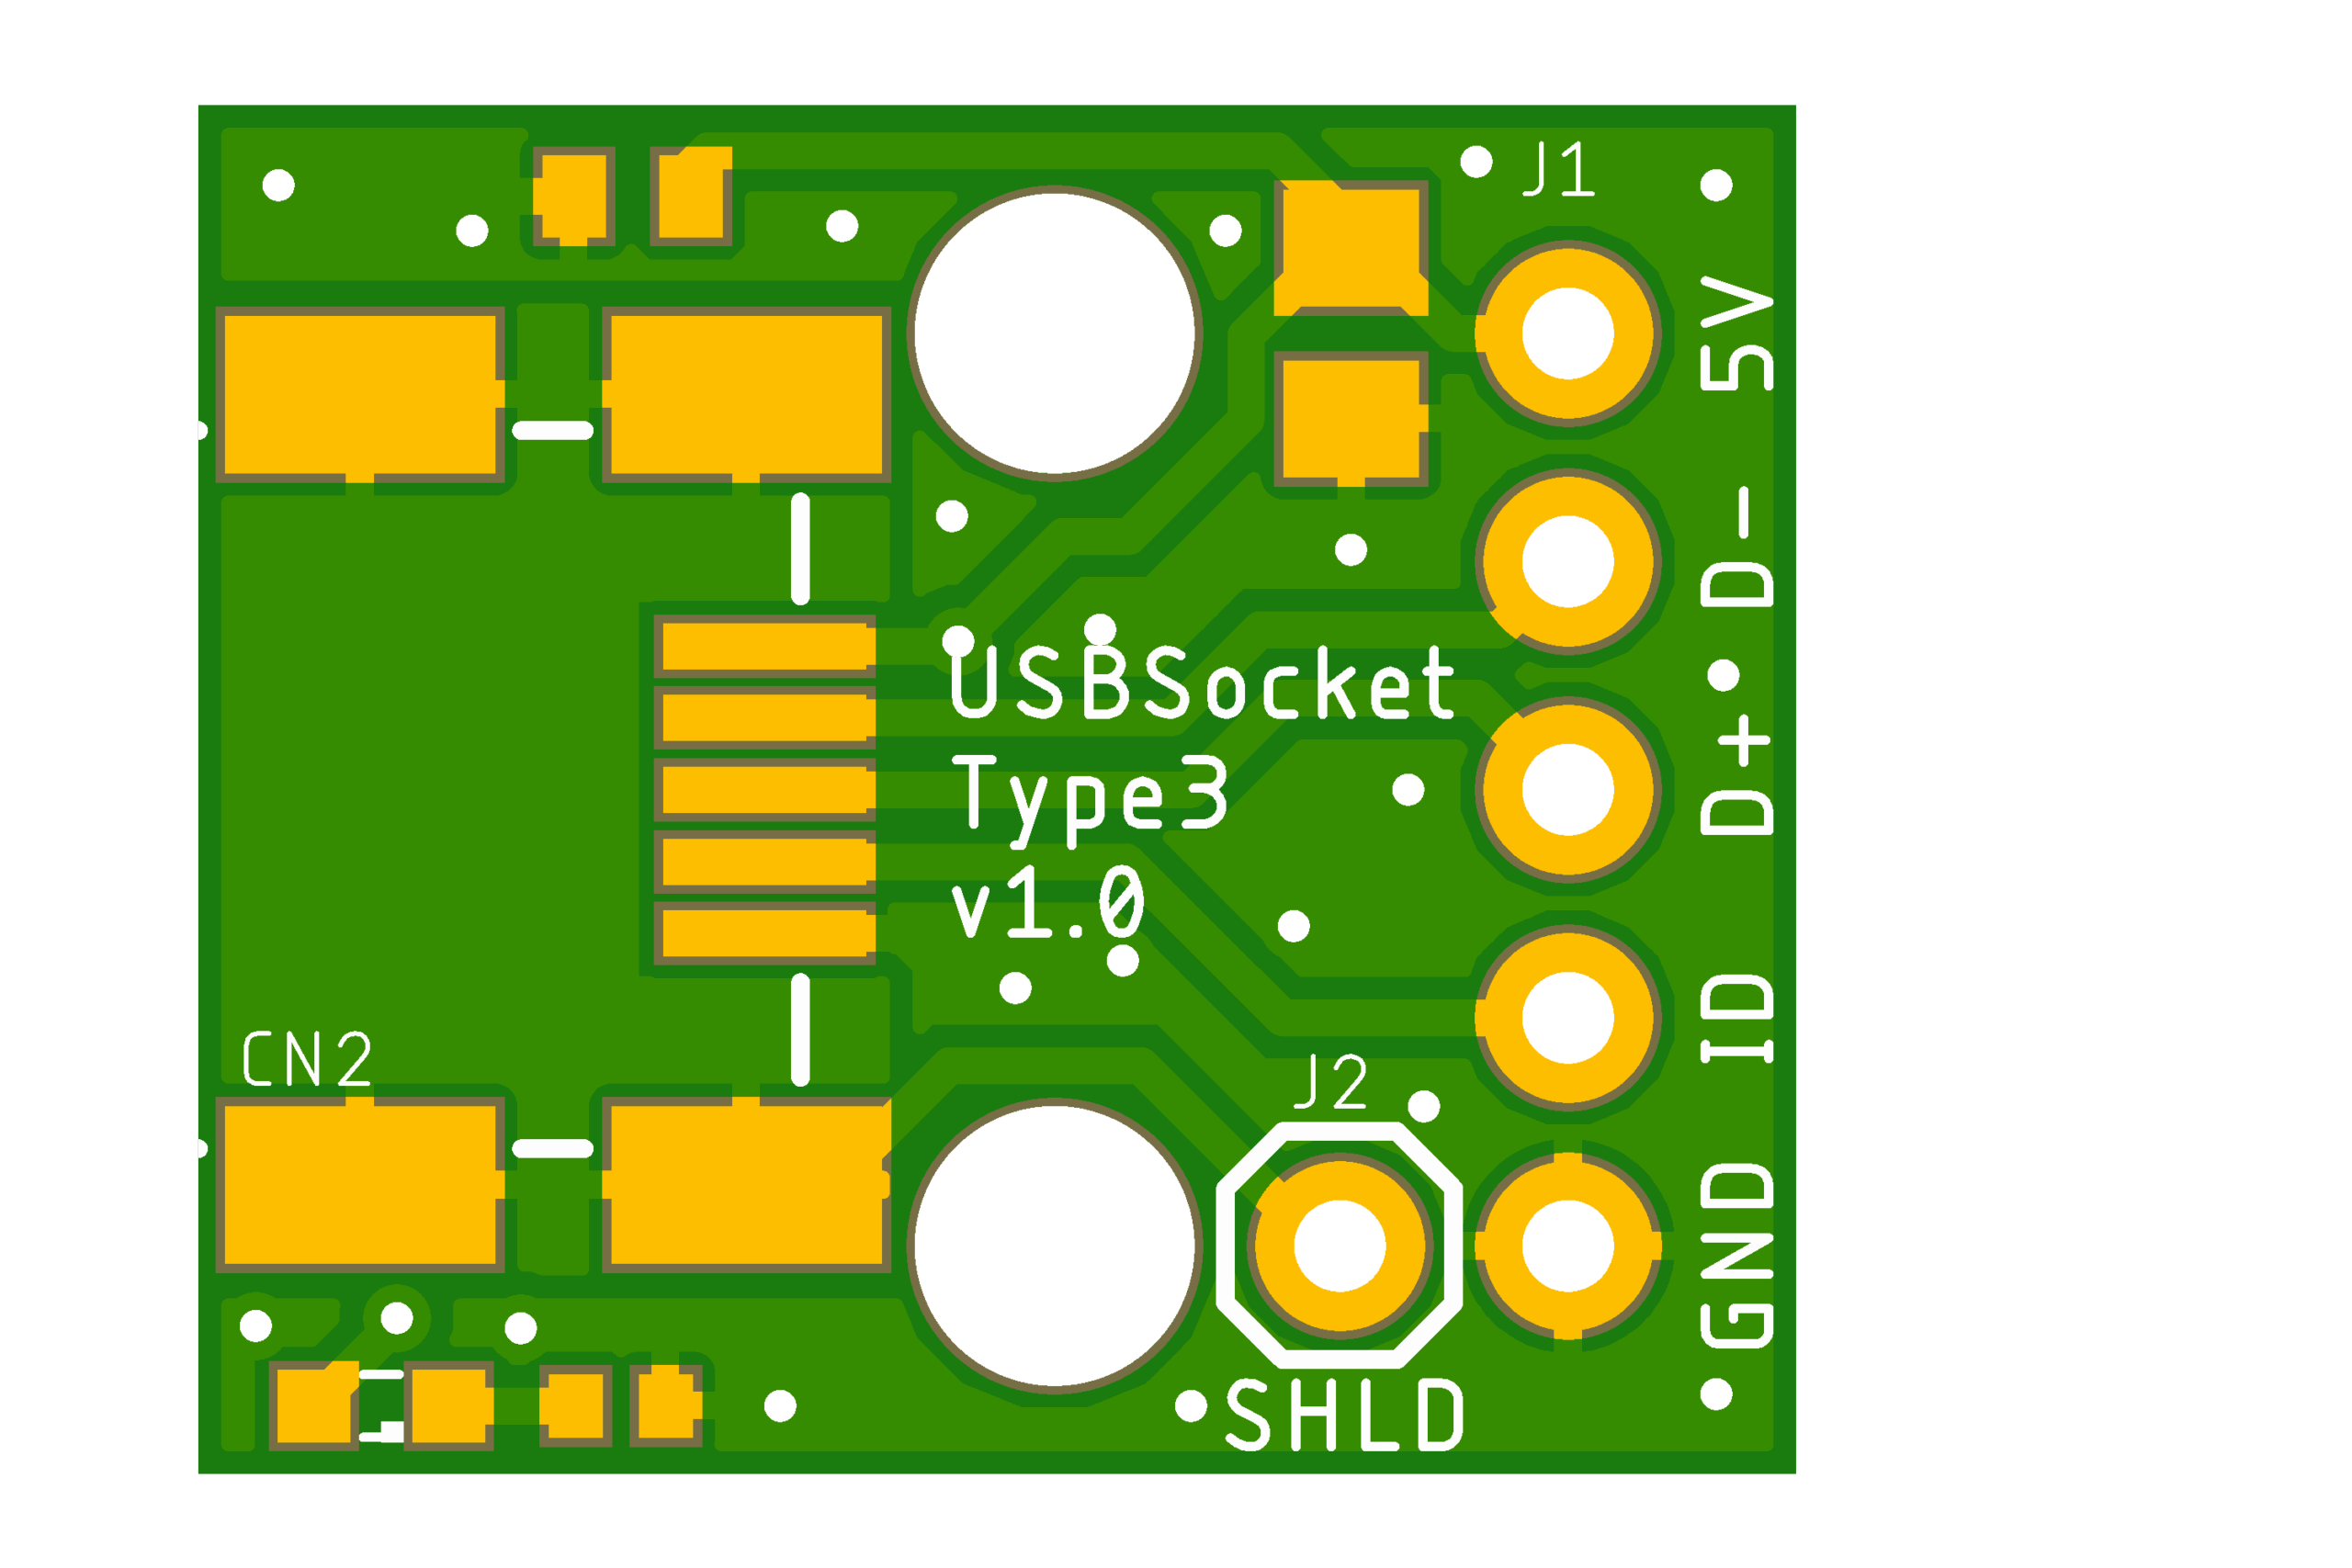
Type3 is breadboard friendly miniUSB socket
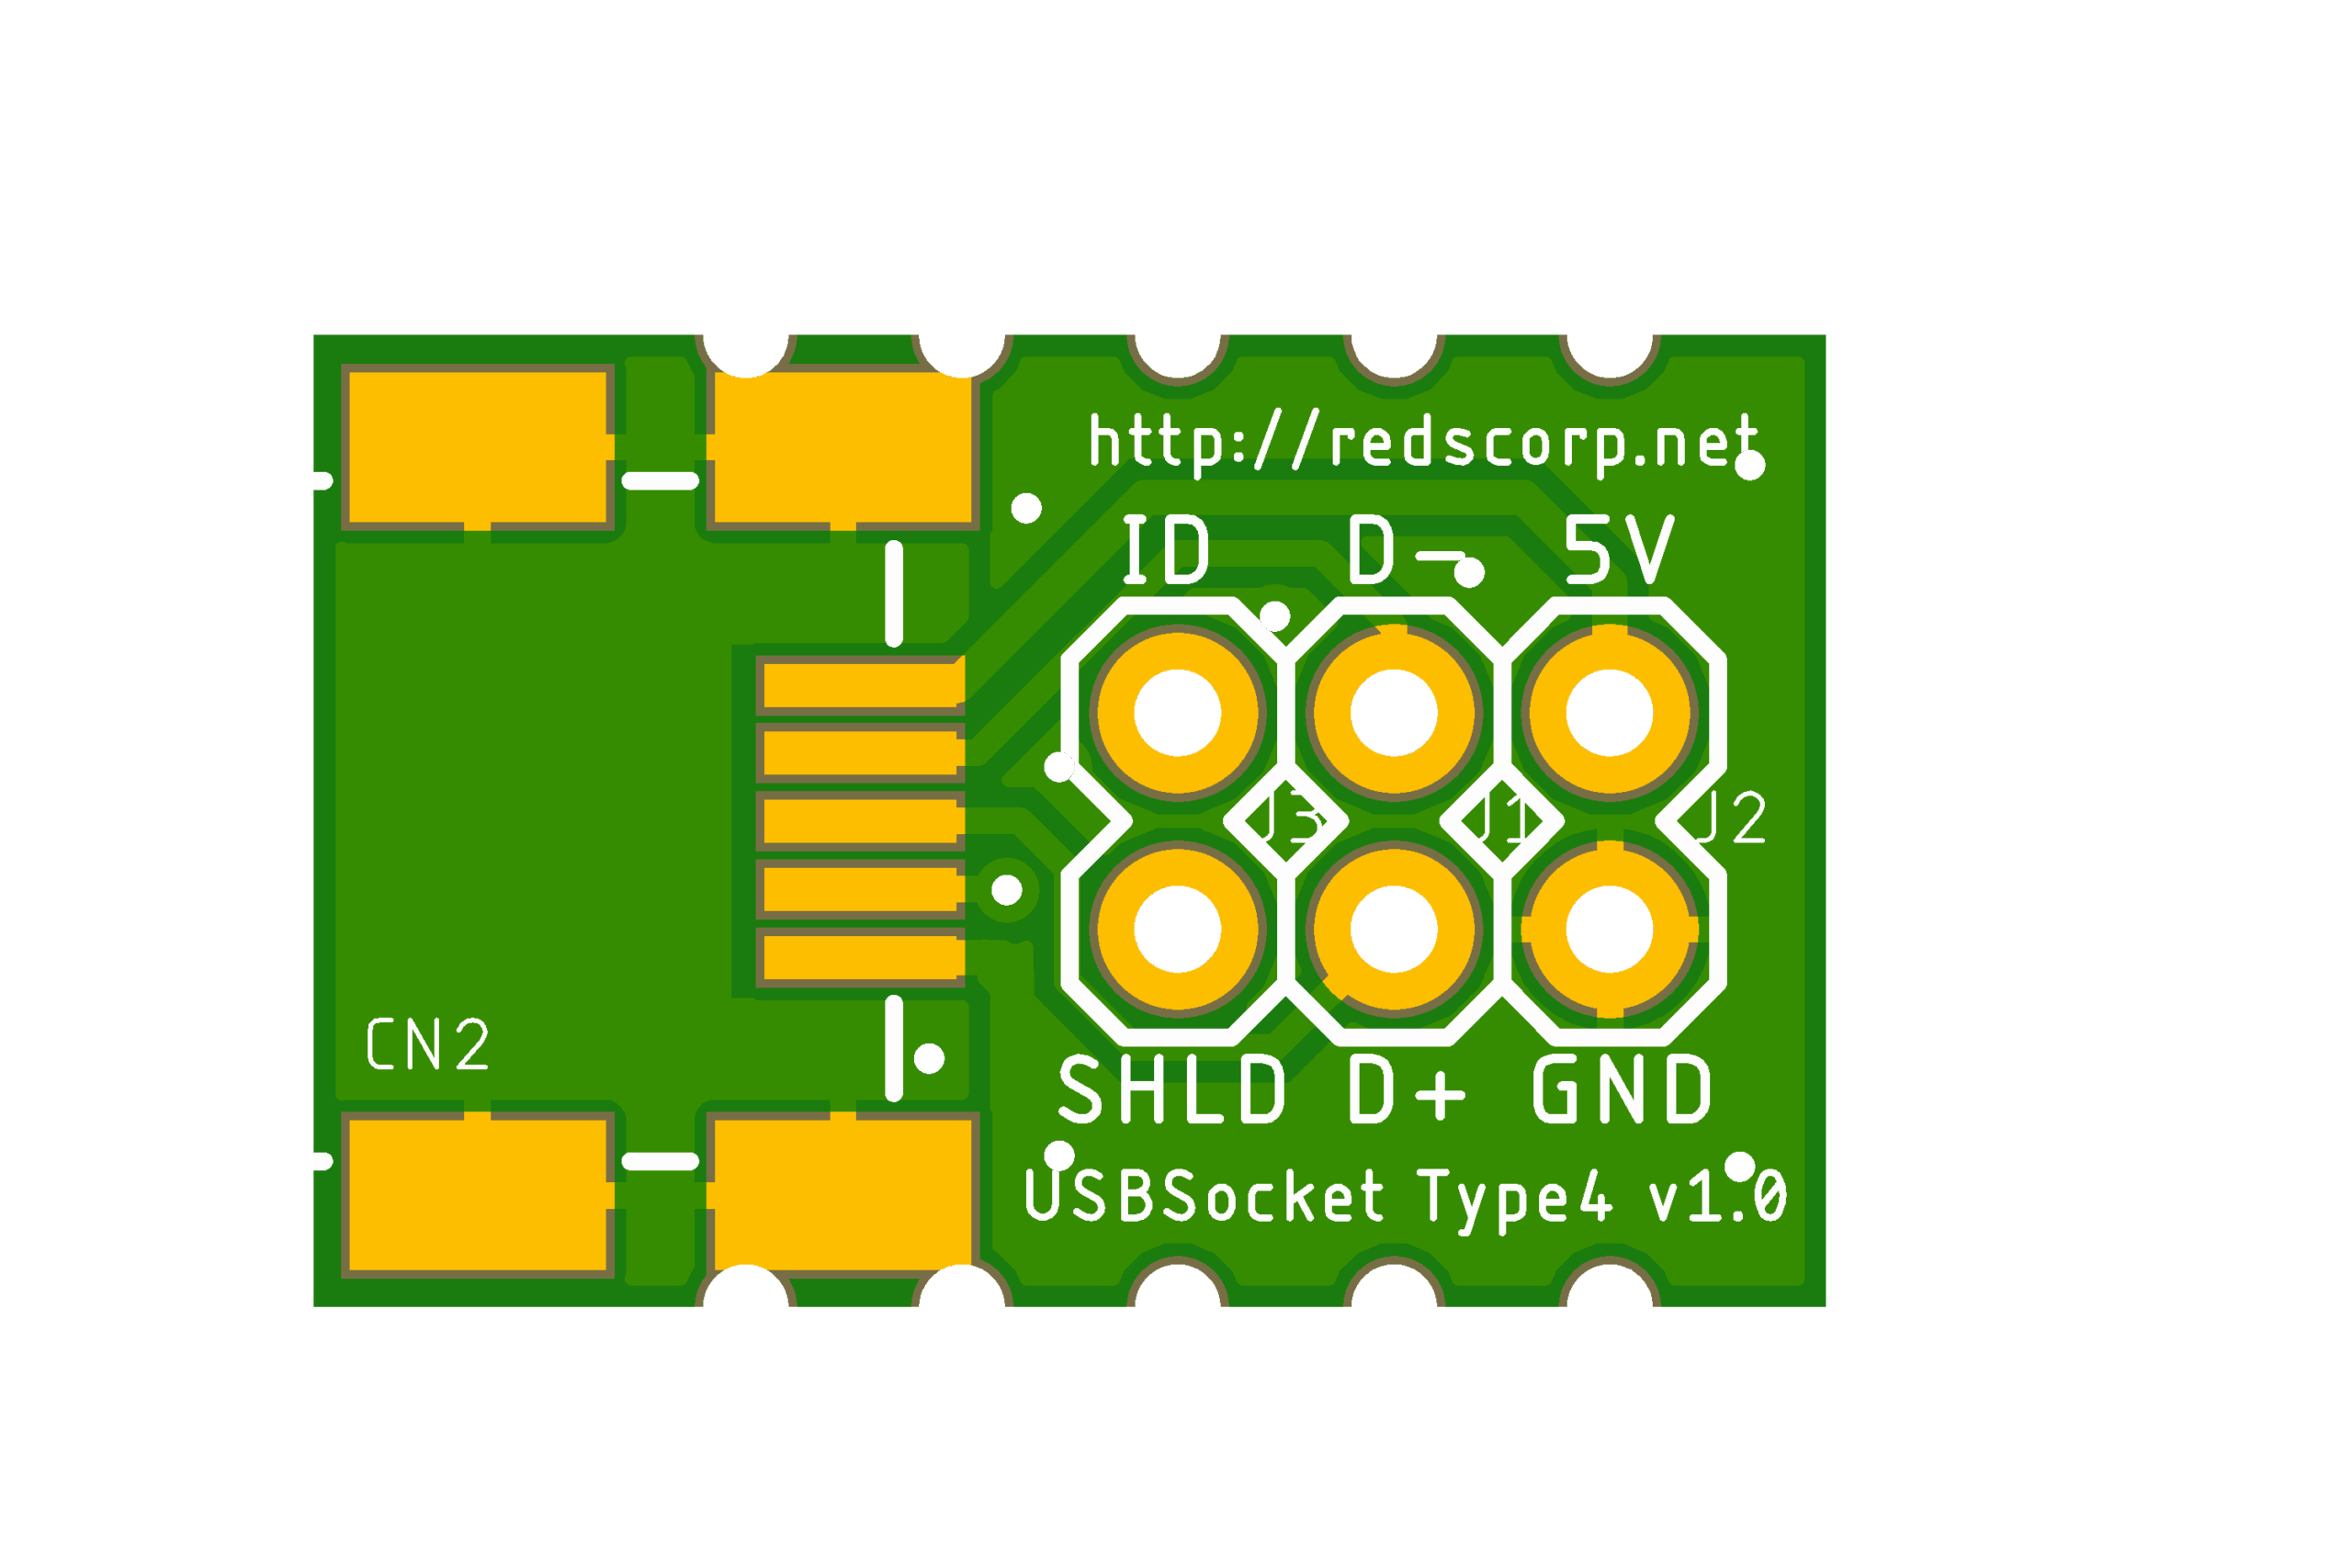
Type4 is cable mount friendly miniUSB socket
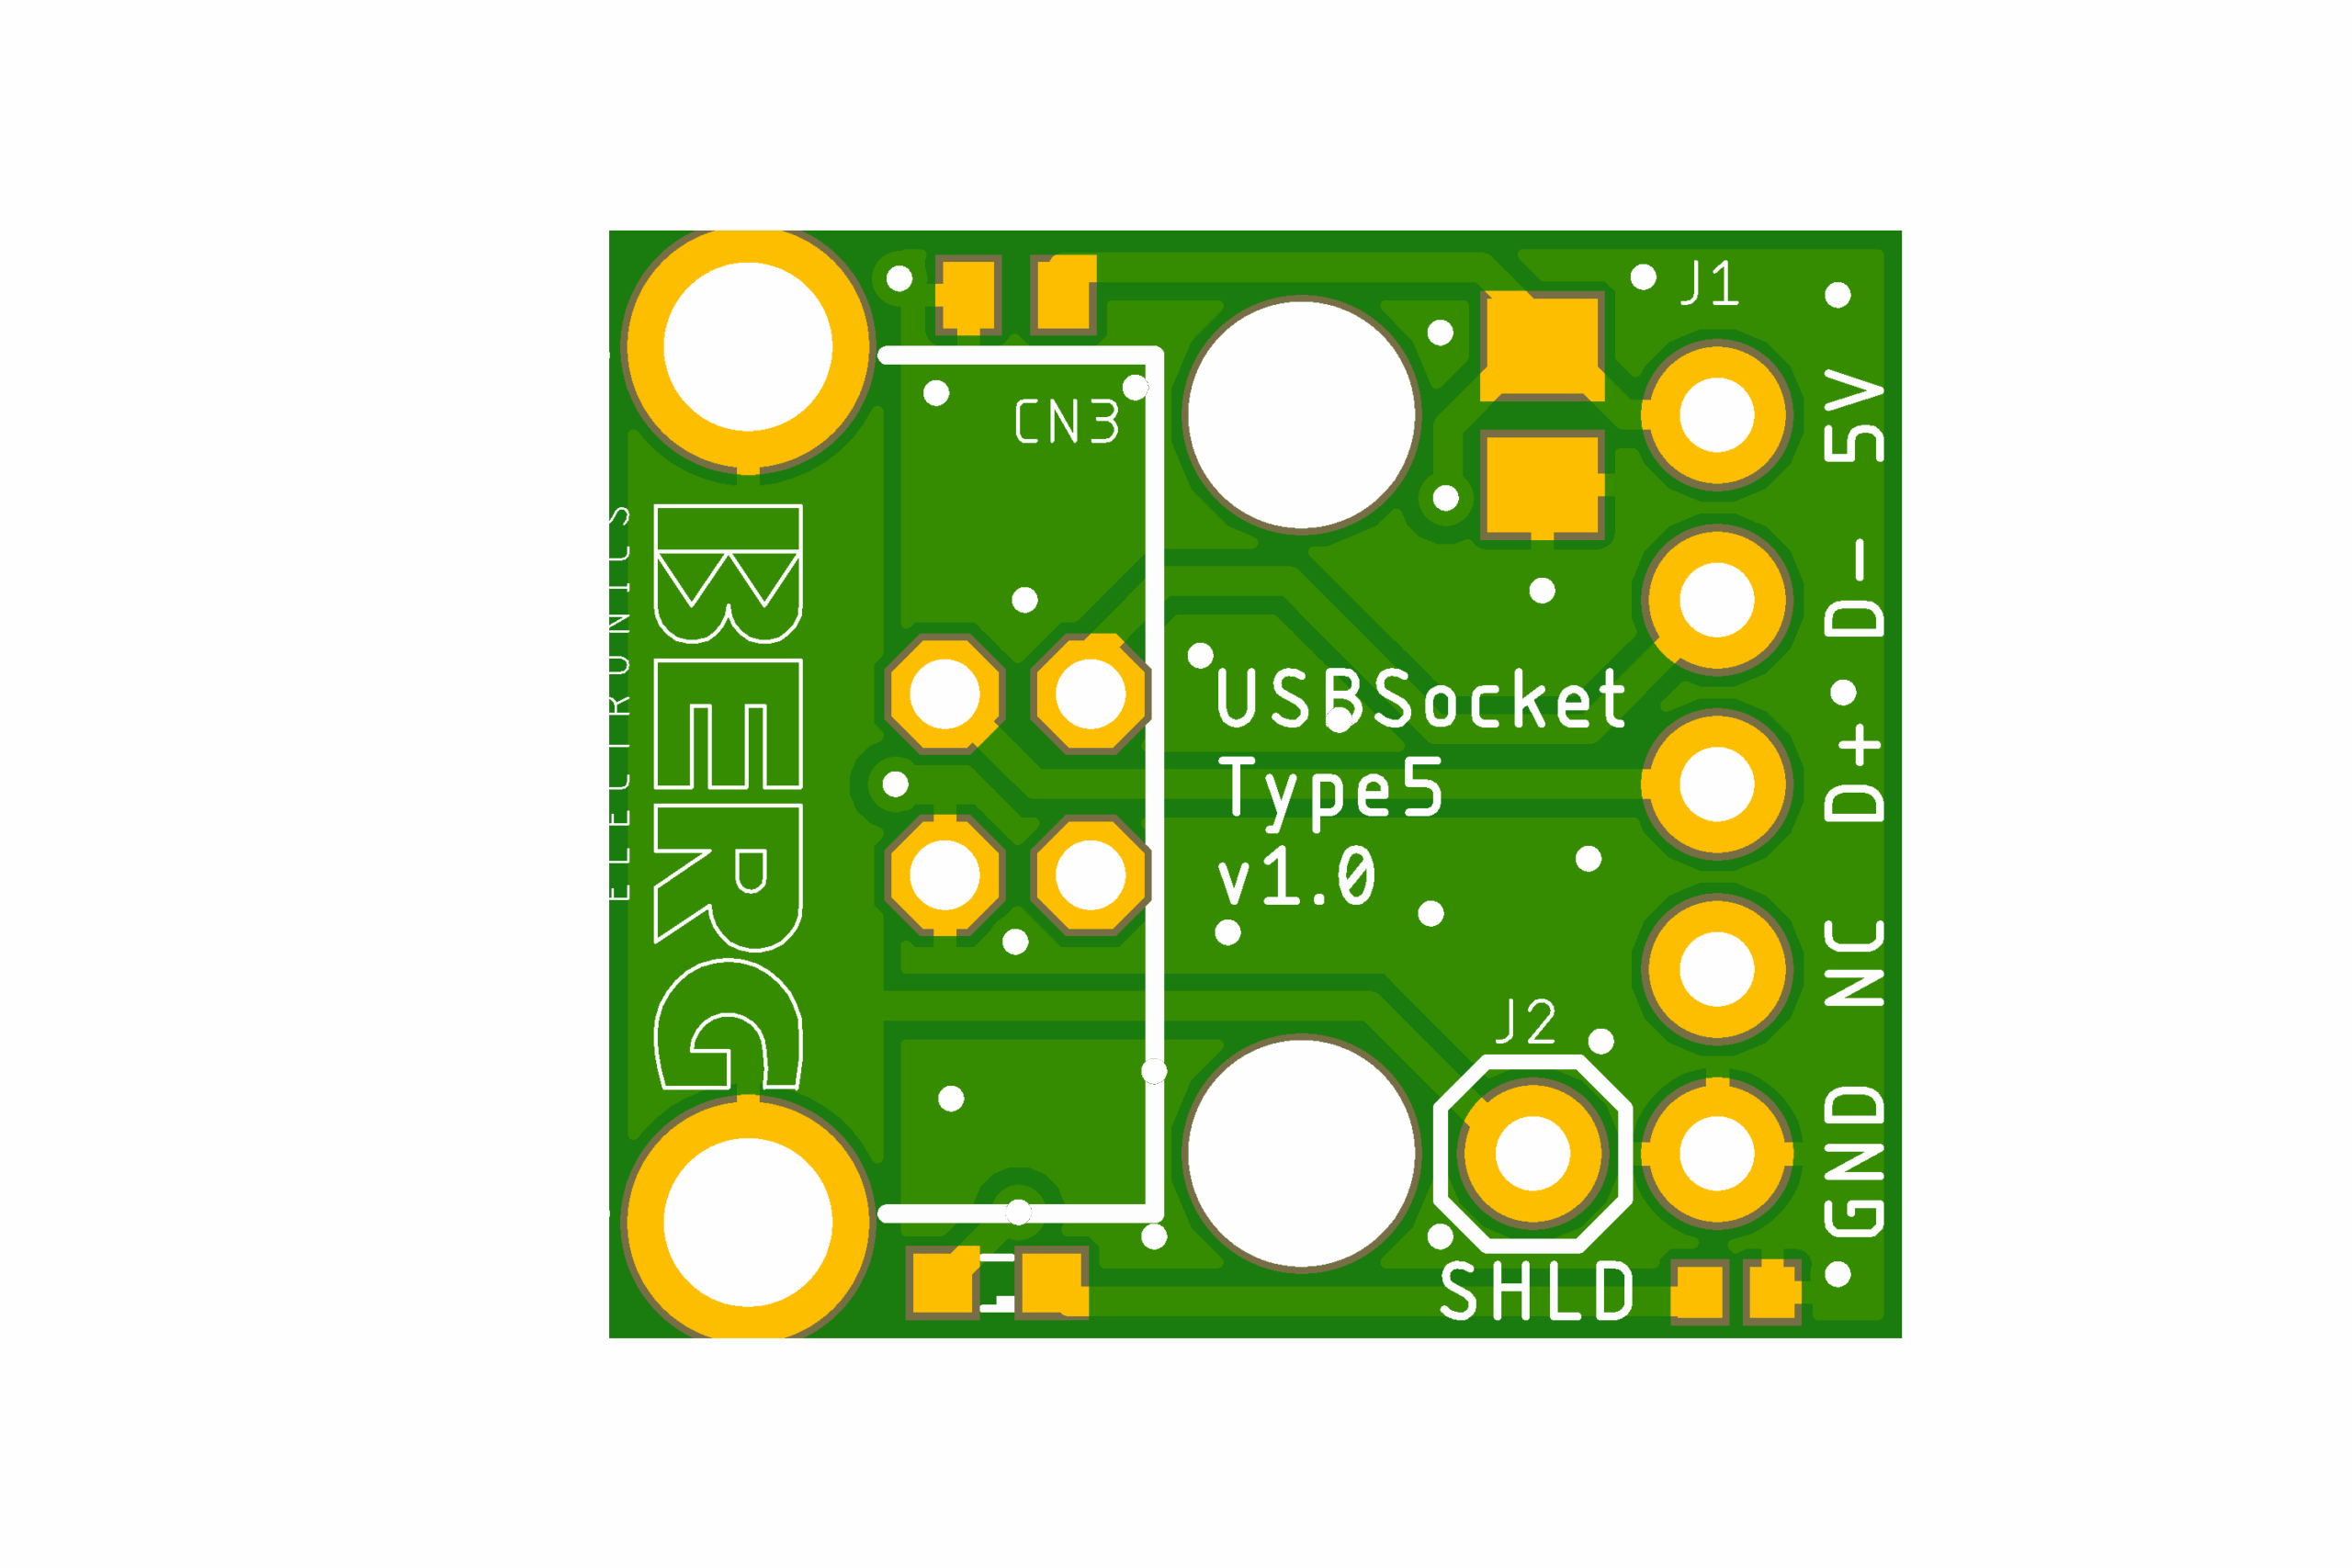
Type5 is breadboard friendly USB socket
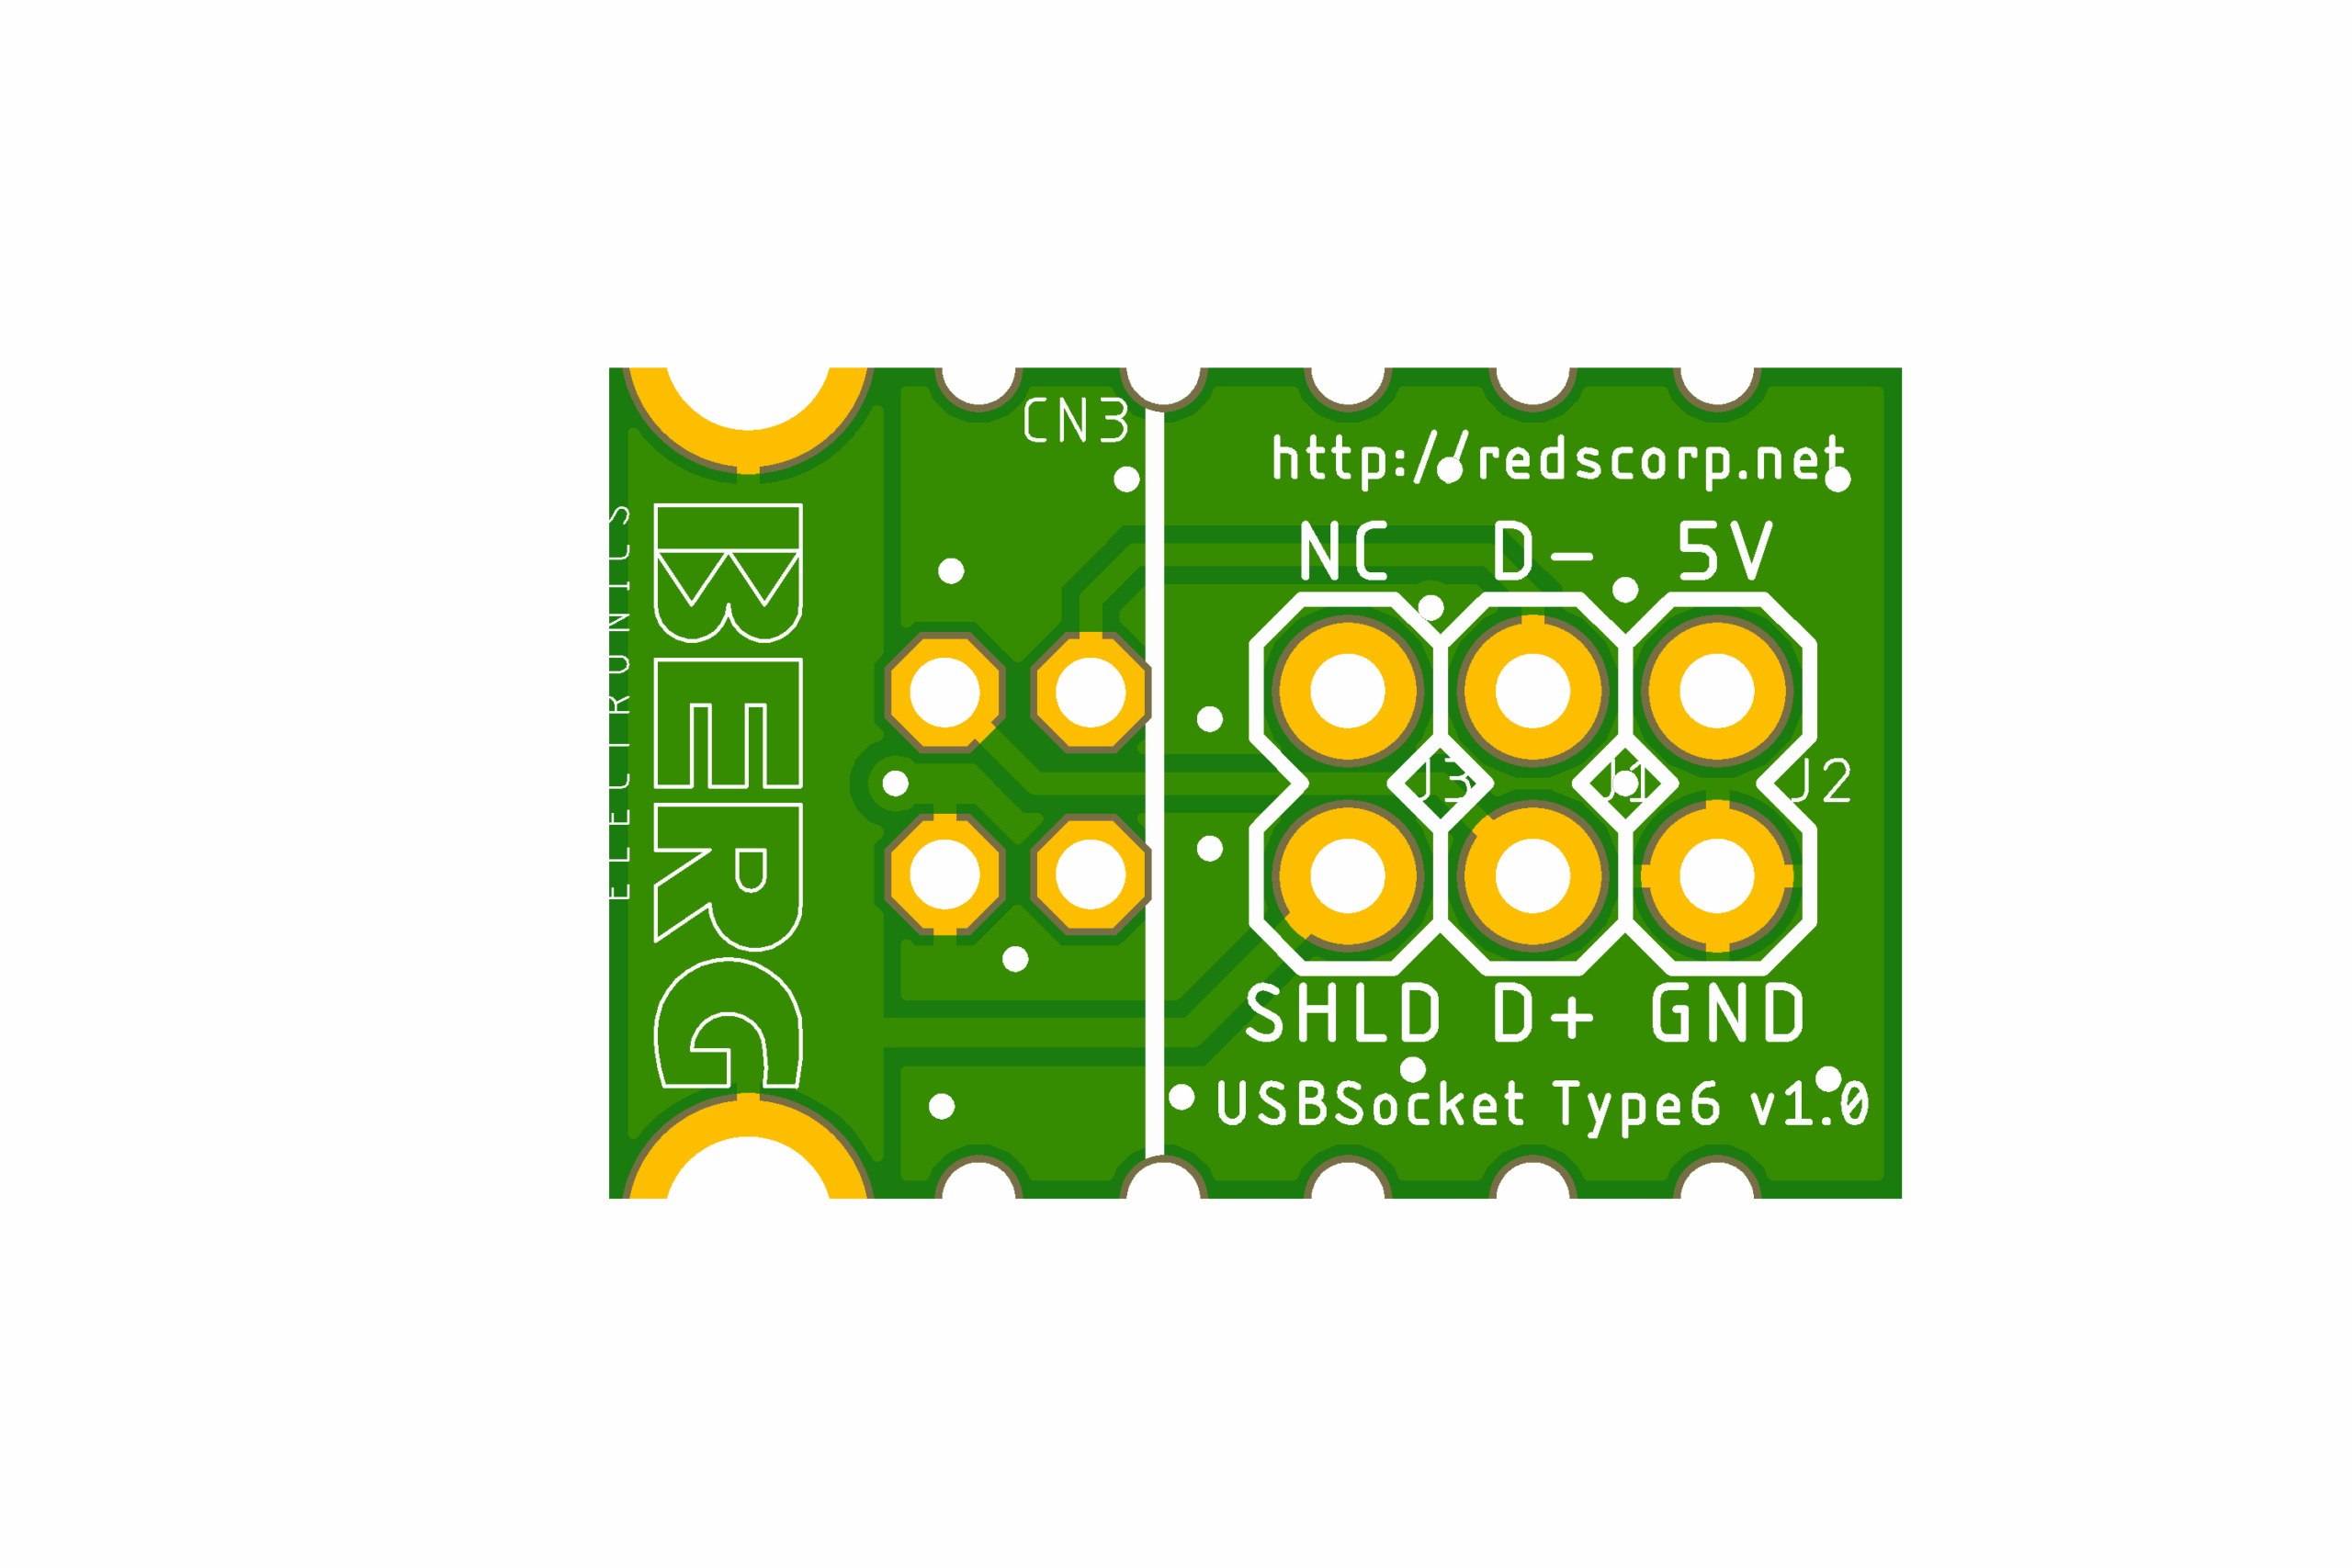
Type6 is cable mount friendly USB socket
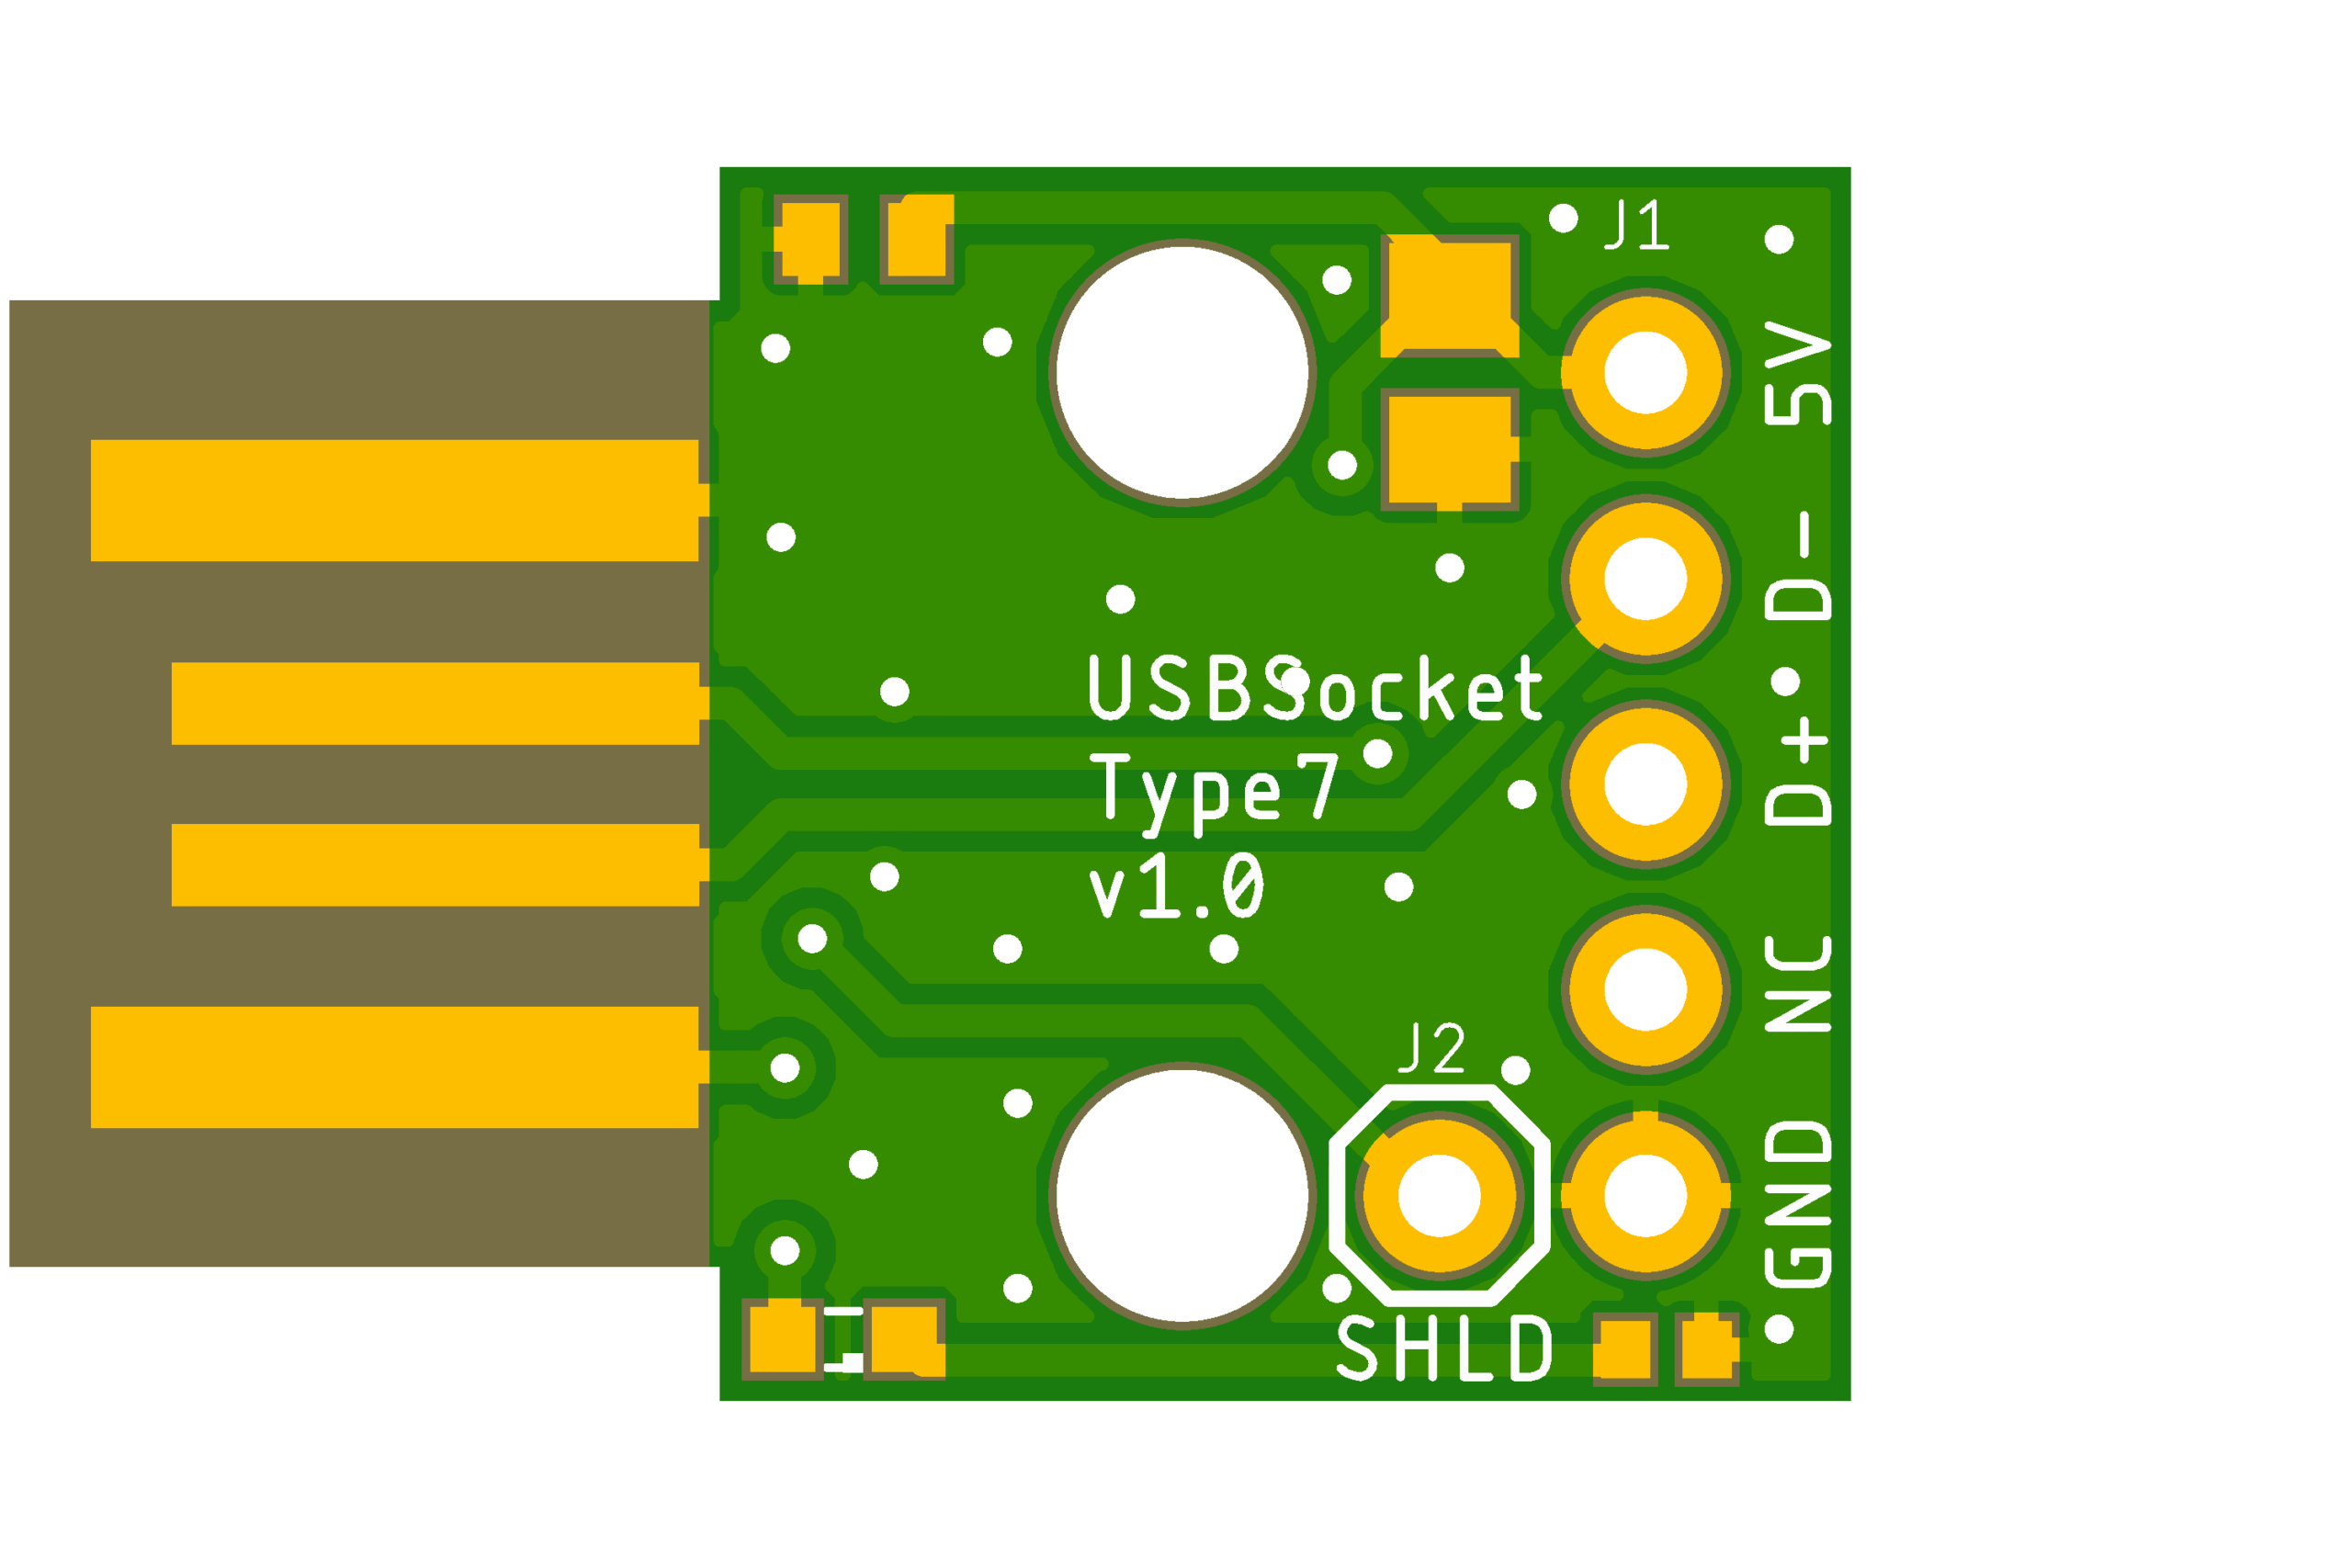
Type7 is breadboard friendly PCB-USB socket
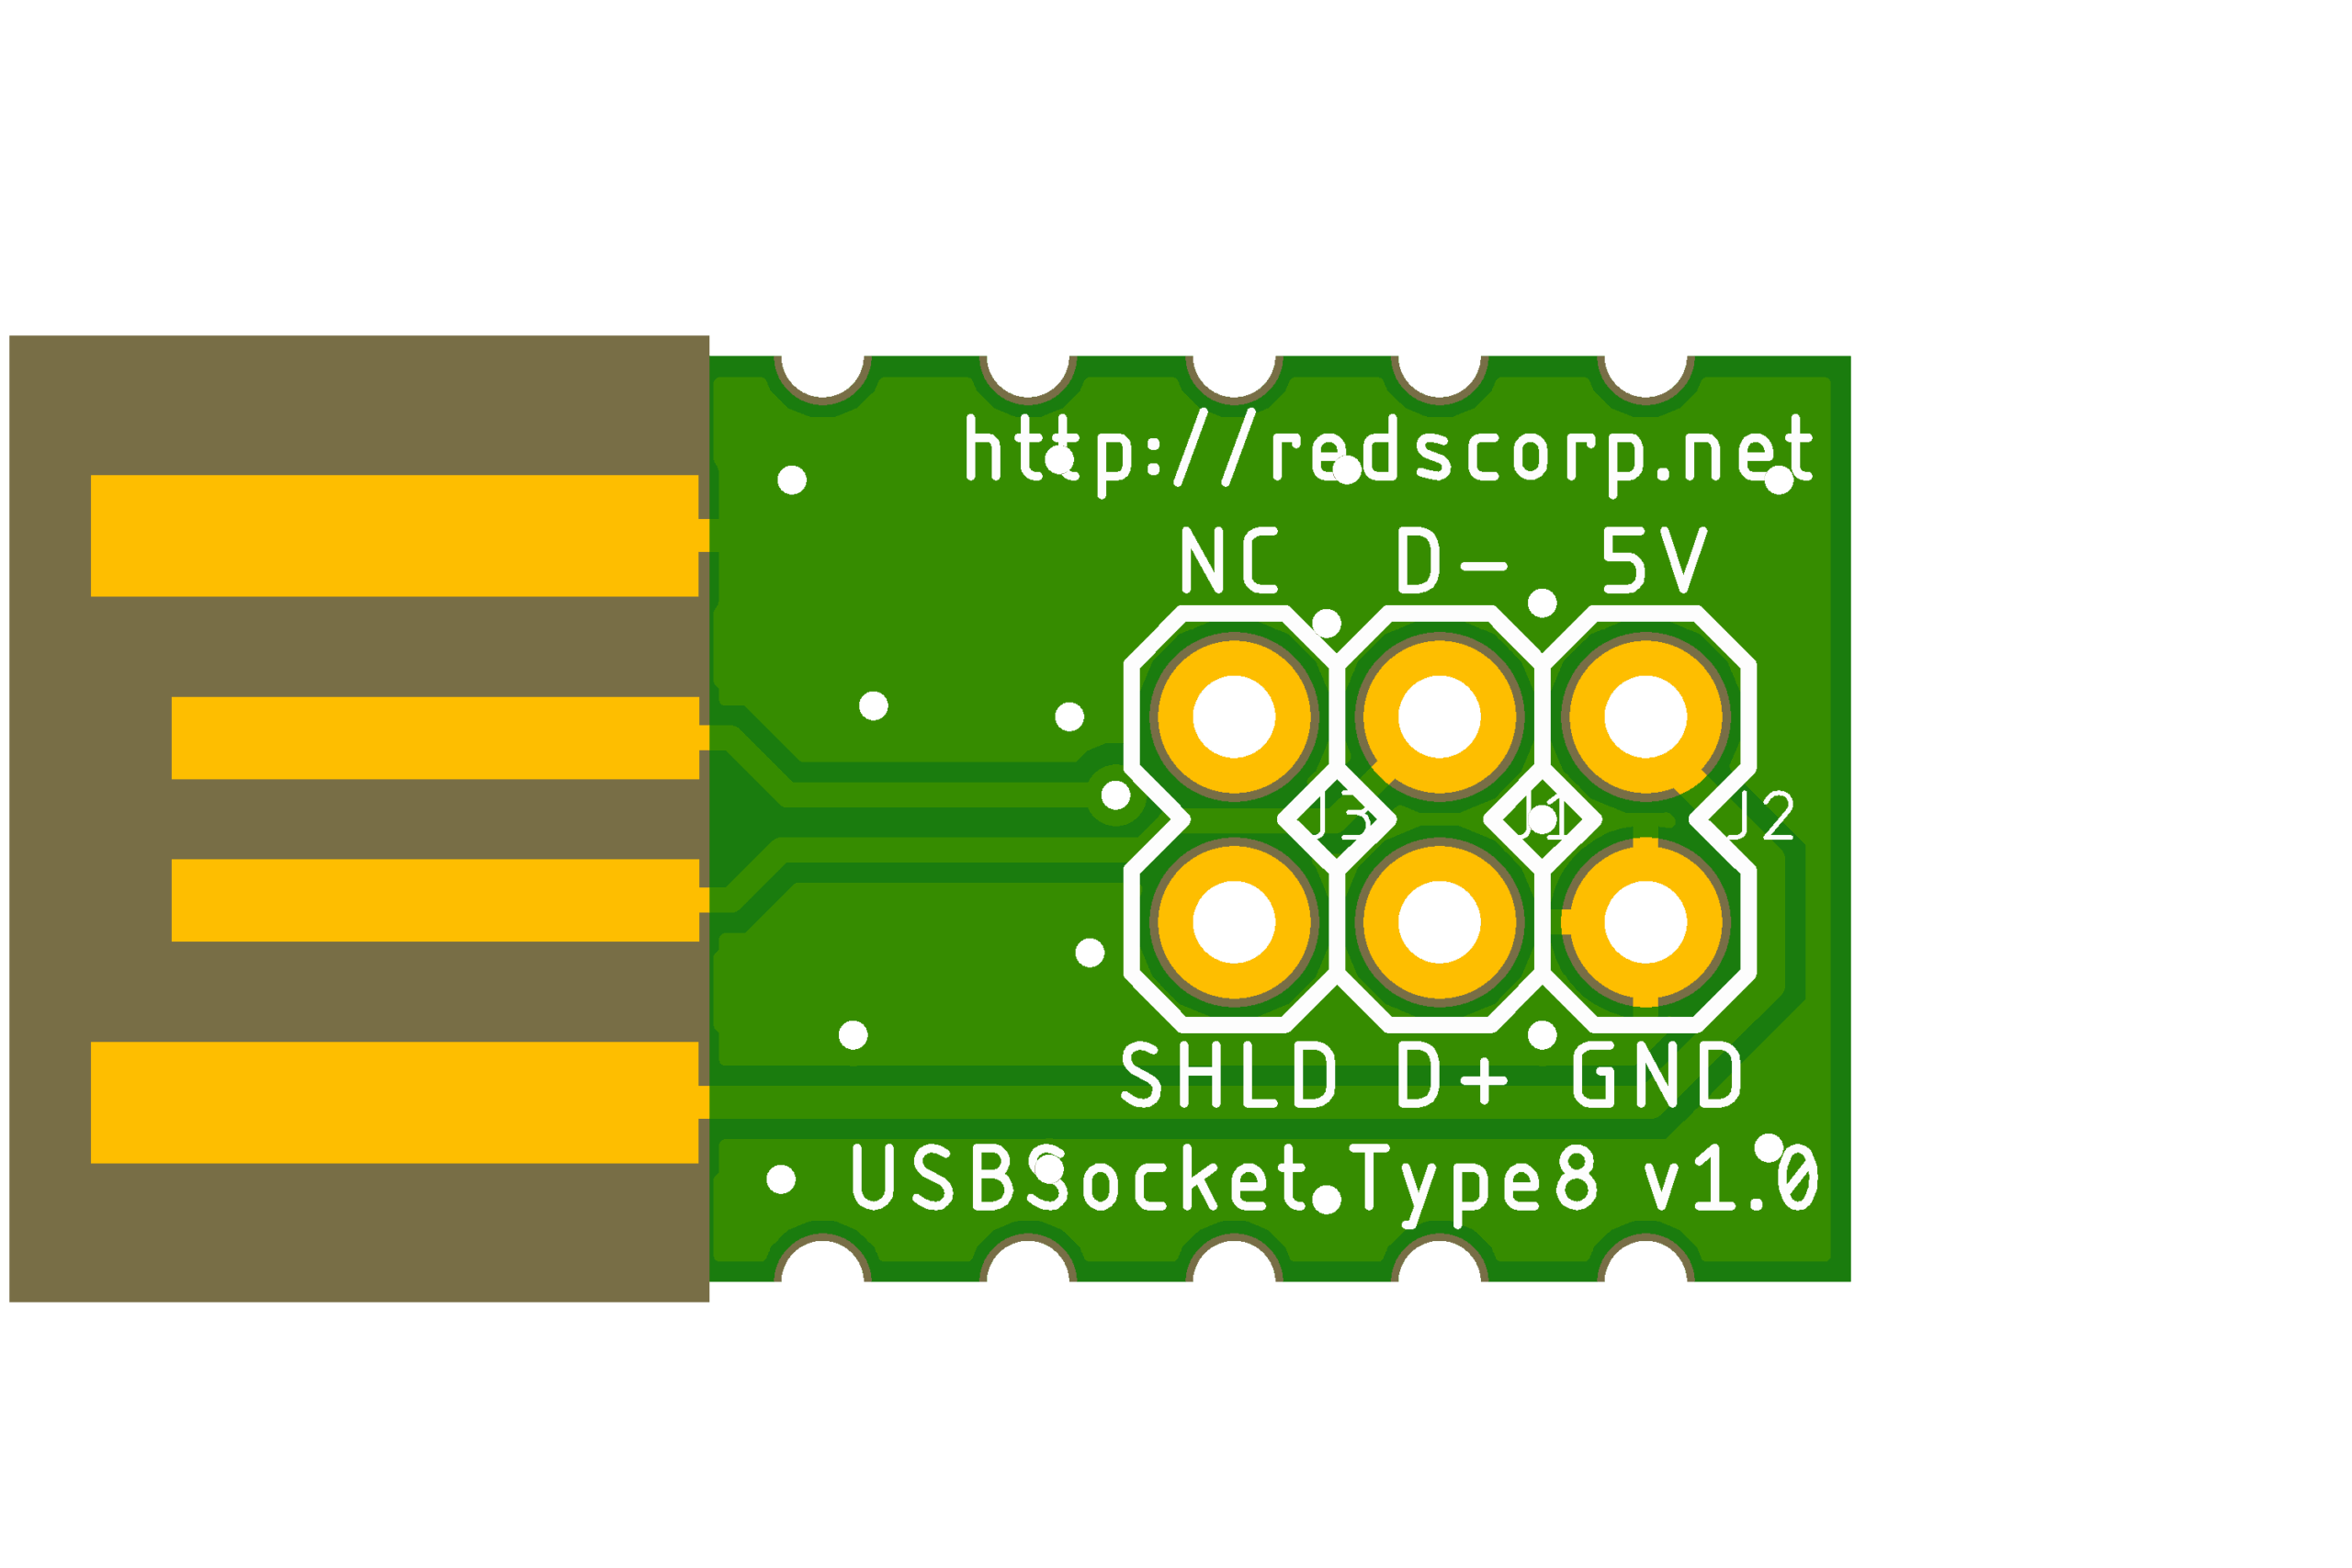
Type8 is cable mount friendly PCB-USB socket
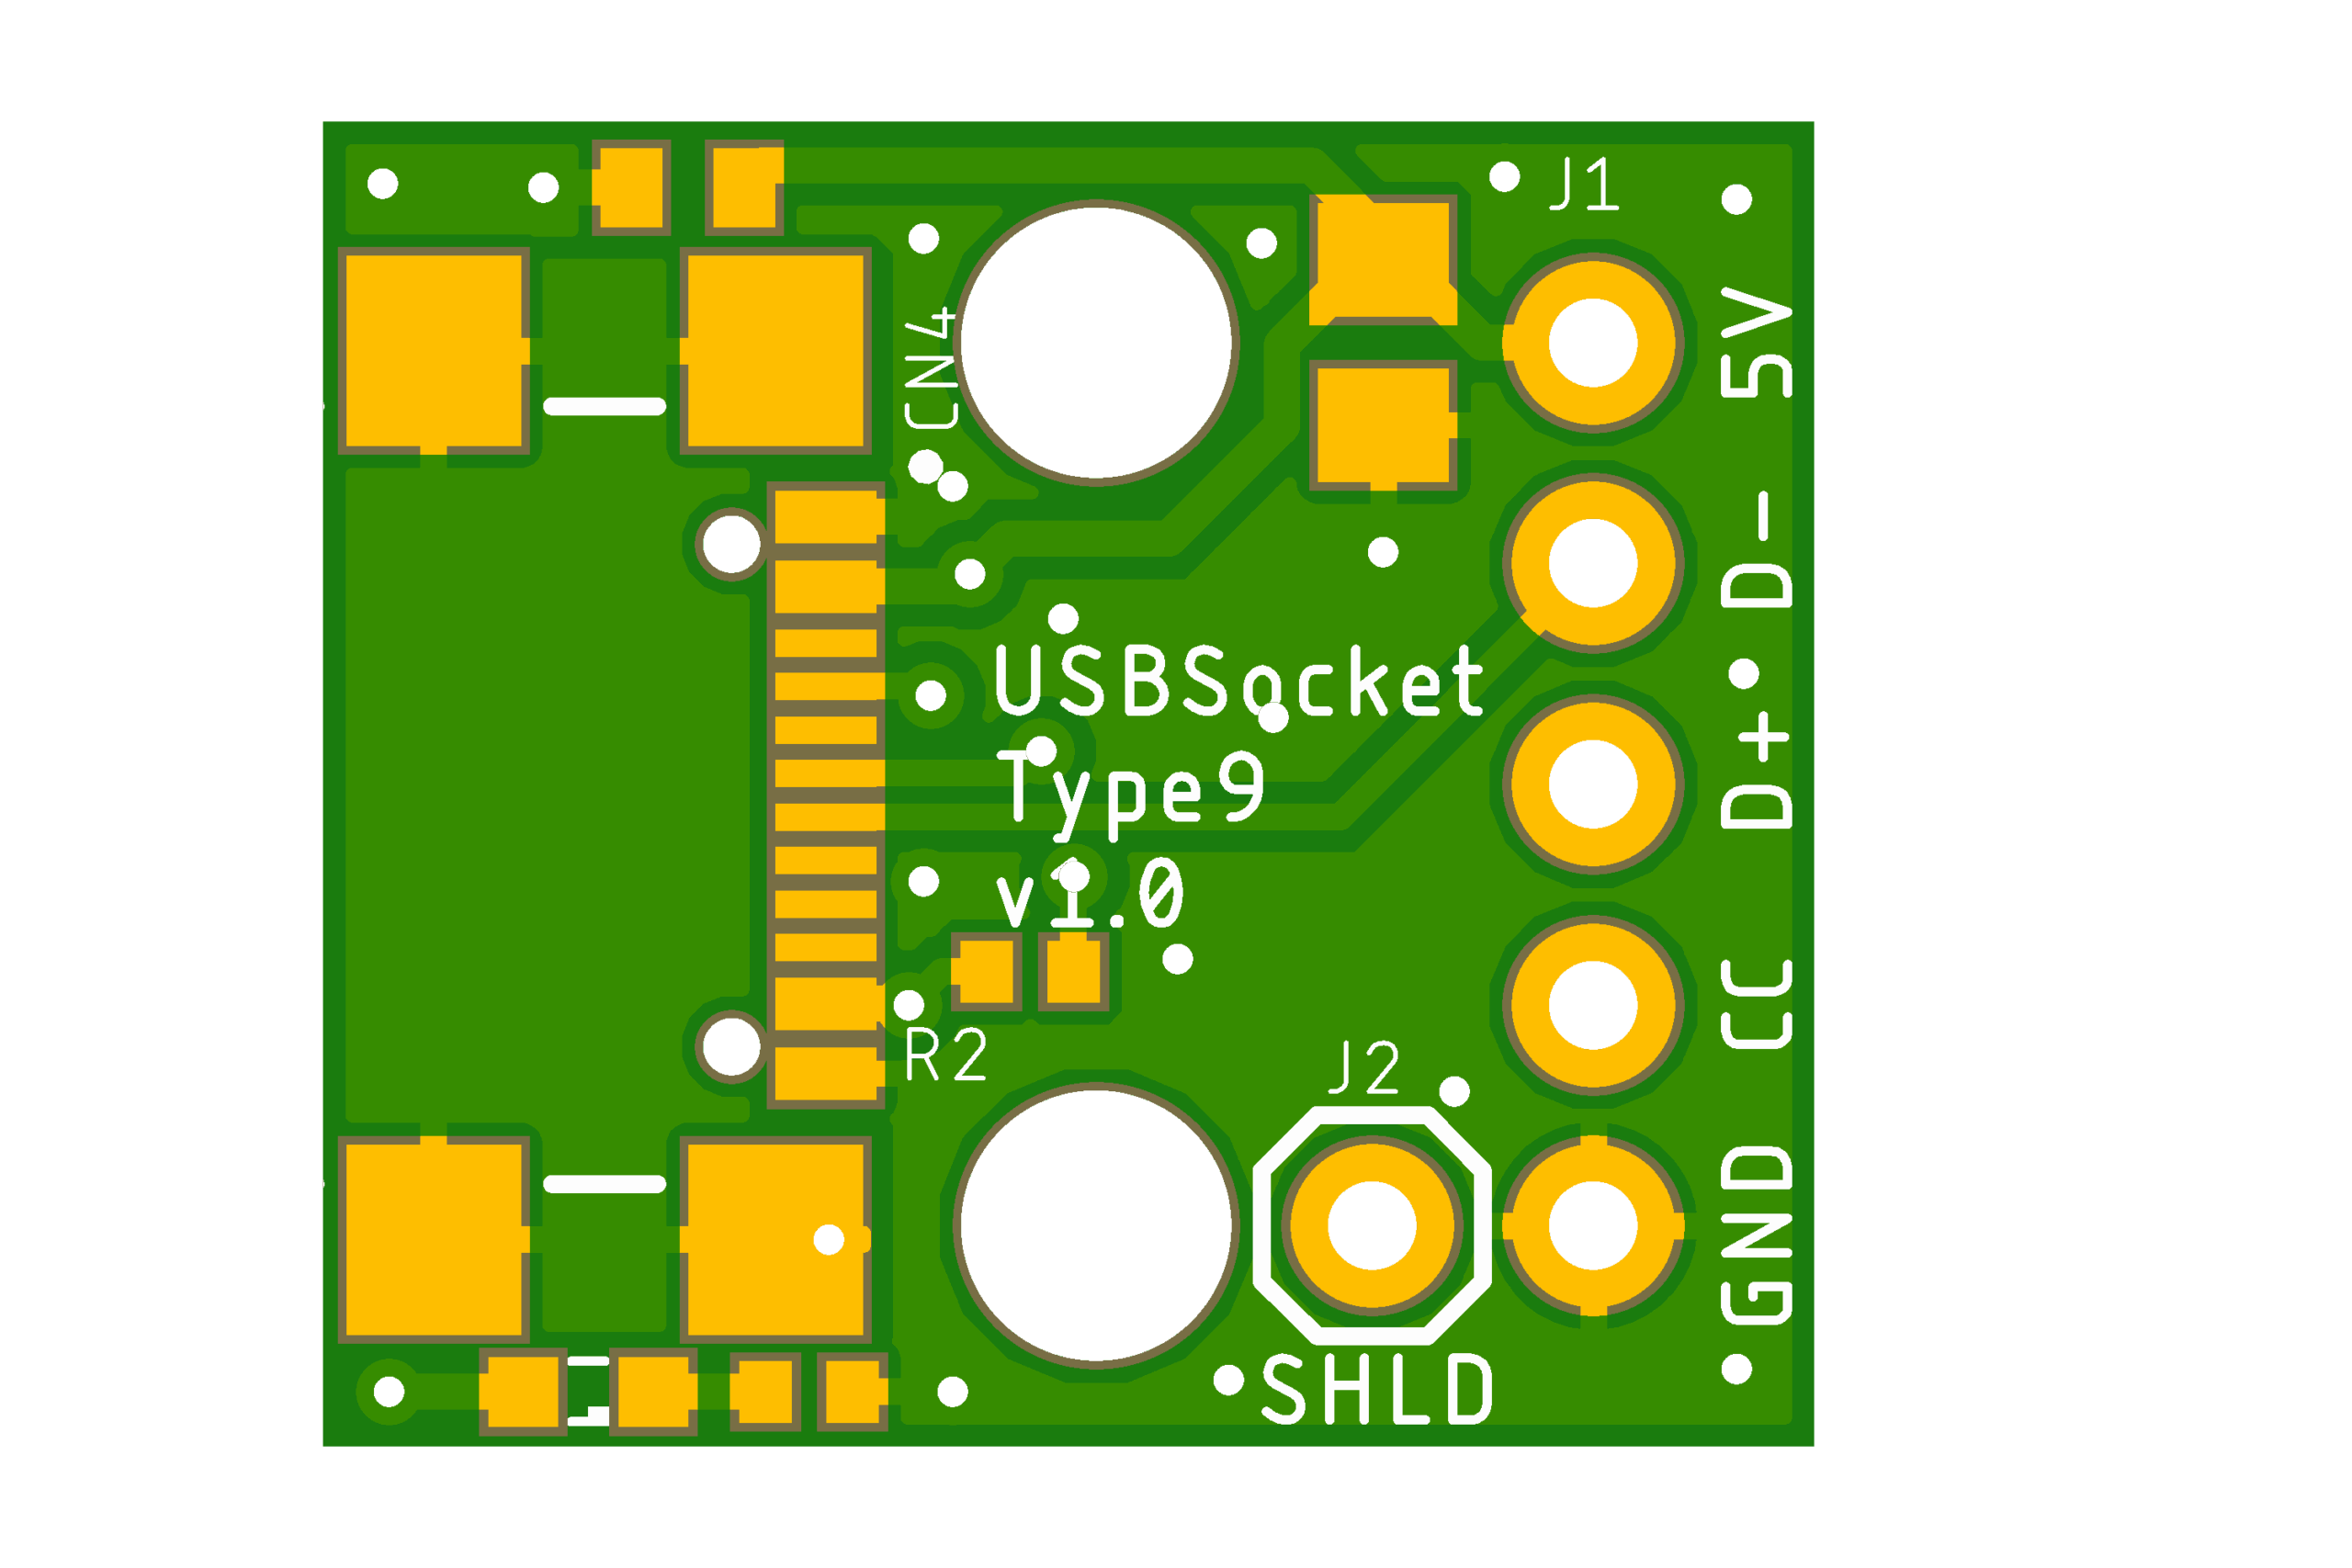
Type9 is breadboard friendly USB Type-C socket
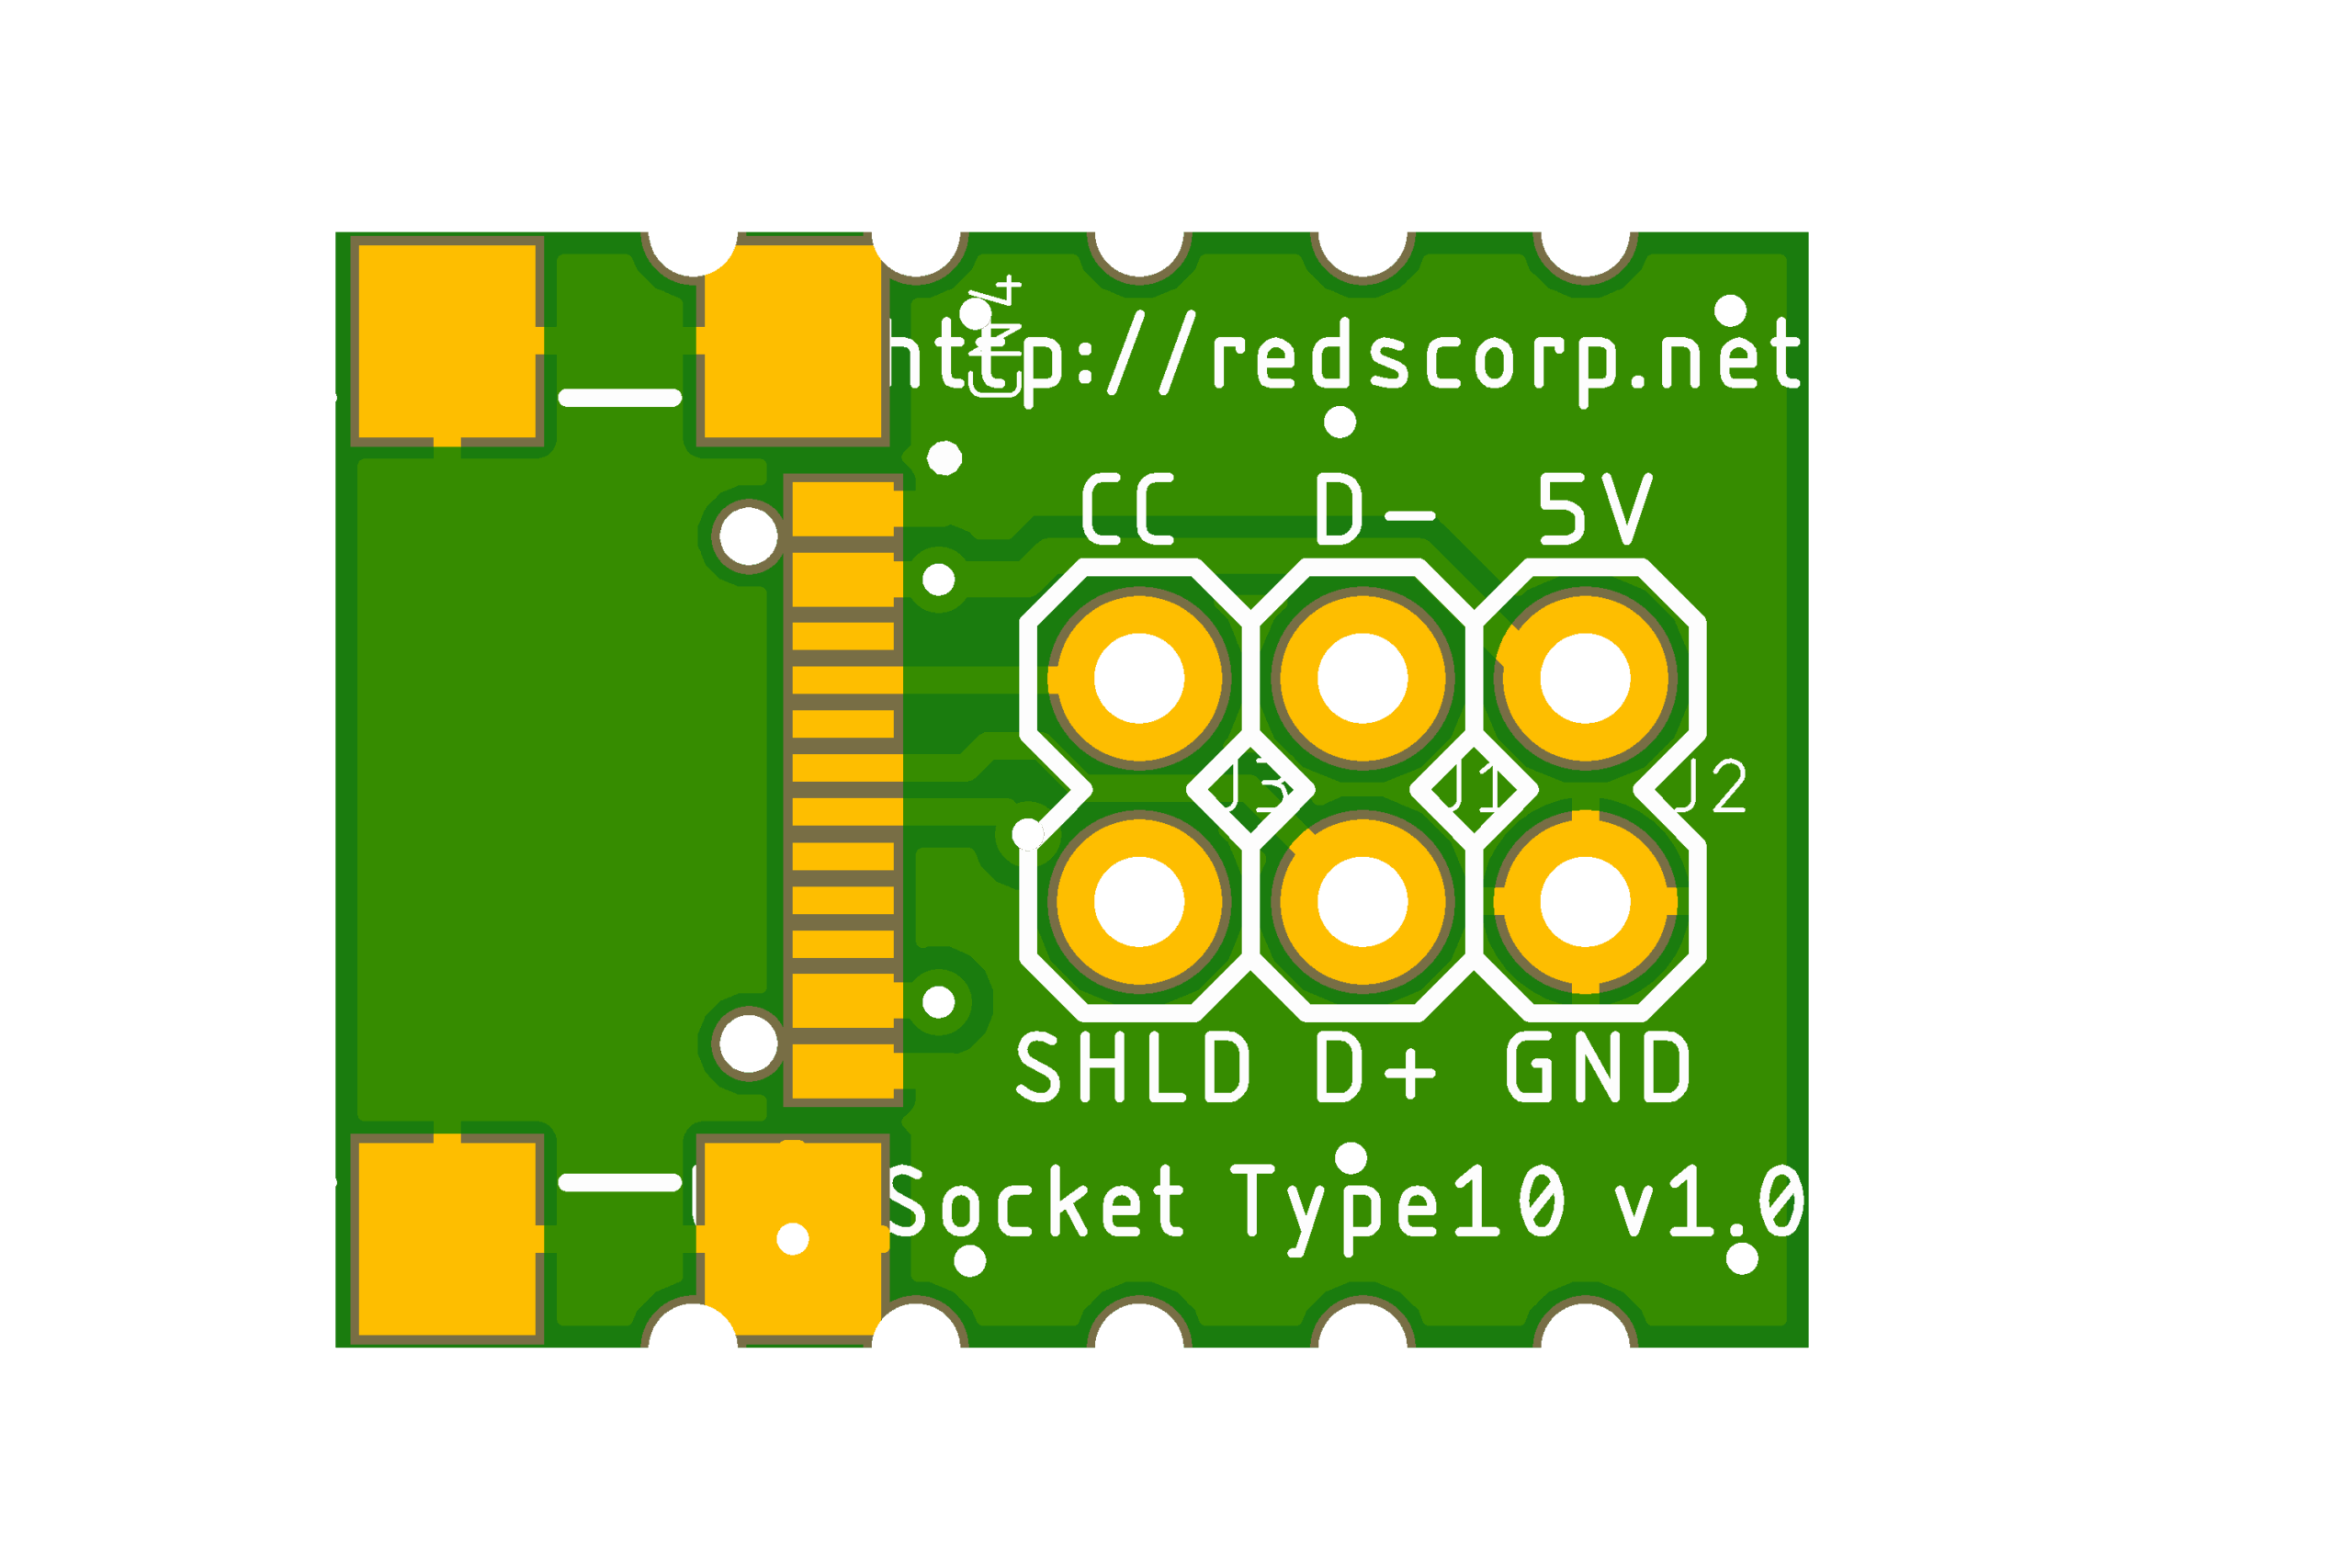
Type10 is cable mount friendly USB Type-C socket
USBSocket_Type1_v1.0
USBSocket_Type1_v1.0 is a simple microUSB adapter board, which mostly designed to be breadboard friendly.
USBSocket_Type7_v1.0 is a simple PCB-USB adapter board, which mostly designed to be breadboard friendly.
This PCB board should be about 1.6-2.0mm thick!
USBSocket_Type8_v1.0 is a simple PCB-USB adapter board mostly usable for smaller or cable applications.
This PCB board should be about 1.6-2.0mm thick!
Bill Of Materials is currently available only for LCSC Electronic Components Distributor, which is probably cheapest anyway.
LCSC BOM
Designator
Part/Value
Package/Footprint
LCSC #
CN1
MOLEX 473460001
SMD
C132560
CN2
MOLEX 675031230
SMD
C136452
CN3
MOLEX 670688000
TH
C114097
CN4
Hanbo Electronic MC-107S
SMD
C2874570
C1*
Cap. 47uF
0805
C109461
C2*
Cap. 100nF
0402
C60474
LED1*
LED Green
0603
C364559
R1*
Res. 1K
0402
C384390
R2*
Res. 56K
0402
C25796
*) These passive components are optional but it’s recommended to install them.
How to help
Your contributions as code, resources, or finances are welcome! Please contact me directly via email at andriy.golovnya@gmail.com or through my GitHub profile.
If you’d like to make a financial contribution, you can donate via PayPal or Ko-Fi. Your support is greatly appreciated.
Gateways provide valuable networking, computational, and storage support for the
Internet of Things. This gateway platform is an extensible architecture that
supports multiple communication protocols, backend storage options, system
monitoring tools, and user interaction options, while enabling rapid
prototyping of new gateway services. Two core ideas underly this gateway
architecture: 1) devices should be automtically supported when in range of the gateways, and
2) data streams provided by the gateway should be easily interpretable.
This gateway provides many common services for embedded devices and sensors,
an environment for running applications local to the gateway,
and standard MQTT topics for retreiving the data streams. To promote
scalability, each node points to a method for interpreting its own data
and appending metadata. This allows the gateway to automatically adapt
to new devices without being manually configured. After devices are
discovered and their data packets are interpretted, the gateway
creates a data stream which can be published to the cloud, displayed to users,
or fed to an application.
Information
Goals
This project has several goals:
Provide gateway layer functionality for a range of devices.
It should not be specific to just some projects.
Be as generic as possible. All device specific logic
should be developed elsewhere and pulled in only when
a relevant device is discovered.
Expose data streams in a low-friction manner.
This means making them available over common protocols
and in a self-describing data format.
Relay data streams to interested services. These could
be local to the gateway or cloud hosted endpoints.
Software Stack
The gateway stack is a series of discrete modules linked
by MQTT. Roughly, each folder in /software is a
separate module.
Parent Project
The gateway is being developed as a part of the Urban Heartbeat Kit Project.
More documentation on how to use a running gateway can be found there.
Super Quick Start
If you have a SwarmGateway, you can get data from it quickly. Install Mosquitto, then:
to get the full data stream. If you are not on the same network, pass -h
the correct IP address.
You can also see a load a status page in a web browser: swarmgateway.local.
Related Projects
This is a list of other projects in the gateway vein. Some
have concepts that directly influenced this gateway design,
some are hardware platforms that this gateway supports, and others
just play a role in the gateway tier.
IoT Gateway: Leverage
smartphones to forward BLE advertisements.
CloudComm: Eventual
data delivery to the cloud over BLE.
PowerBlade:
Collect BLE advertisements from PowerBlade devices.
GAP: Add 802.15.4 hardware support
to the BeagleBone Black.
Example project on how to leverage Kotlin for better JSON parsing using Moshi.
This repo is the side product of a talk presented at Berlin Kotlin Meetup and Berlin Android Meetup.
The plan is to add more examples and tips on parsing JSON with Moshi into Kotlin classes.
Structure
Currently this repo serves as an example project on how to enforce nullability,
make use of default constructor values and a few more features Kotlin provides and how to use them in your models.
For a better understanding of the code the slides and especially the blog post linked below should help.
Basic structure briefly explained:
main/MoshiBuilder – singleton that provides an instance of Moshi with all its parsing adapters
main/adapter/ – a package with helpful MoshiAdapters
main/model/ – example models to showcase what is possible
The project also contains tests to showcase the general functionality.
Playing around with the adapters while having a look on the tests
is probably the best way to get a feeling of what this repo is all about 😉
Copyright 2017 Stefan Medack

Licensed under the Apache License, Version 2.0 (the "License");
you may not use this file except in compliance with the License.
You may obtain a copy of the License at

   http://www.apache.org/licenses/LICENSE-2.0

Unless required by applicable law or agreed to in writing, software
distributed under the License is distributed on an "AS IS" BASIS,
WITHOUT WARRANTIES OR CONDITIONS OF ANY KIND, either express or implied.
See the License for the specific language governing permissions and
limitations under the License.
Like the project? Let @wise-team become your favourite witness!
If you use & appreciate our software — you can easily support us. Just vote for “wise-team” to become you one of your witnesses. You can do it here: https://steemit.com/~witnesses.
Probabilistic Matrix Factorization for Recommendation by R
我使用R语言实现了矩阵分解(mf.R)、概率矩阵分解算法(pmf.R)。
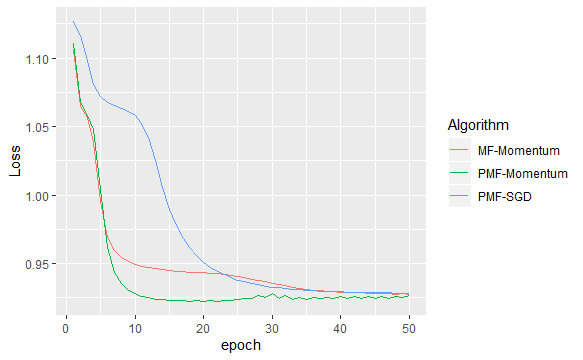
优化部分采用了随机梯度下降算法(pmf-sgd.R)以及动量优化算法(mf.R,pmf.R)。
本代码的核心部分改编自Ruslan Salakhutdinov提供的matlab代码(http://www.utstat.toronto.edu/~rsalakhu/BPMF.html)。
除了输出训练集测试集误差,我还选取了部分预测评分与真实评分进行比较,显示了非常好的预测性能(pre.Rmd)!
除了预测评分,我还考虑了TOP-N推荐,最后可以为每位用户i推荐他最可能感兴趣的j部电影(pre.Rmd)。
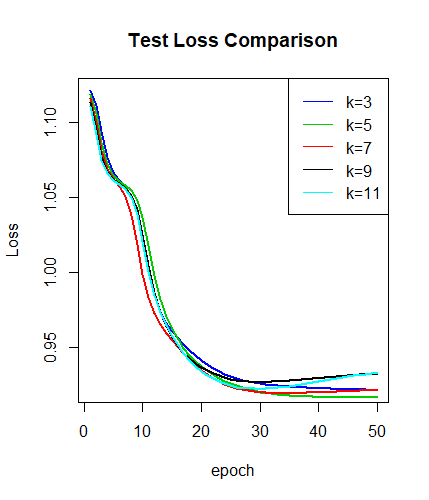
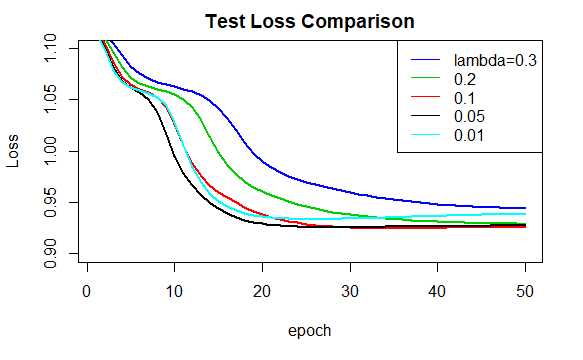
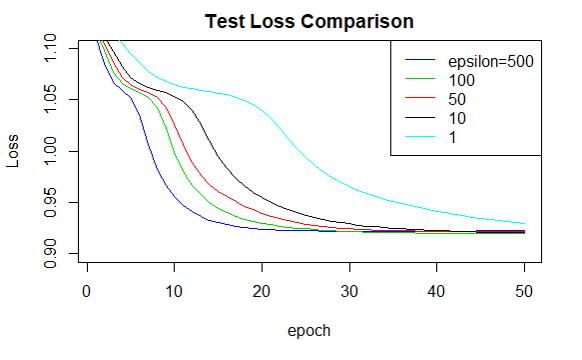
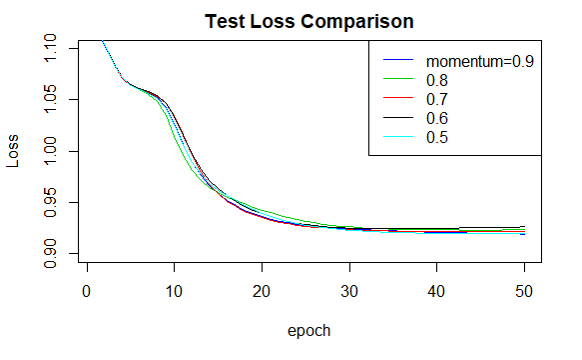
最后,我封装了PMF函数(fun_pmf.R),通过多次调用该函数,我对比了概率矩阵分解算法的超参数对算法效果的影响(comparison.Rmd),包括用户、物品隐特征矩阵维度k,学习率epsilon,正则化参数lambda,动量优化参数momentum。
我使用的是MovieLen100k数据集(https://grouplens.org/datasets/movielens/) 包括1682名用户对943部电影的评分信息,共有100,000条评分数据。
大部分注释是作者在学习Ruslan Salakhutdinov的代码时加上的,且为中文注释,英文阅读者可以参考Ruslan Salakhutdinov提供的matlab代码。
为了方便展示,除了提供.R文件,我还提供了.Rmd文件。
I use R to achieve matrix factorization(mf.R) and probability matrix factorization(pmf.R) algorithm.
In the optimization part, stochastic gradient descent(pmf-sgd.R) algorithm and momentum optimization(mf.R,pmf.R) algorithm are used.
The core part of this code is adapted from matlab code provided by Ruslan salakhutdinov (http://www.utstat.toronto.edu/~rsalakhu/BPMF.html).
In addition to the output training set test set error, I also selected some prediction scores to compare with the real scores, showing a very good prediction performance(pre.Rmd)!
In addition to the prediction score, I also consider the top-N recommendation. Finally, I can recommend the most likely j movies for each user i(pre.Rmd).
Finally, I encapsulate the PMF function(fun_pmf.R). By calling this function many times, we compare the influence of the super parameters of the probability matrix factorization algorithm on the algorithm effect(comparison.Rmd), including the dimension k of the hidden feature matrix of users and items, the learning rate epsilon, the regularization parameter lambda, and the momentum optimization parameter momentum.
I use the movielen100k data set(https://grouplens.org/datasets/movielens/), including the rating information of 1682 users for 943 movies, with a total of 100,000 rating data.
Most of the comments are added by the author when learning the code of Ruslan salakhutdinov, and are in Chinese. For English readers, please refer to the matlab code provided by Ruslan salakhutdinov.
For the convenience of presentation, in addition to the .R file, I also provide the .Rmd file.
Reference:
[1] Yehuda Koren, Robert Bell, and Chris Volinsky. 2009. Matrix factorization techniques for recommender systems.Computer 42, 8 (2009), 30–37.
[2] R. Salakhutdinov and A. Mnih. Probabilistic matrixfactorization. In Advances in Neural Information Processing Systems (NIPS), volume 20, 2007.
[3] Ruder S. An overview of gradient descent optimization algorithms[J]. arXiv preprint arXiv:1609.04747, 2016.
[4] R. Salakhutdinov and A. Mnih. Bayesian probabilistic matrix factorization using markov chain monte carlo.In Proceedings of the Twenty-Fifth International Conference on Machine Learning (ICML 2008), Helsinki,Finland, 2008.